Teaching Microsurgery.
The Latvian method.
Olafs Libermanis, Mārtiņš Malzubris.
Foreword. Microsurgery is recognized as an elite specialty. However, participating in build up from zero several microsurgical teams and treatment programs, the Authors observes some essential points in training of a micro surgeon:
- Actually, each persona with average dexterity and intellect is able to became a successful microsurgeon;
- The most important character sign is tendence to self – improving, self-criticism and ability to tolerate failures;
- Only few instruments are mandatory for both training and everyday practice, human food components from any supermarket are enough good to achieve also advanced skills. Living animals are necessary only in the last step of training.
- Almost conditions could be solved with minimal set of flaps. Patients with “very special” diseases could be referred to highly specialized centers.
- The success of the treatment depends not so much on the level of education and theoretical knowledge, but good, stable performing of surgery. During the training, the young micro surgeon must acquire the ability to effectively solve most common clinical tasks, instead to invest time in understanding very specialized and rare conditions.
The purpose of this program is to systematize the empiric experience, gained in Riga. The described principles were helpful in building up from zero microsurgical centers in Soviet and the Post-Soviet countries.
The Latvian approach.
History. The founder of the Riga School neuro surgeon professor Jānis Kupčs, introduced in seventies of the 20-century the extra intra cranial bypass surgery. In performing of a bypass, the construction of the anastomosis is the most important step. The quality of the anastomosis is directly linked to clinical result. The potency of the anastomosis, confirmed by an x ray examination, is also absolute and spectacular indicator of the surgeon’s performance. Jānis Kupčs, Igors Aksiks, Kārlis Bicāns and other, involved in the EIKA project turned extremal attention to constructing an anastomosis. Soviet government provided resources for the training – a Vivarium, a three-store building with free, unlimited and permanent access (24/7/365) to laboratory animals and microscopes. The lack of specialized instruments and sutures was solved by federal procurement, of local craftsman’s and contraband from aboard. Some instruments and devices were manufactured by young surgeons. Since middle of eighties, Soviet industry started to produce quite good quality microsurgical instruments, some factories later became of suppliers for well-known Western brands.
The most essential principles, established by Jānis Kupčs and coworkers are:
- Gentle, atraumatic handling of the vessel;
- Extreme attention to quality of the intima; removing of adventitia, avoiding the prolapse of adventitia in the lumen;
- Careful adaptation of the vessel ends, avoiding of the tension, gentle handling during creating of anastomosis, adequate geometry avoiding of stenosis, avoiding and management of the bleeding between sutures.
As the basic principles in education of young surgeons (Jānis Kupčs, Guntis Bite, Olafs Libermanis) were:
- Fast, intense training on large volume of objects and also patients;
- Fast involving of the student in clinical work, permitting to perform independently; student was allowed to introduce also new procedures and to develop of original methods,
- Rapid and adequate reaction to problems, performing the salvage procedures.
In the 1983, Jānis Kupčs started to teach the third-year student Jānis Zaržeckis, who attracted his fellows Jānis Ģīlis and Olafs Libermanis. In the 1. January 1985, executing the demand of the Soviet Health minister, Latvia launched a Microsurgical department in the multi profile city hospital. Since the certified surgeons, recruited to the Department as leaders and core members of the team, does not have microsurgical skills, the last course students became almost only “anastomose – masters” in the newly started unit. During the next years the clinic survived the collapse of the Soviet Union and subsequent economic catastrophe. After some stabilization, the principles, established by Jānis Kupčs, resulted in development a state-of-the-art department for acute trauma, team for maxillofacial reconstruction, a specialized clinic, dealing with heavy pressure sores and problem wounds, a department to treat bone infection problems and a pediatric hand reconstruction unit.
The method.
Almost of clinics are faced to big flow of routine conditions and lack of skilled surgeons. Medical students are almost exhausted by the tedious “over- detailed” nomenclature and few practical activities. The education process in Europe is long; graduates are prone to search for prestige subspeciality (e.g., breast reconstruction, elective hand surgery) and keep away from “dirty” trauma.
Our methods include few sets of basic knowledges, necessary to complete the standardized clinical tasks, bounded to function, biomechanics and practical characteristics of tissue. We adapt to medicine the methodology, used in repair of cars and other mechanical devices. In the surgical step of the treatment, the patient is considered rather as “object”, surgical procedure as “repair”, tissue as “material”, flaps and grafts as “spare parts”. We consider our method to be effective in fast training of specialists, who will be capable to provide rapid, good quality service for big number of patients with more or less standardized, mostly traumatic conditions.
The main idea is to adopt the educational methods from the Martial art, military training system and repair of technical devices to the reconstructive surgery.
Our principles are:
- Action is topographically, physiologically and functionally based,
- Rationally and expense saving approach, responsibility for equipment and materials, ability to independently perform basic repairs;
- Focusing on small range of skills, permanent repetition of the basic exercises, to gain manual dexterity, maintain the technique and develop new skills;
- Clean, atraumatic technique, sparing of anatomical structures, combined with wide, aggressive approach.
- Involving of essential clinical steps and maneuvers also in early stages of education, for example, “clinically – like” metacarpal head removal in preparing of the chicken foot specimen.
- Training to act in hard, uncommon conditions and developing of the intuition.
- High ethical standards, study of the current developments, homework with literature
The goal.
After one year of education, performed on the basis of a busy, multidisciplinary hospital, a physically fit, motivated trainee must be able to independently perform finger replantation and transfer of some basic microvascular flaps.
Practical anatomy. Instead of the systemically anatomy with boring and extensive references to nomenclature, we went to practical anatomy. Practical anatomy means the approach – “you must perform that procedure, here are landmarks, here is the point you must find he vessel, perform incision over that tendon”.
Preparing. When starting a new exercise, the student became time for reviewing instructions and literature. The time for preparing is limited. After 5-7 minutes the preparing is interrupted with the order – “you have a patient, finish to read and start to wok”. Maintaining limited time for preparing keeps the trainee in stress, avoid the excess detailing and stimulates intuition and ability to improvisation.
Performing of procedure. The principles described above are applied to all stages and elements of a surgical procedure: approach, tissue handling, performing of the clinical task and closure.
Approach making.
Principles: Plan incision. Limit the incision to the area you really need to perform the clinical task. Avoid to excessive approach. Control adjacent tissue, make and maintain clear the operating field. Find the right tissue plane. Isolate the structures you need from the structures you do not need. Keep secured the big vessel adjacent to the operating area, to be able to react in case of accidental damage. Create good visibility and circumstances for precise work.
Performing. During the all procedure, the trainee must adhere to atraumatic technique. Surgical technique should be focused, fast and economic. Standardized movements are clean and effective and pointed on the target. Video recording helps to detect the parasitic motions, as tossing, plucking, scraping, and chaotic grabbing.
Tissue handling. It’s very important to consolidate speed, wide but sparing approach, effective structure handling and clean, atraumatic technique. The moisture of the operating field should be maintained. Grasping of the tissue with the instruments should be minimalized, almost used in the places, considered later to be debrided. It’s necessary to acquire various functions for single one instrument, as example, the Adson – Brown forceps could be used not only as grasping tool but also replace the skin hook, for separating the tissue, preserving of structures and for opening and handling of the Acland clamps.
Closure. Closure of the wound is performed, following common plastic surgery rules. Since a reconstructive surgeon is often dealing with tissues with compromised blood supply, tension should be avoided. The students are trained to rapidly take a skin graft.
Modeling of clinical scenarios.
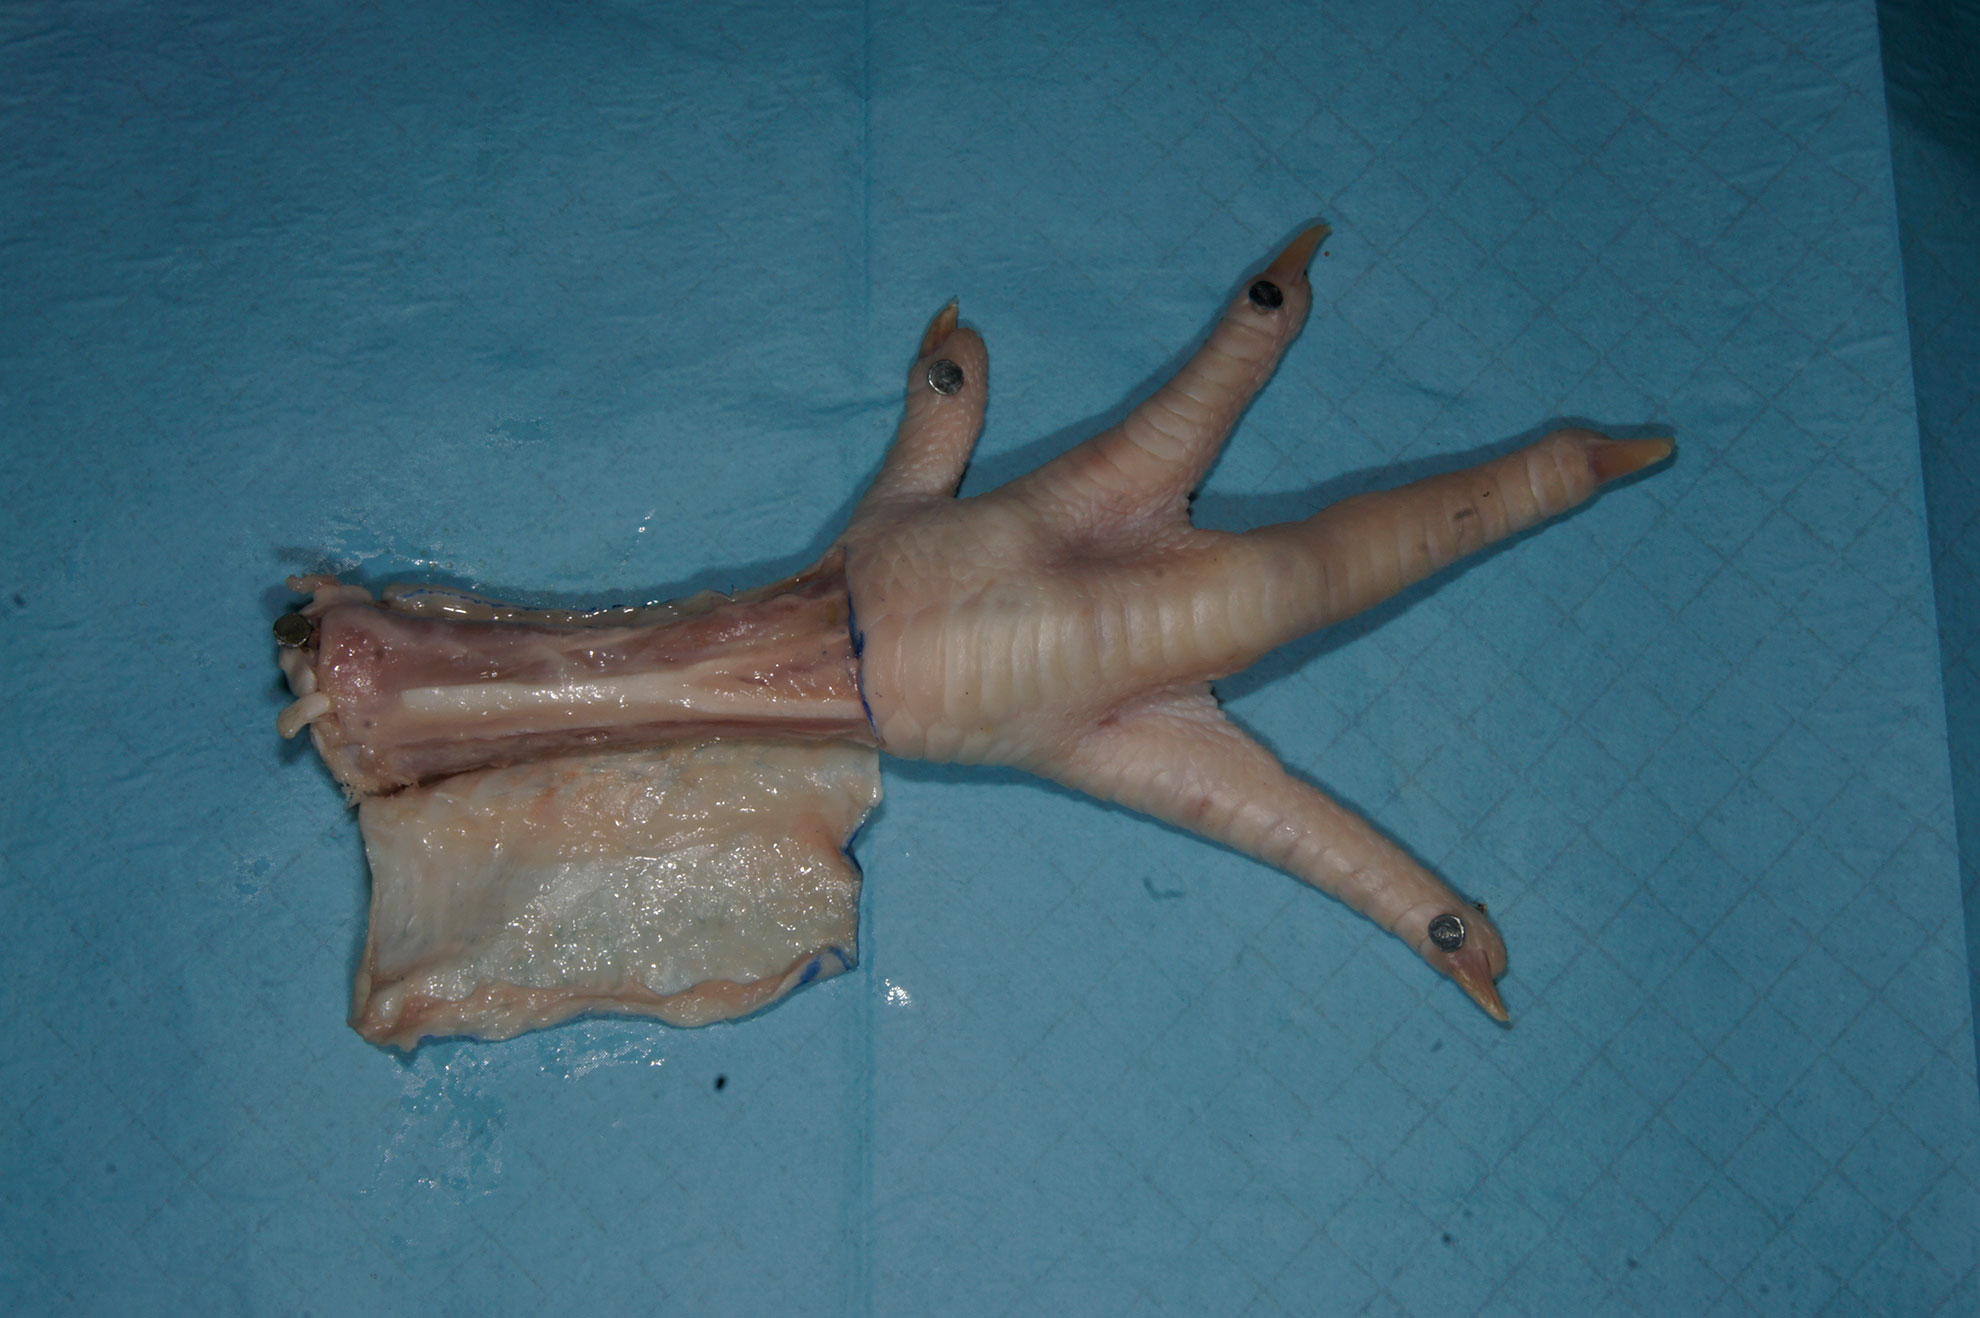
Until about 2005, access to cadaver material in Latvia was simple, and in the initial period of the development of the microsurgery, the human bodies were used to obtain and develop surgical techniques. In the search for a replacement for the live models used in microsurgery training, attention was paid to the lower extremities of poultry. Commercially available chicken and turkey feet not only provide good vessel source for microsurgical training, but also allow for simpler and more sophisticated surgical techniques and even clinical scenarios such as surgical approach, tendon and bone management, osteosynthesis, bone plastics and even microvascular bone transplantation.
The models:
Non – living chicken.
General considerations.
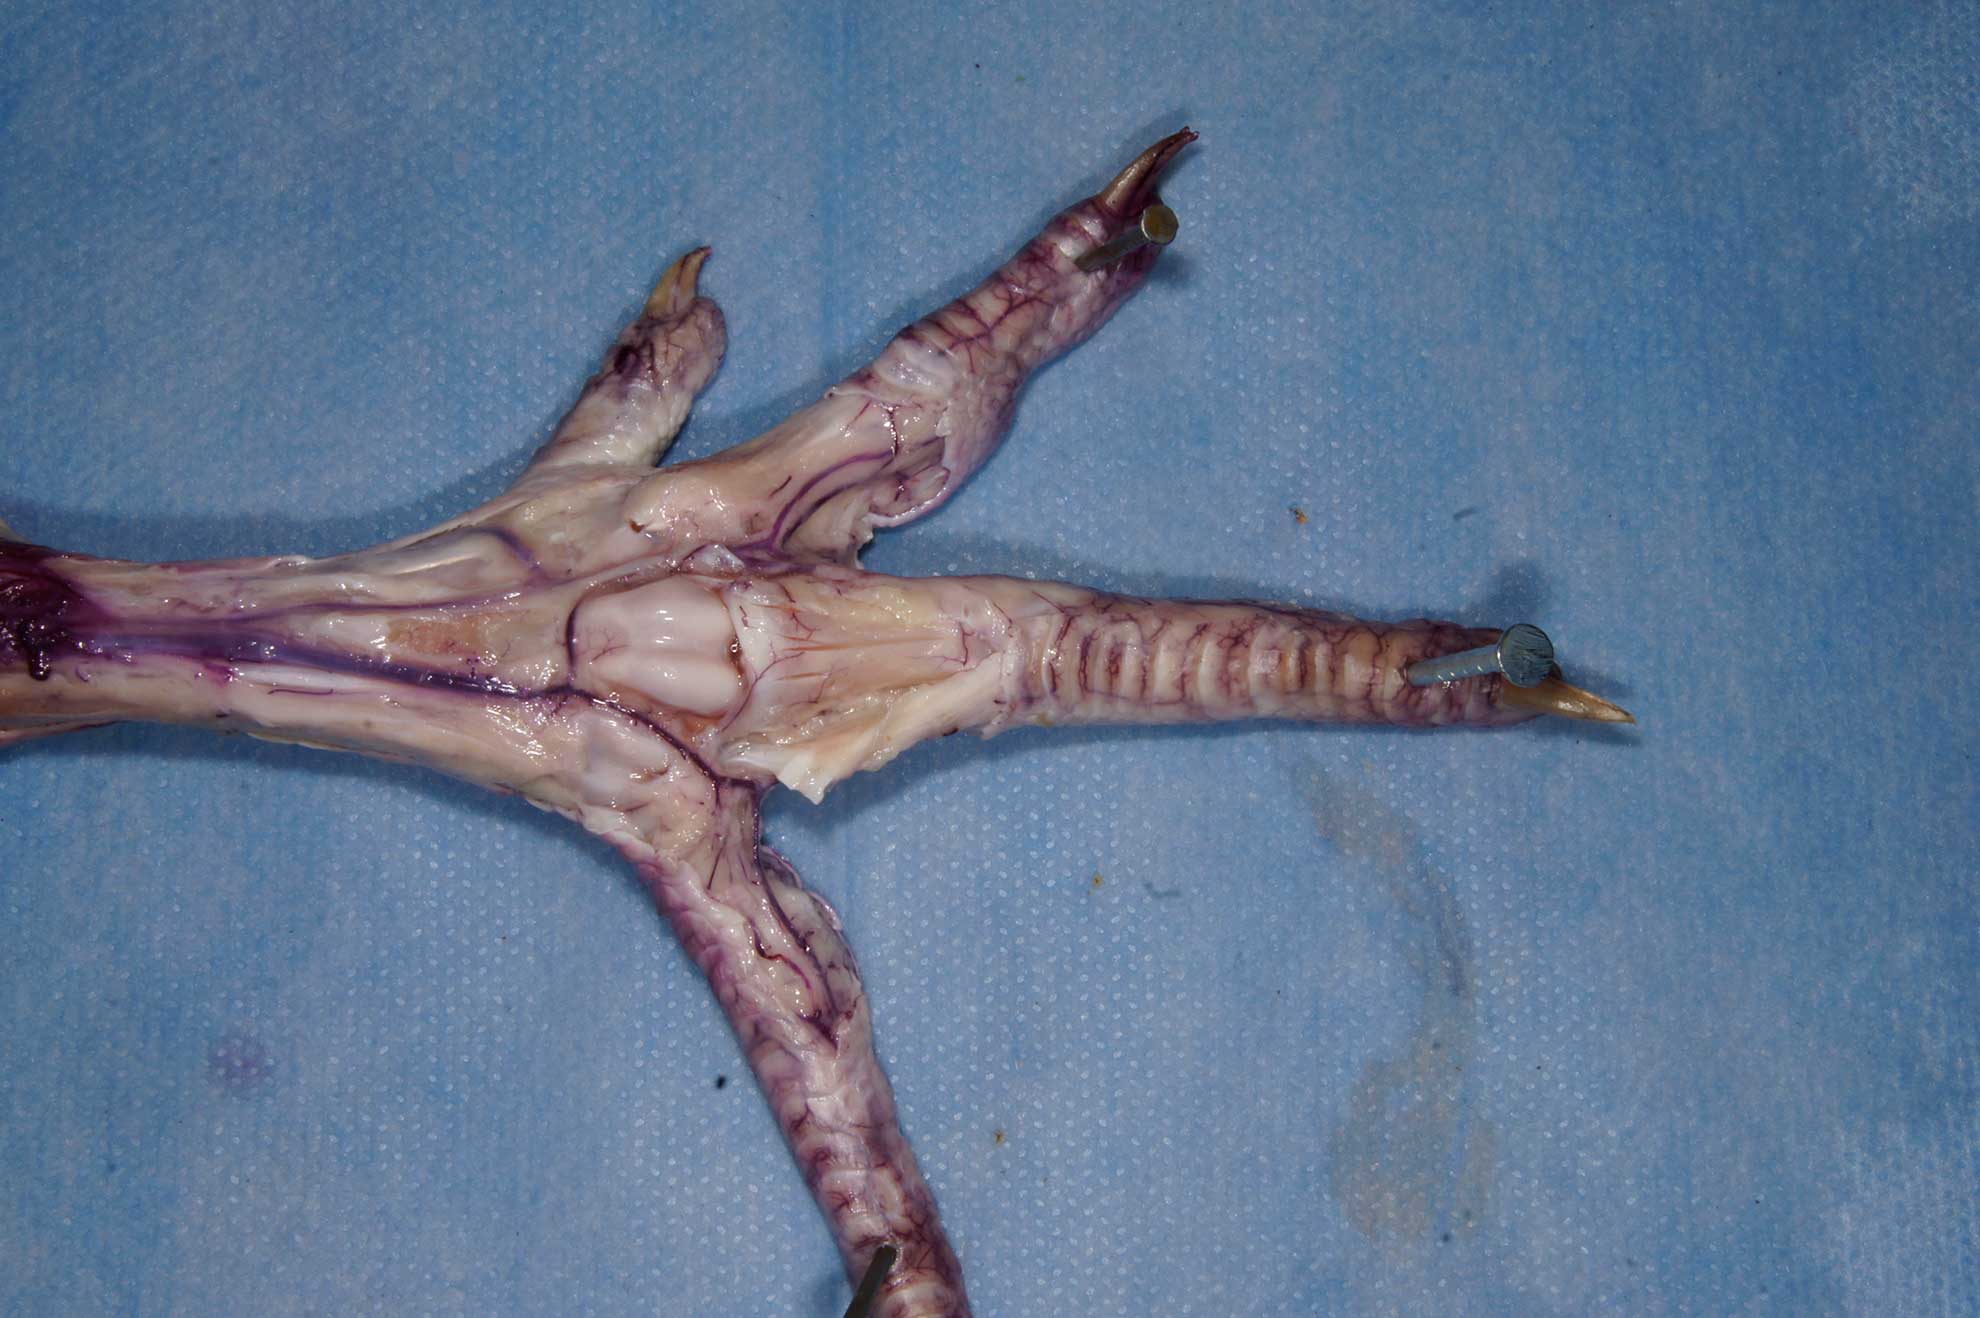
That model is cheap and reduces the use of living animals. Unquestionably, a successful microsurgeon must gain practice in handling of a functional blood vessel and must be able to evaluate the patency of anastomosis, but the use of rats could be significantly reduced. In the earlier exercises, focused only on the arterial end – to – end anastomosis and respecting the Human food, chicken foots were choose, because considered to be the almost worthless component in the Latvian kitchen. Later, widening the range of tasks, we discovered the potential of the chicken foot as a educational platform also for some clinical – like maneuvers. If the foot is used for everyday exercises to maintain the skill in the rapid performing of the anastomosis, it could be refrigerated and thawed many times and could last for some weeks, if stored in fridge. The common dorsal metatarsal artery on the dorsal site of the foot, is about 1,0 – 1,2 mm in diameter. A big subcutaneous vein on the medial aspect is about 1,5 mm in diameter and has smaller distal branches.Digital subcutaneous veins are in about 1 mm in diameter, but he digital arteries are about half of millimeter. As recognized earlier, the chicken foot is anatomically and functionally close to the human hand. Therefore, that model might serve as surrogate of the human hands in practicing a set of basic reconstructive procedures.
Illustrative materials: ChickenLeg-IllustrativeMaterials
Chicken foot
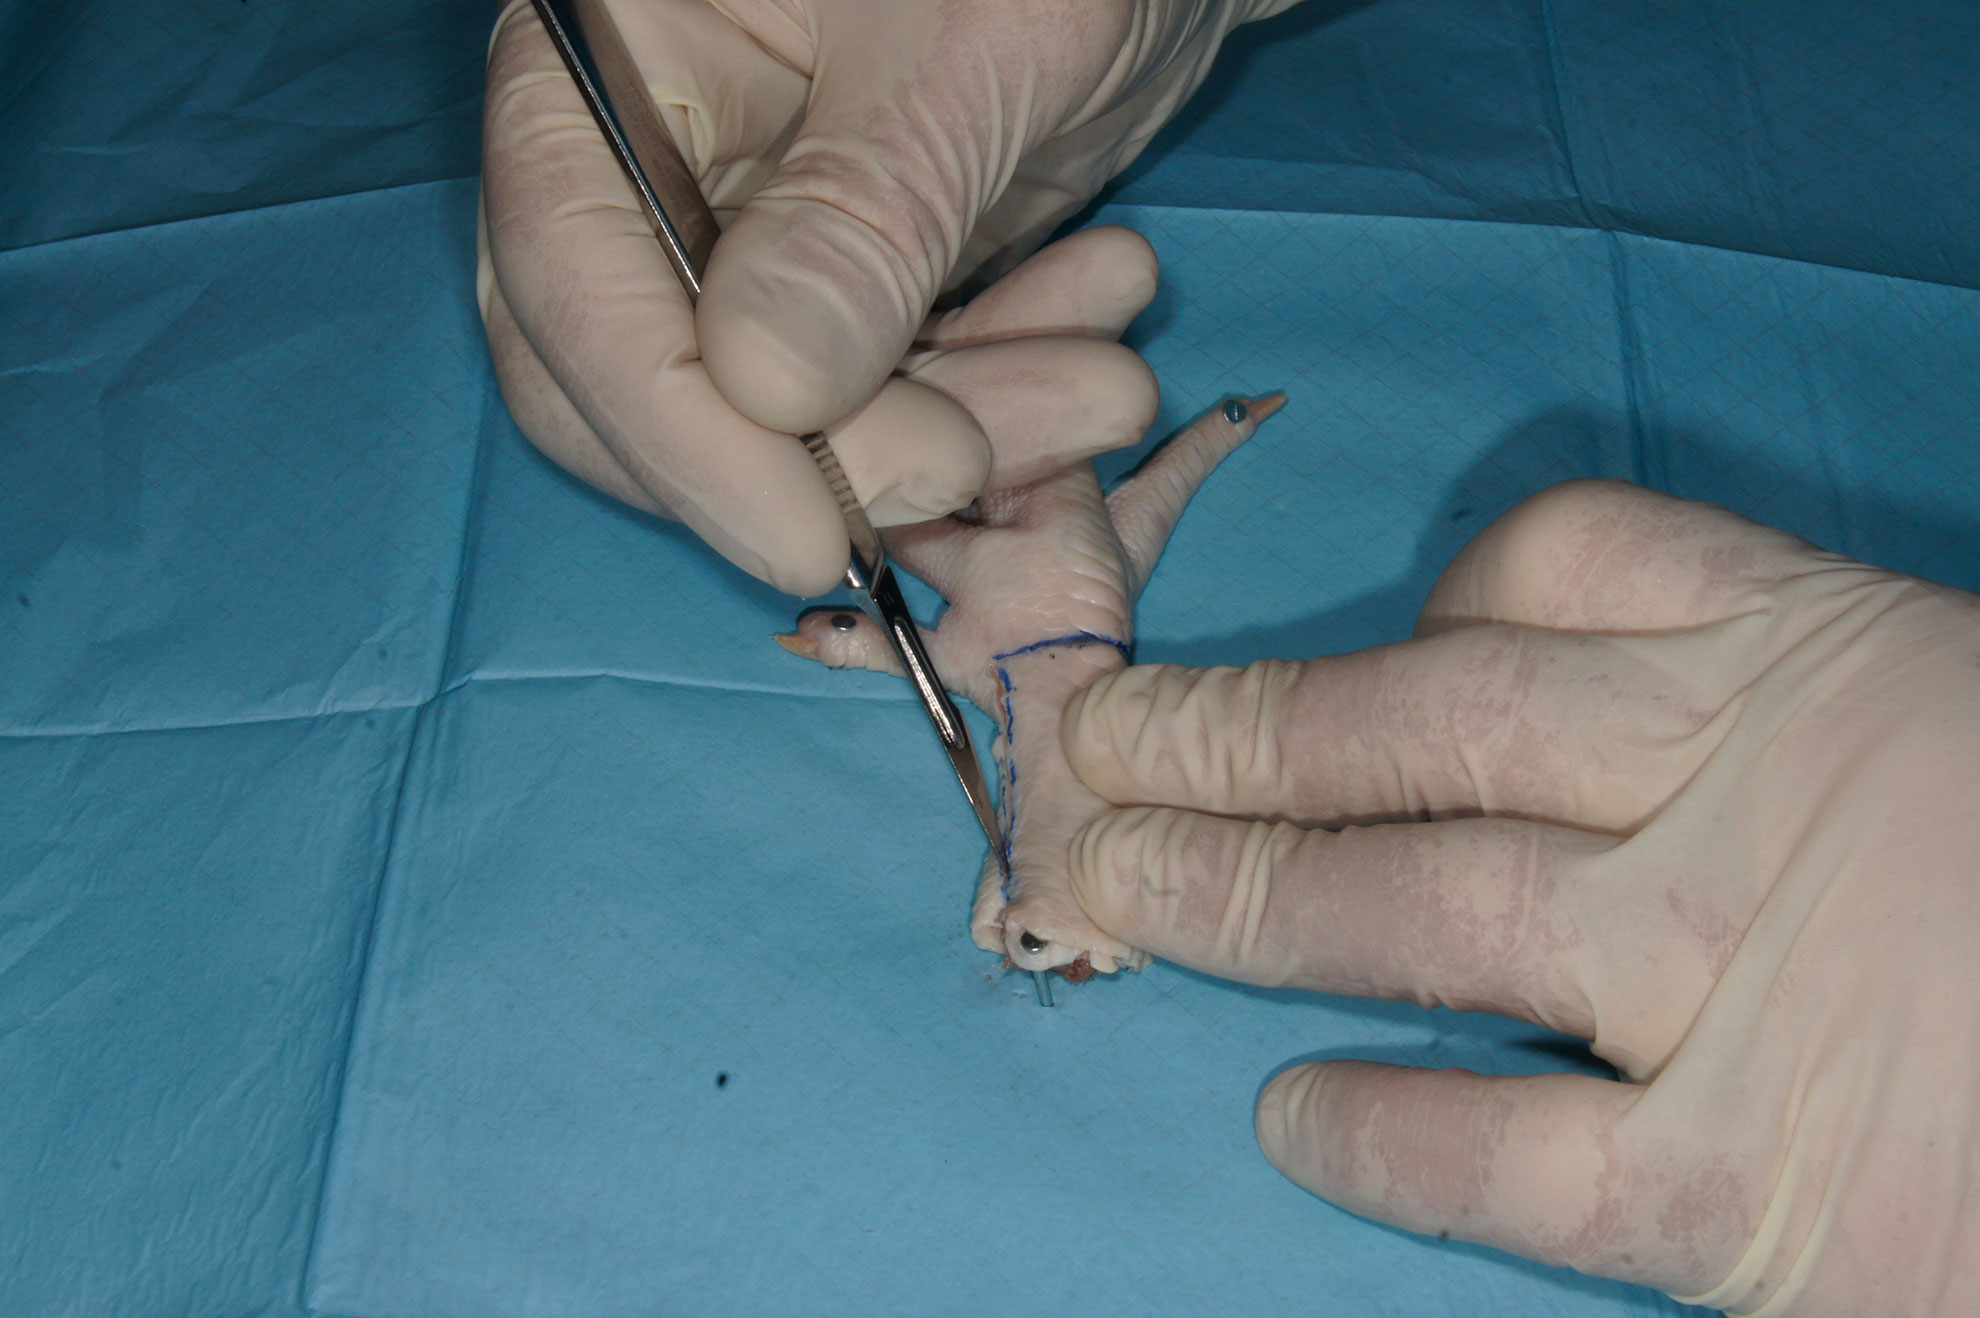
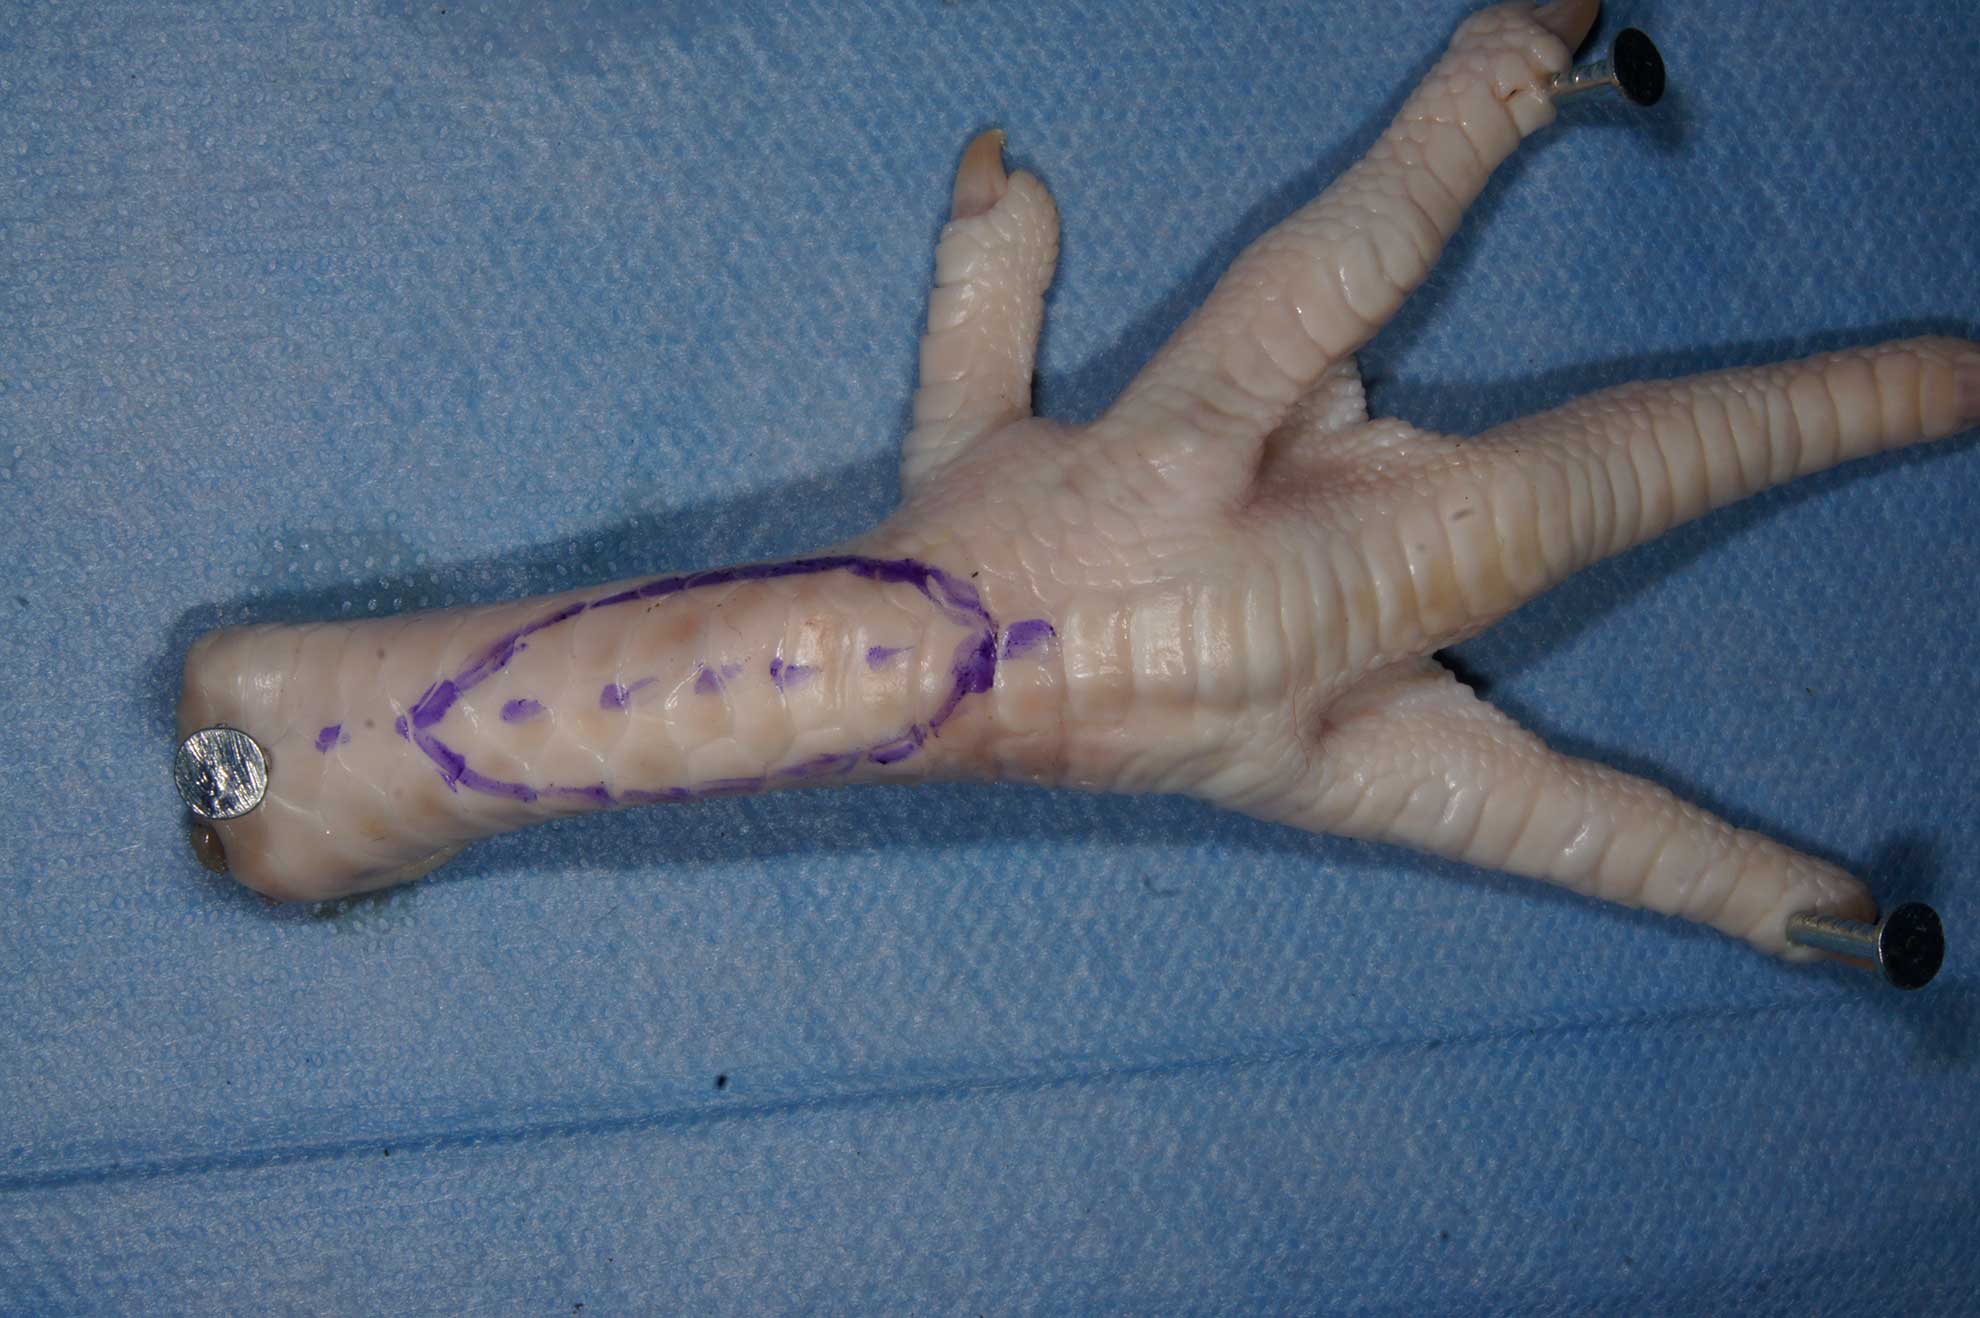
I. Topographical approach to the training area. Model: chicken foot.
Training:
Illustrative materials: ChickenLeg-ApproachPict
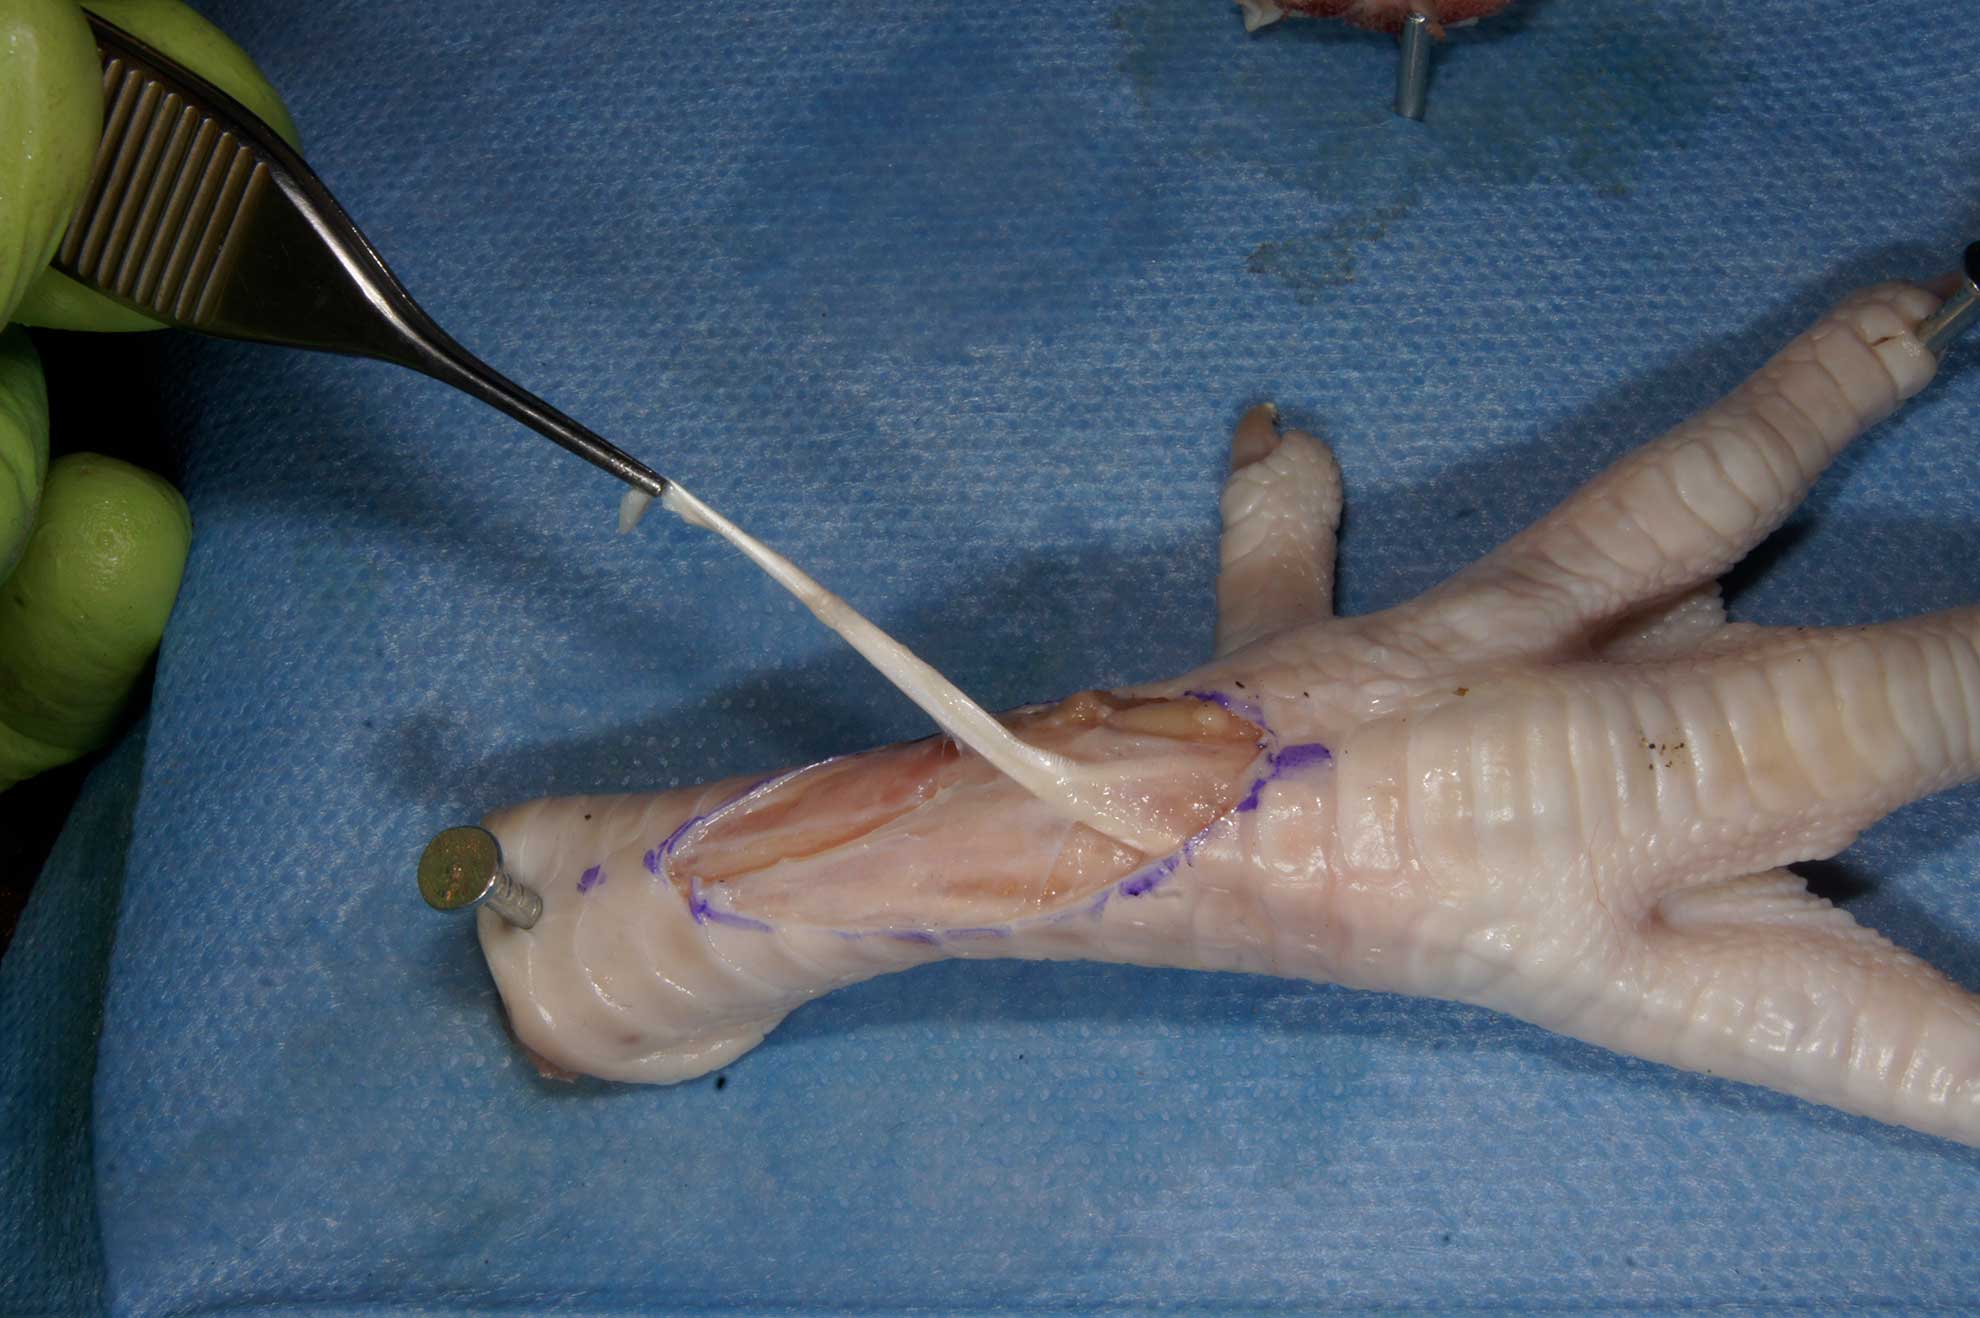
- Fixate specimen on the board with small nails, fixing base of the foot and at least two toes. Position the specimen with plantar surface down to the board and dorsal surface upwards
- Use good quality instruments, similar lines as the used in operating room
- For preparation, use the Nr.11 scalpel blade. Secure handling of sharp, aggressive No 11. Blade is important for further exercises.
- Do degloving lateral, dorsal and medial aspect of foot at the plane just below skin, starting from lateral side
- Main subcutaneous vein is localized on medial side of the foot, very superficially with intimate fixation to skin
- Keep skin and open surfaces moist during the preparation
- Use proper plastic surgical technique – skin hooks instead forceps, gentle tissue handling, similar to the technique used in surgical theatre
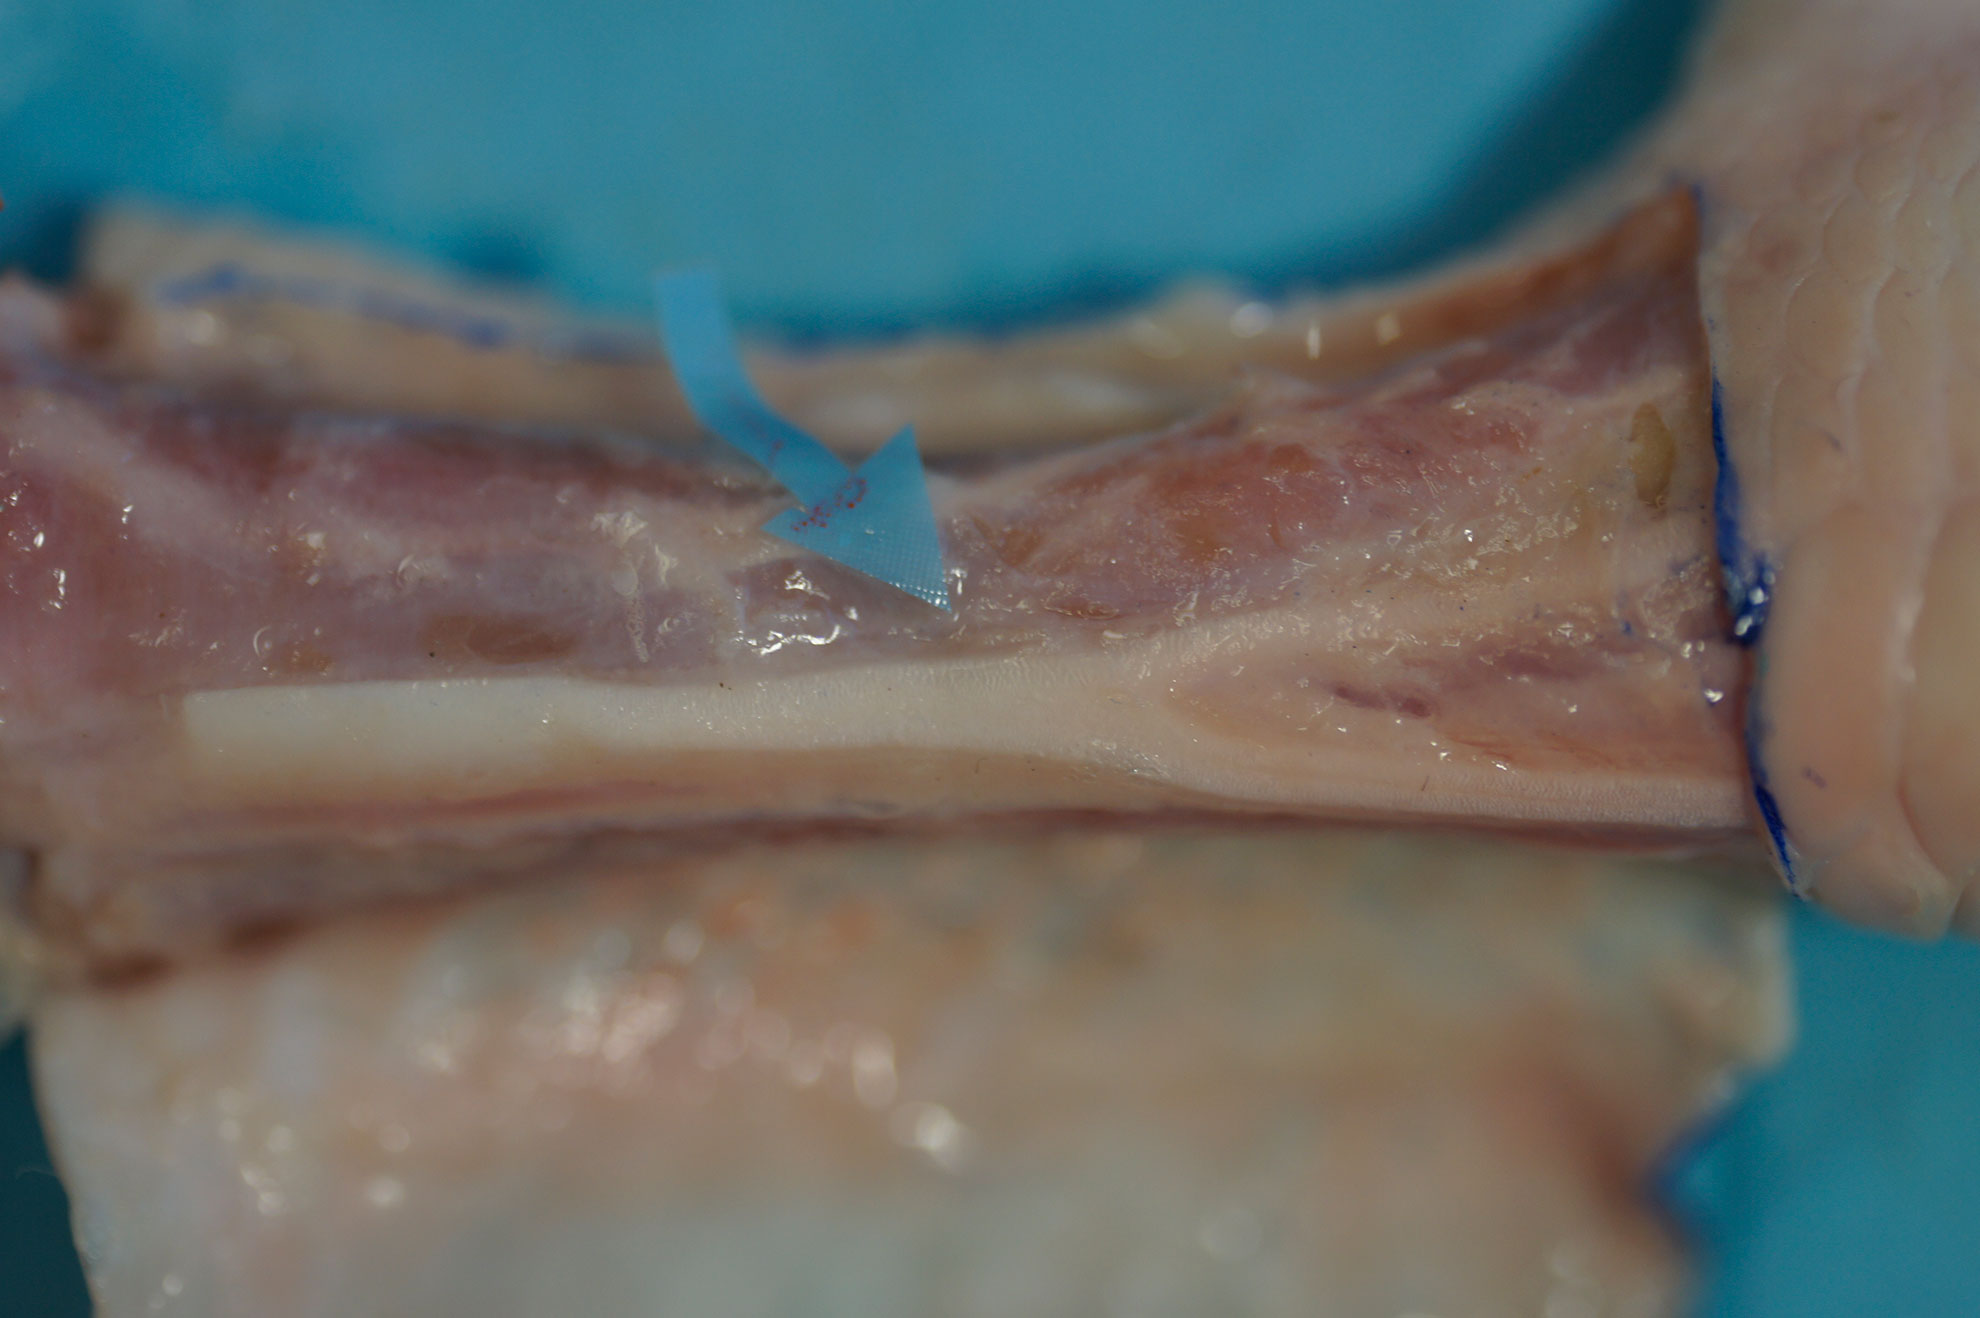
- The common dorsal metatarsal neurovascular bundle is located medial to common extensor tendon, beneath the tendon plane.
- Slightly mobilize the thin extensor of the hallux tendon and elevate the more solid elliptical common extensor tendon. Use of optical aids – loops or microscope would be helpful for secure preparation.
- Separate the artery from the nerve and accompanying veins. Preserve the thin, delicate veins during the preparation. For separation of the artery, use micro scissors or No 11. Scalpel blade. The scalpel blade, when adequately handled, makes the preparation faster and spares time.
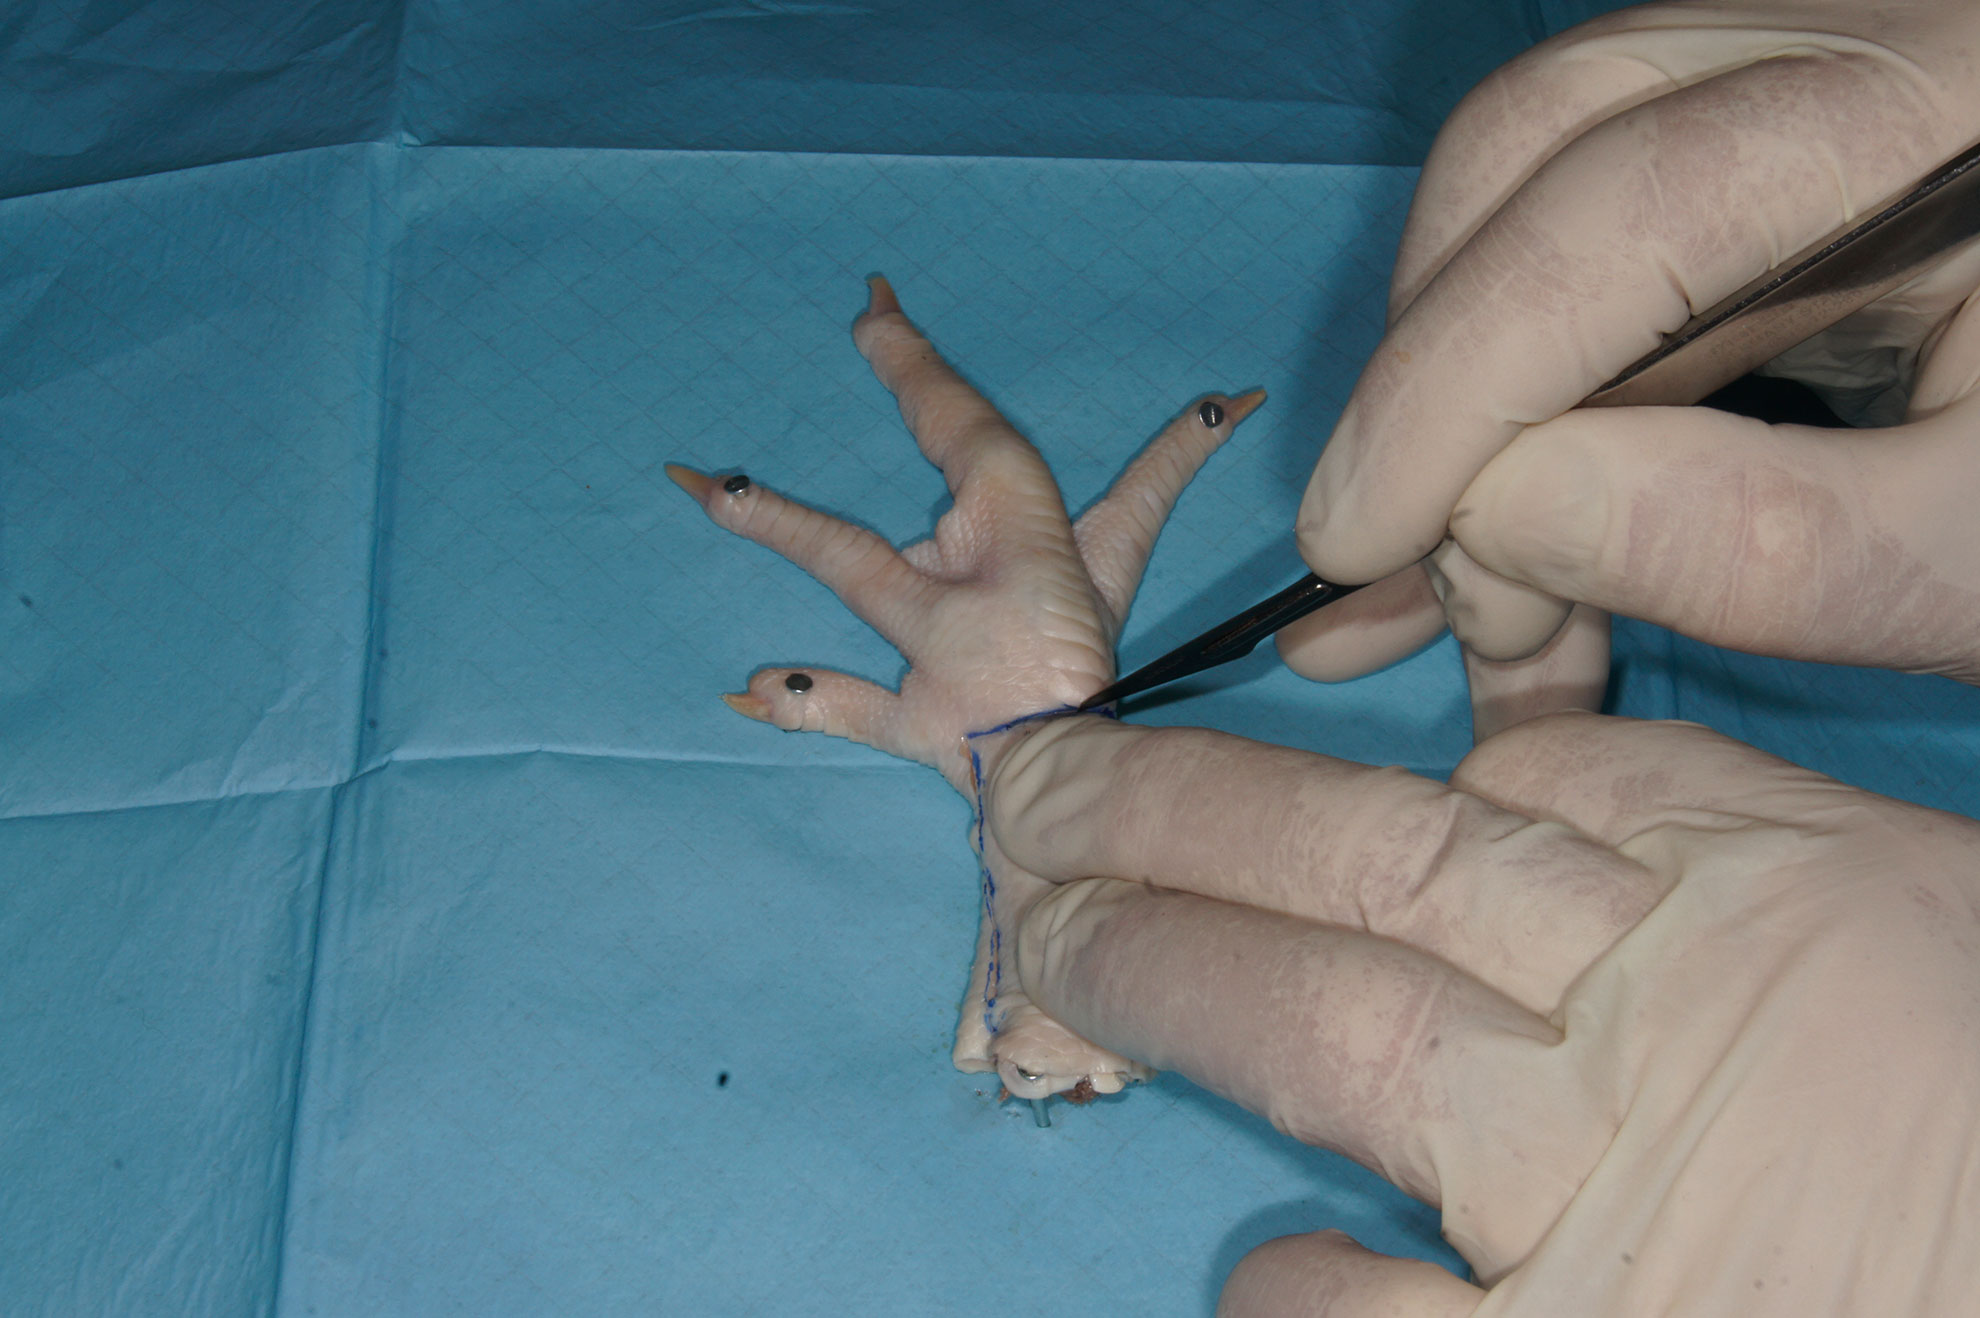
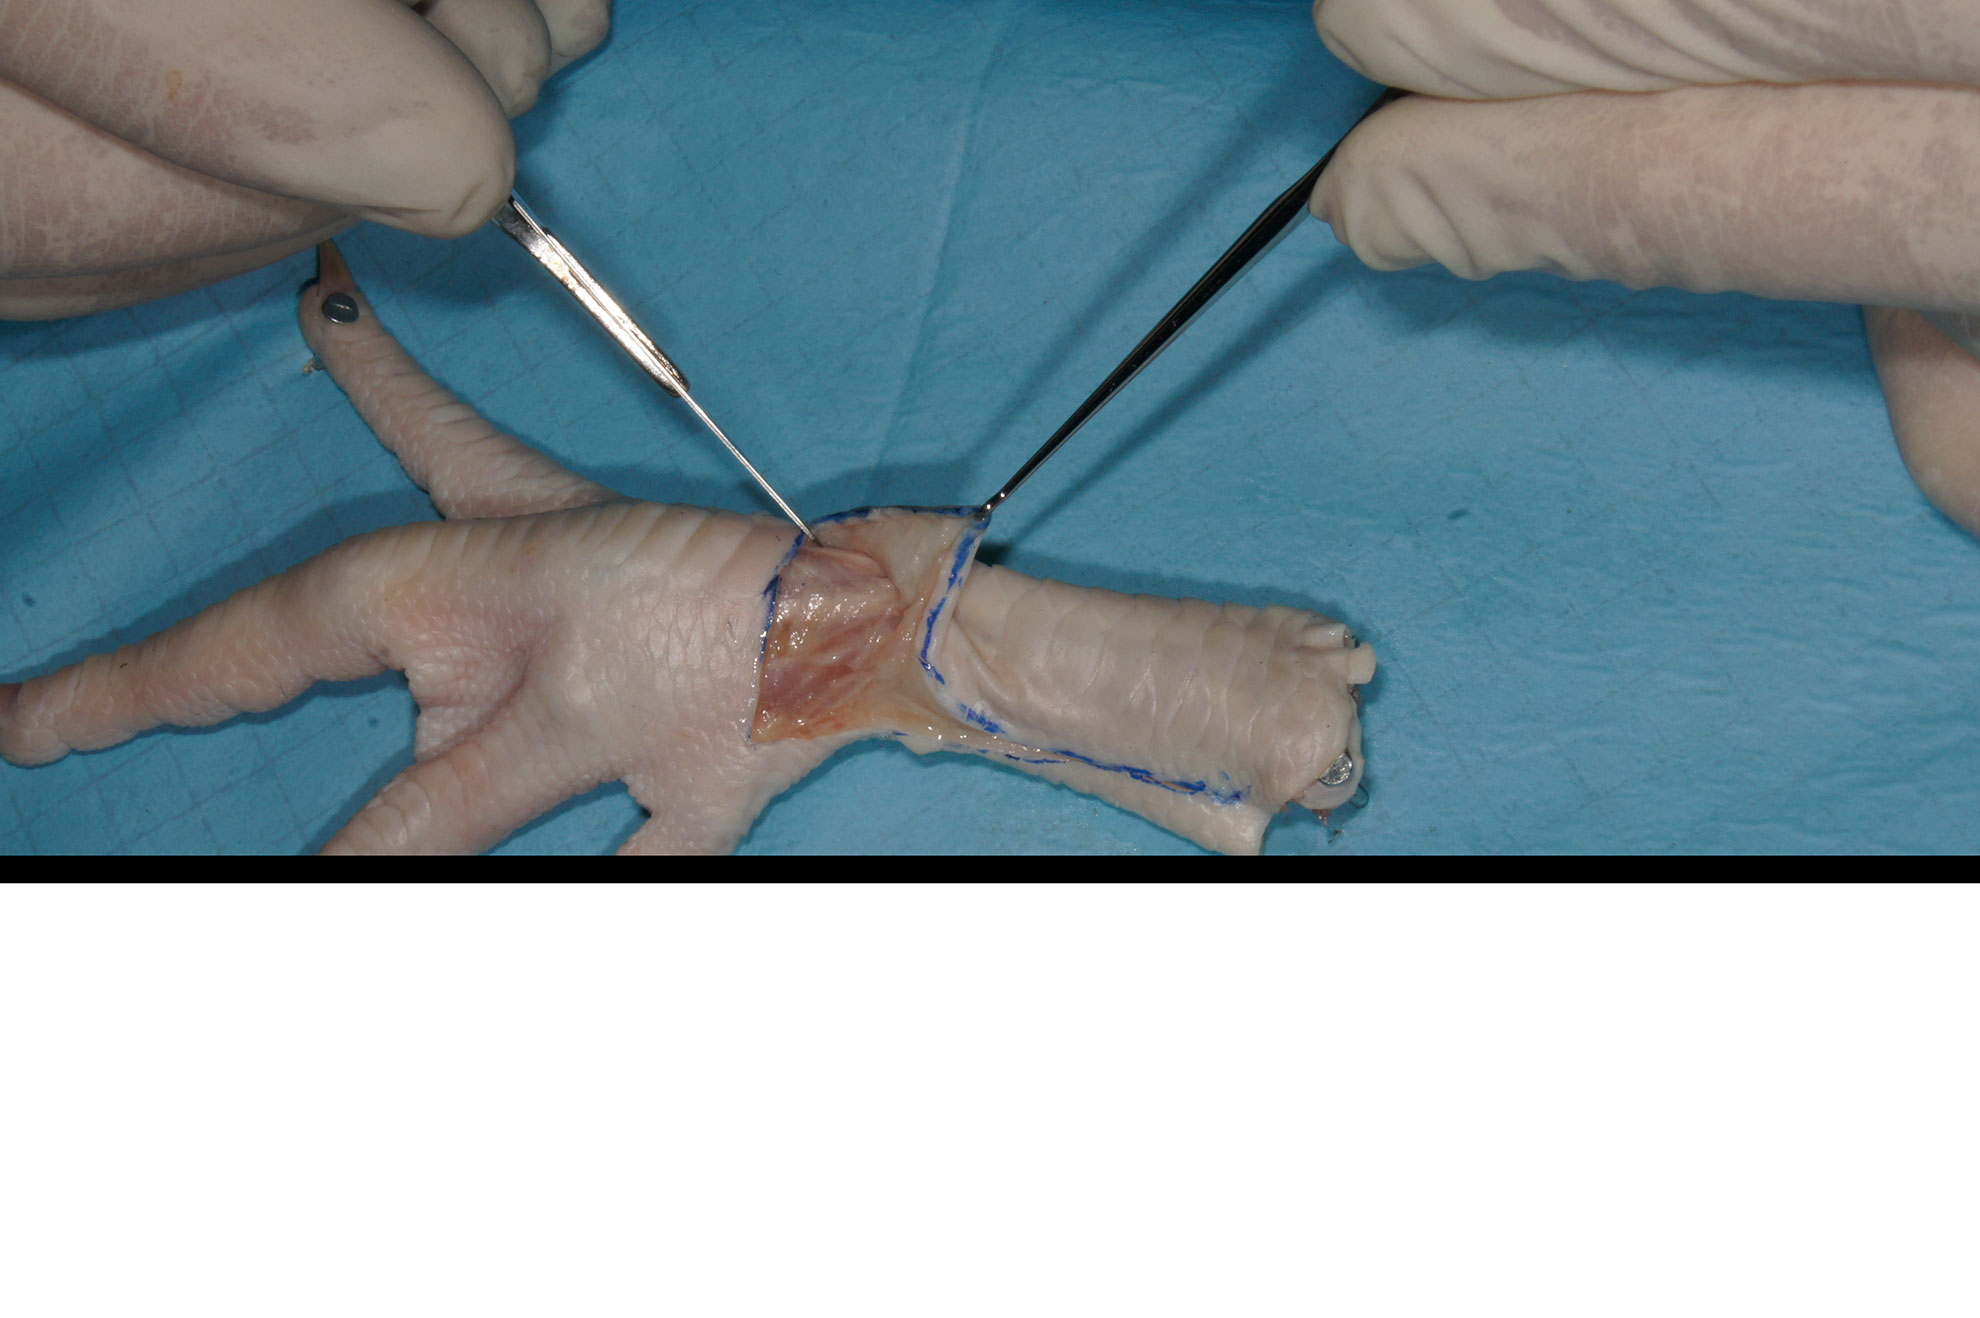
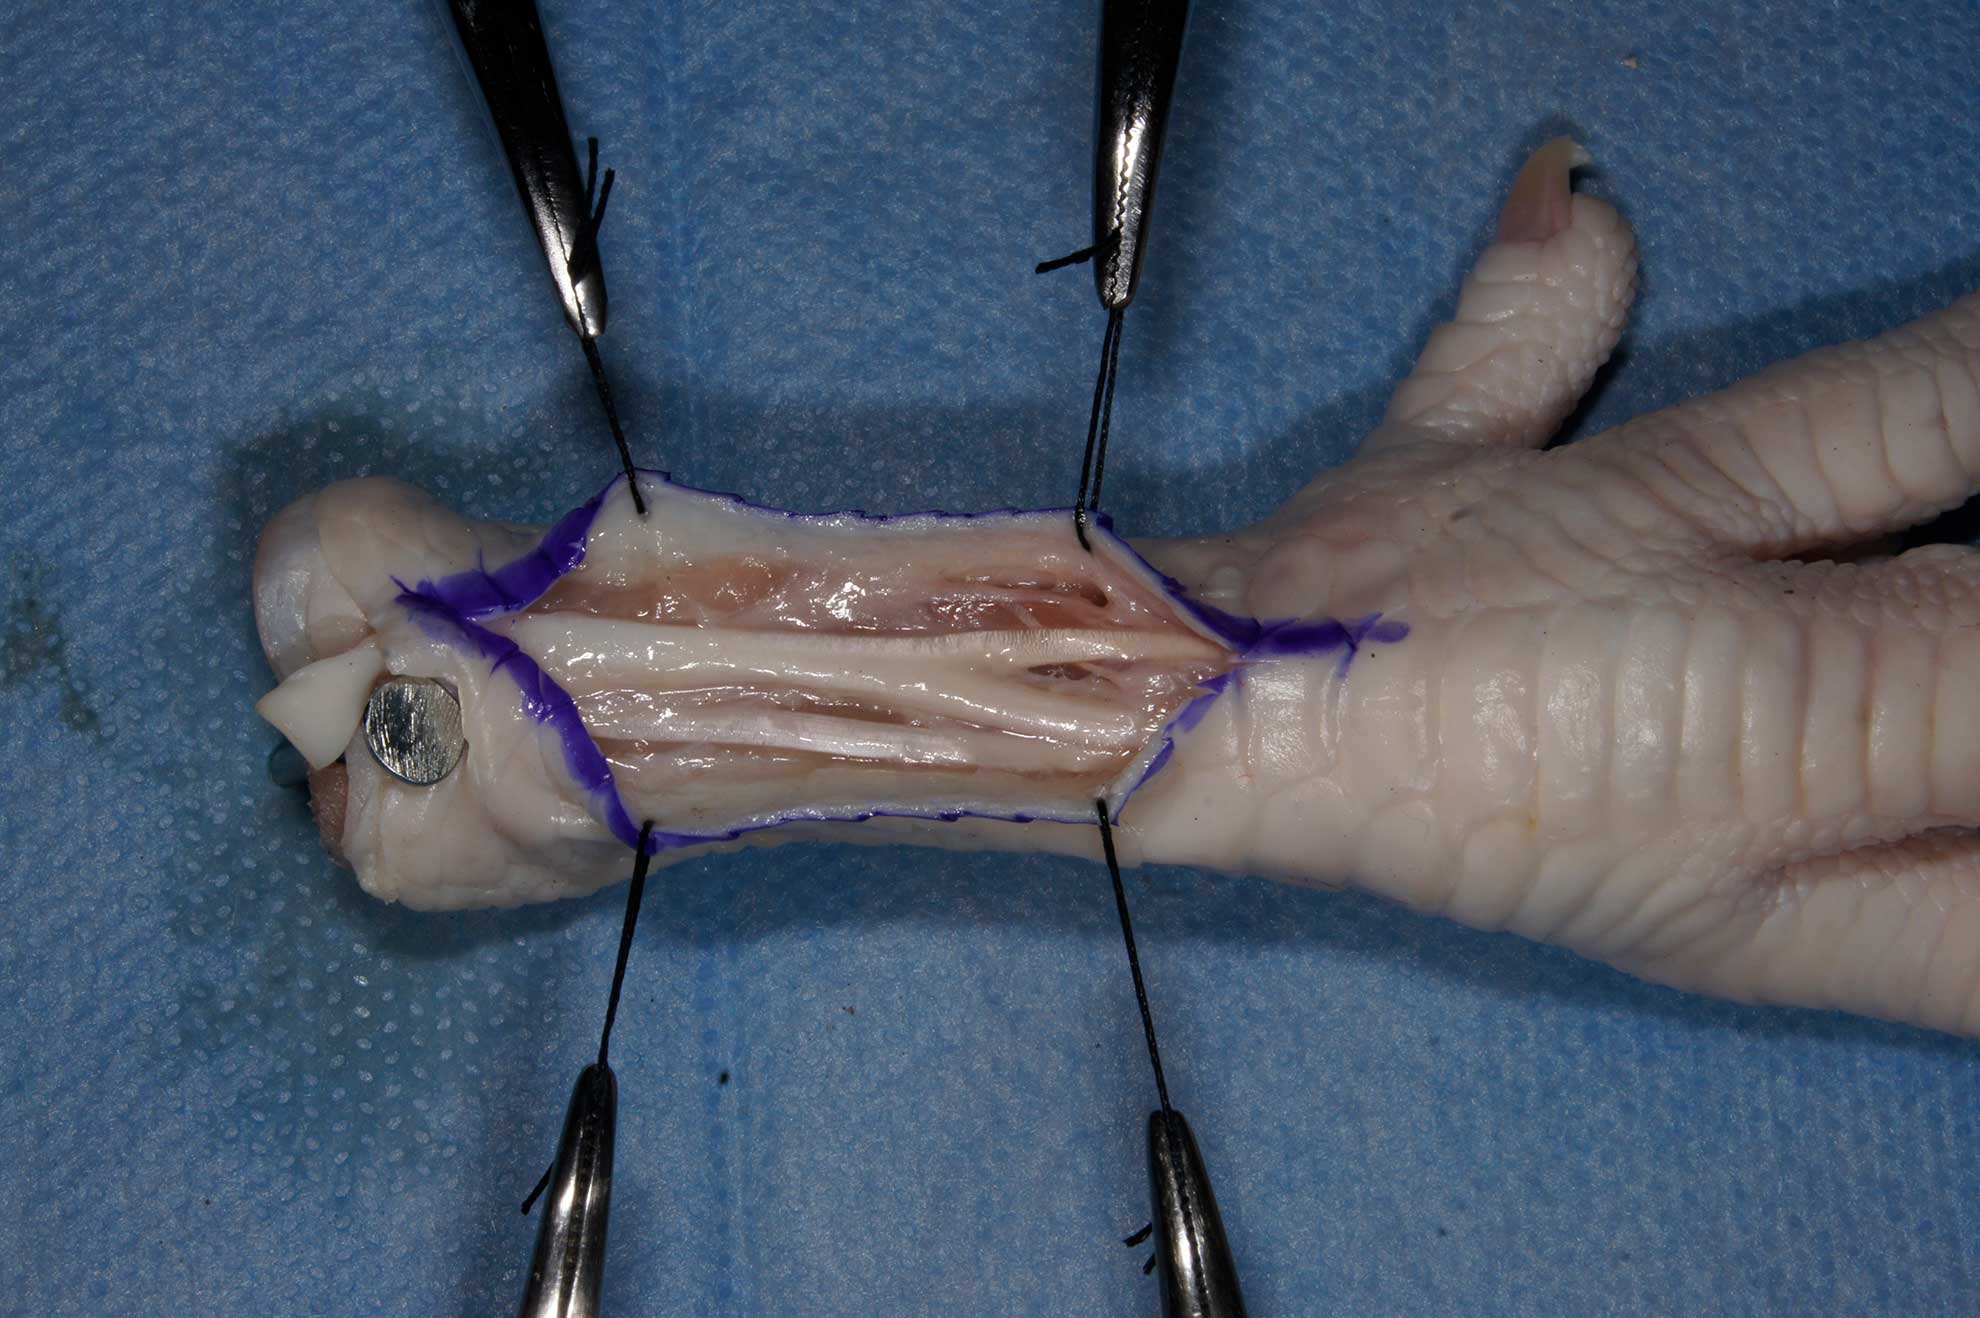
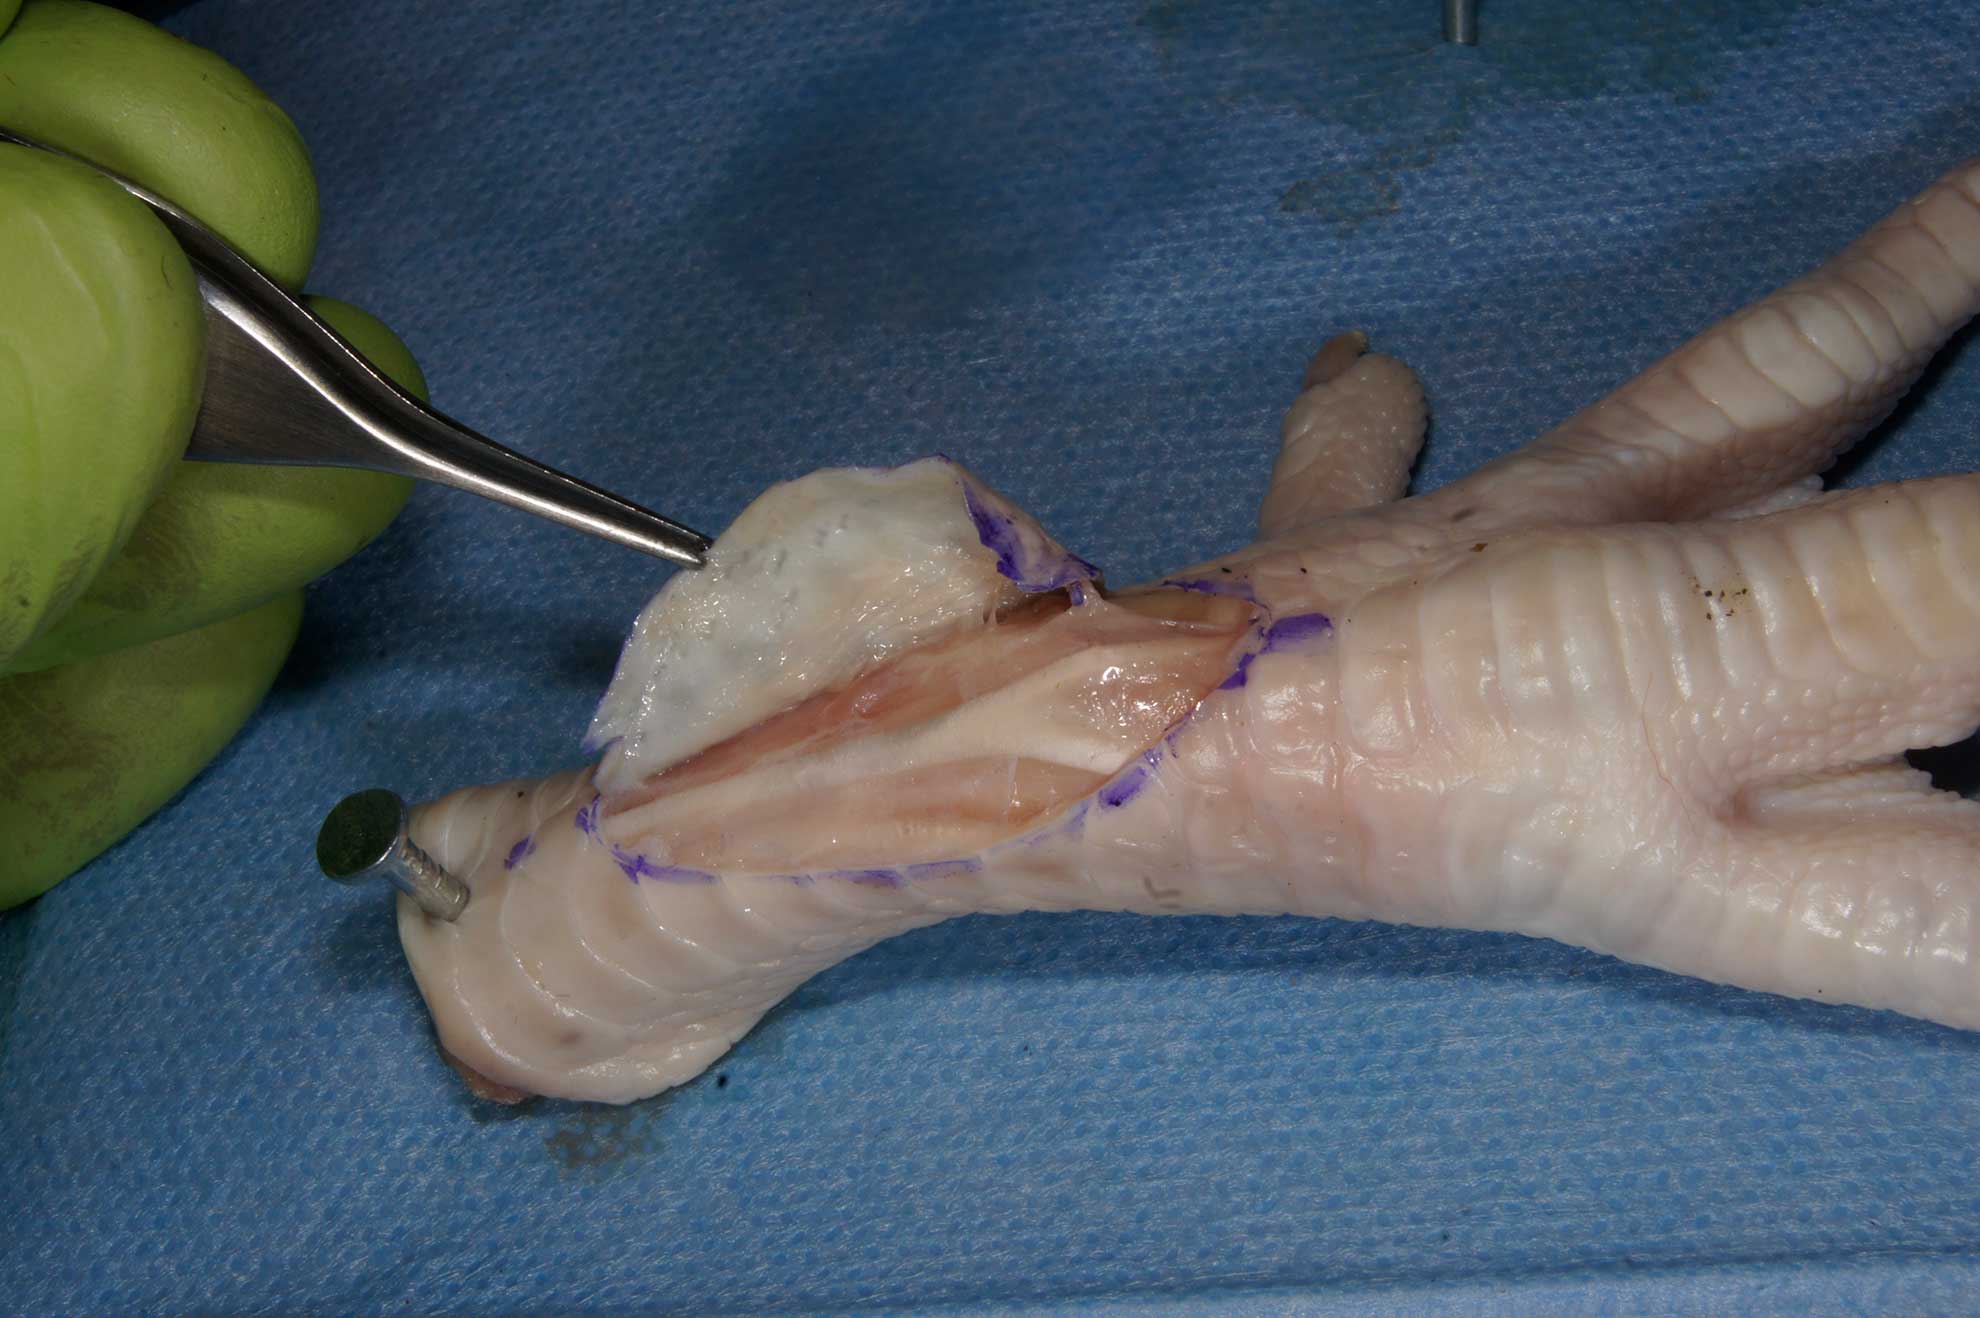
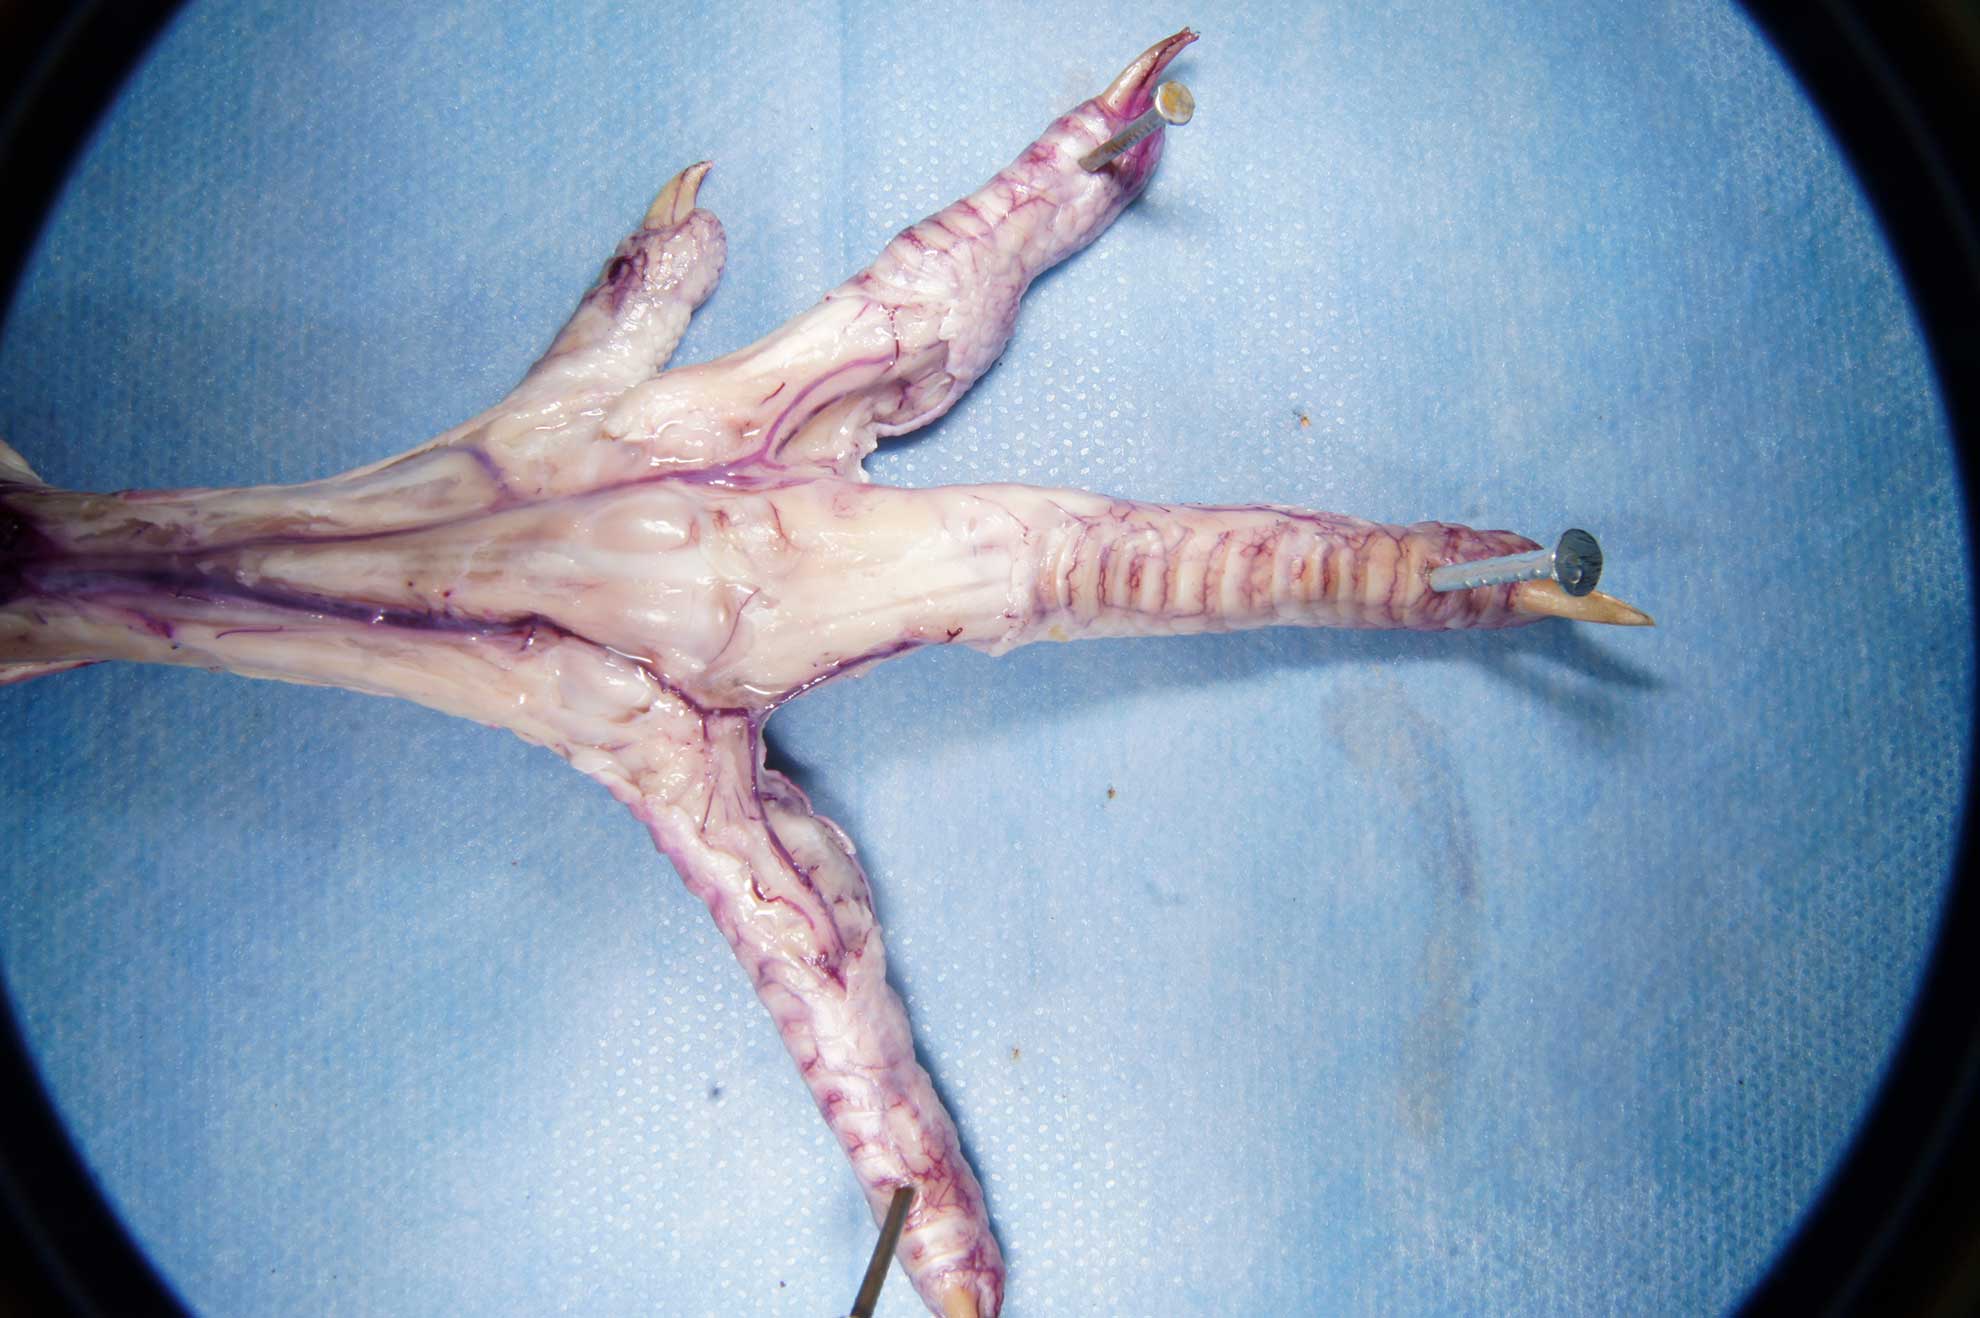
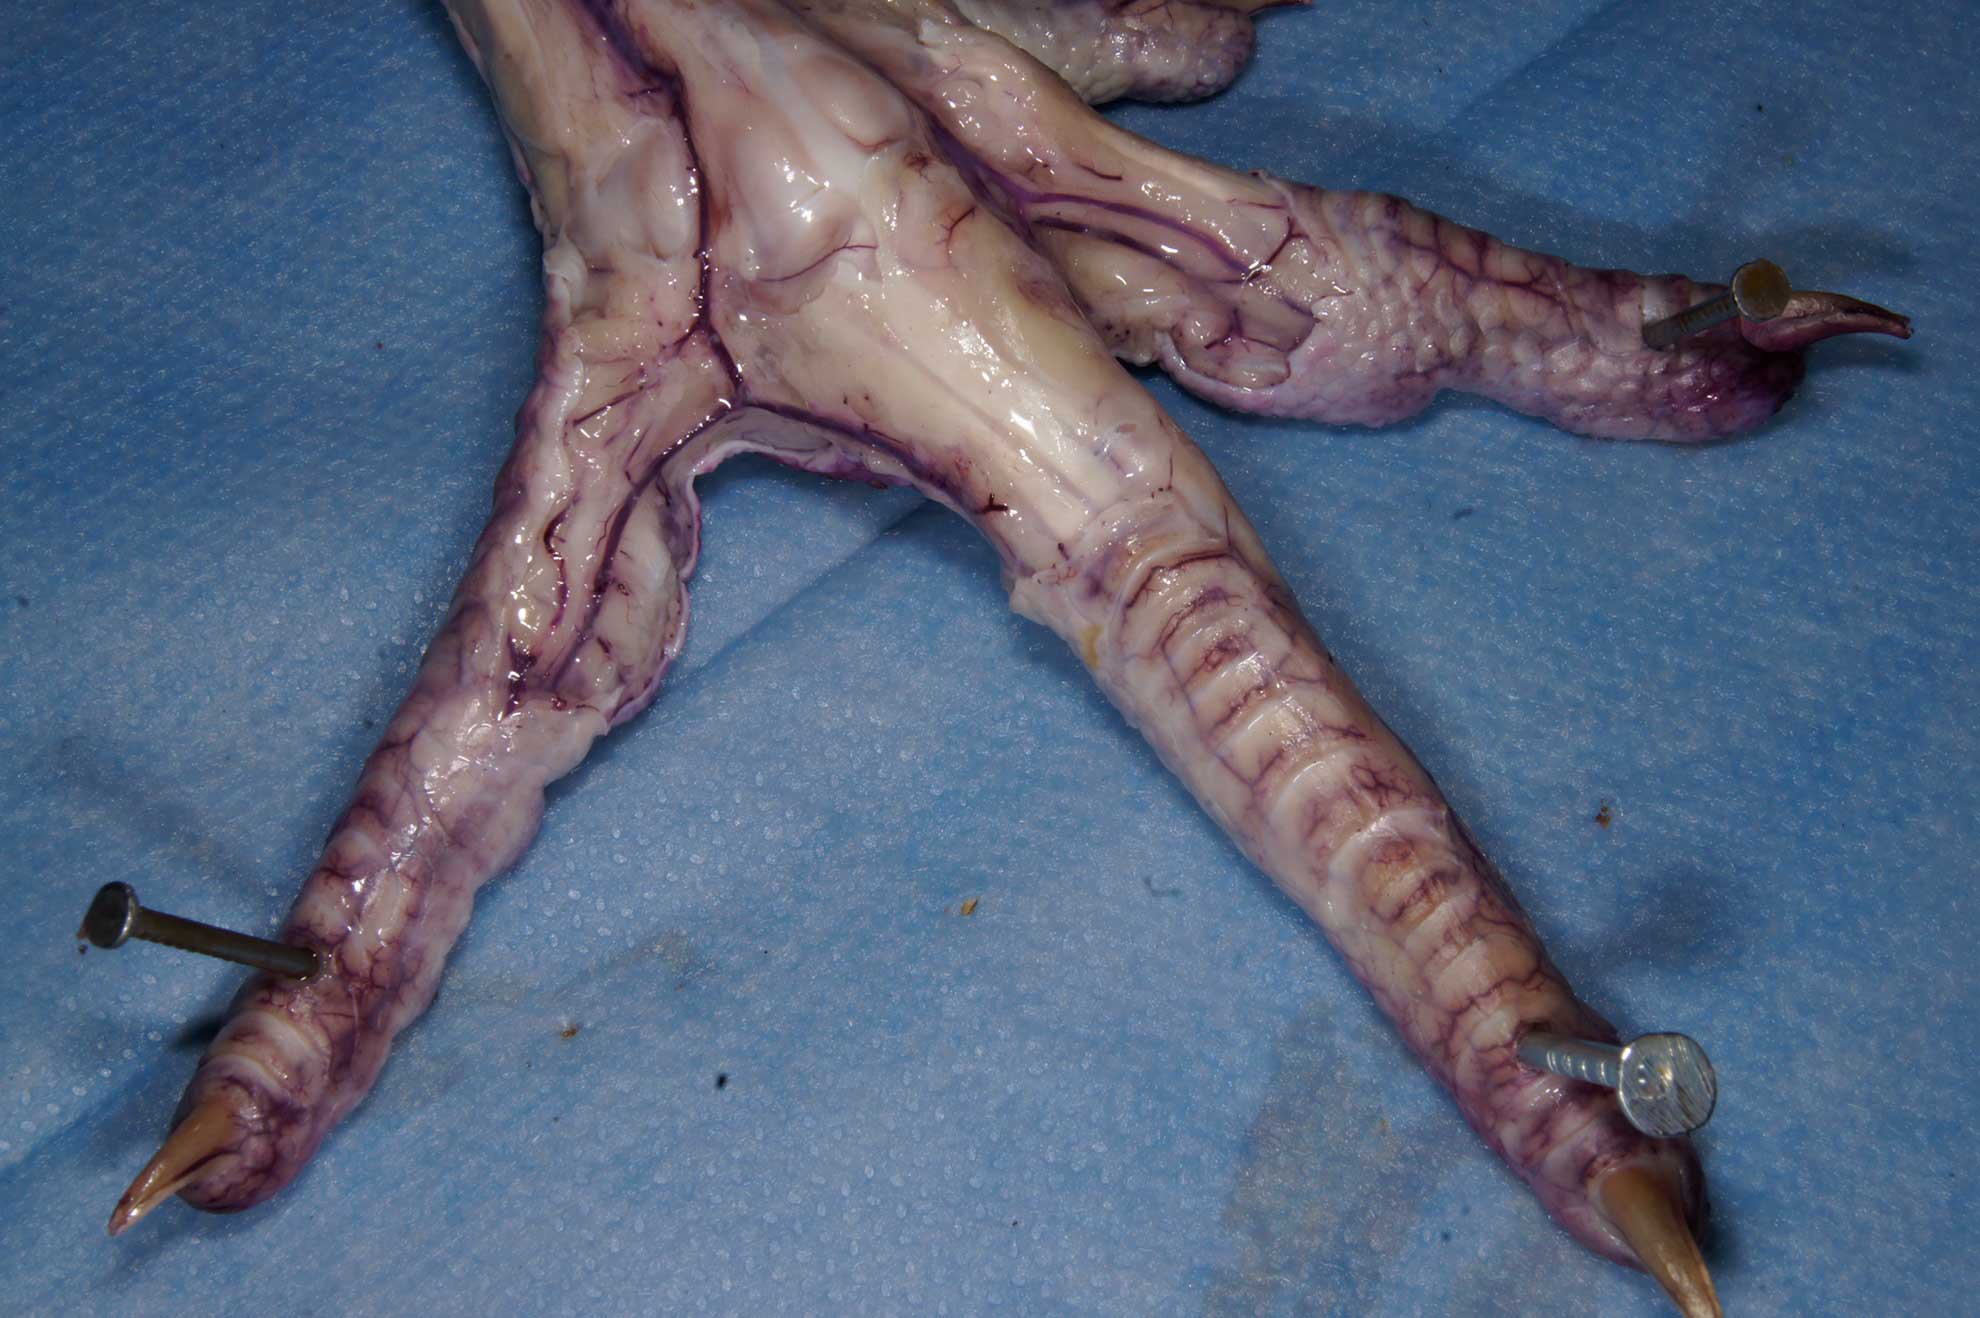
II. Surgical approach to the training area.
Goals: anatomical based approach, topographical landmarks, gentle preparation, atraumatic technique, creation of the surgical field, placing of stiches, preparing of skin grafts.
Version: Surgical – grade procedure
Illustrative Materials: ChickenLeg-SurgicalGradeProcedure
- Locate the common extensor tendon on the dorsal aspect of the tibia.
- Draw the incision line.
- The incision line is just medial to the common extensor tendon. The contour the margin of the tendon is visible under the skin. The skin is slightly elevated. The neurovascular bundle is located below the tendon.
- Elevate the skin on both sides of the incision line, use skin hooks, preserve subcutaneous tissue, preserve the deep fascia.
- Create the surgical field, fixating the wound edges by stiches, trap the ligatures by Mosquito clamps. Perform incision in the deep fascia.
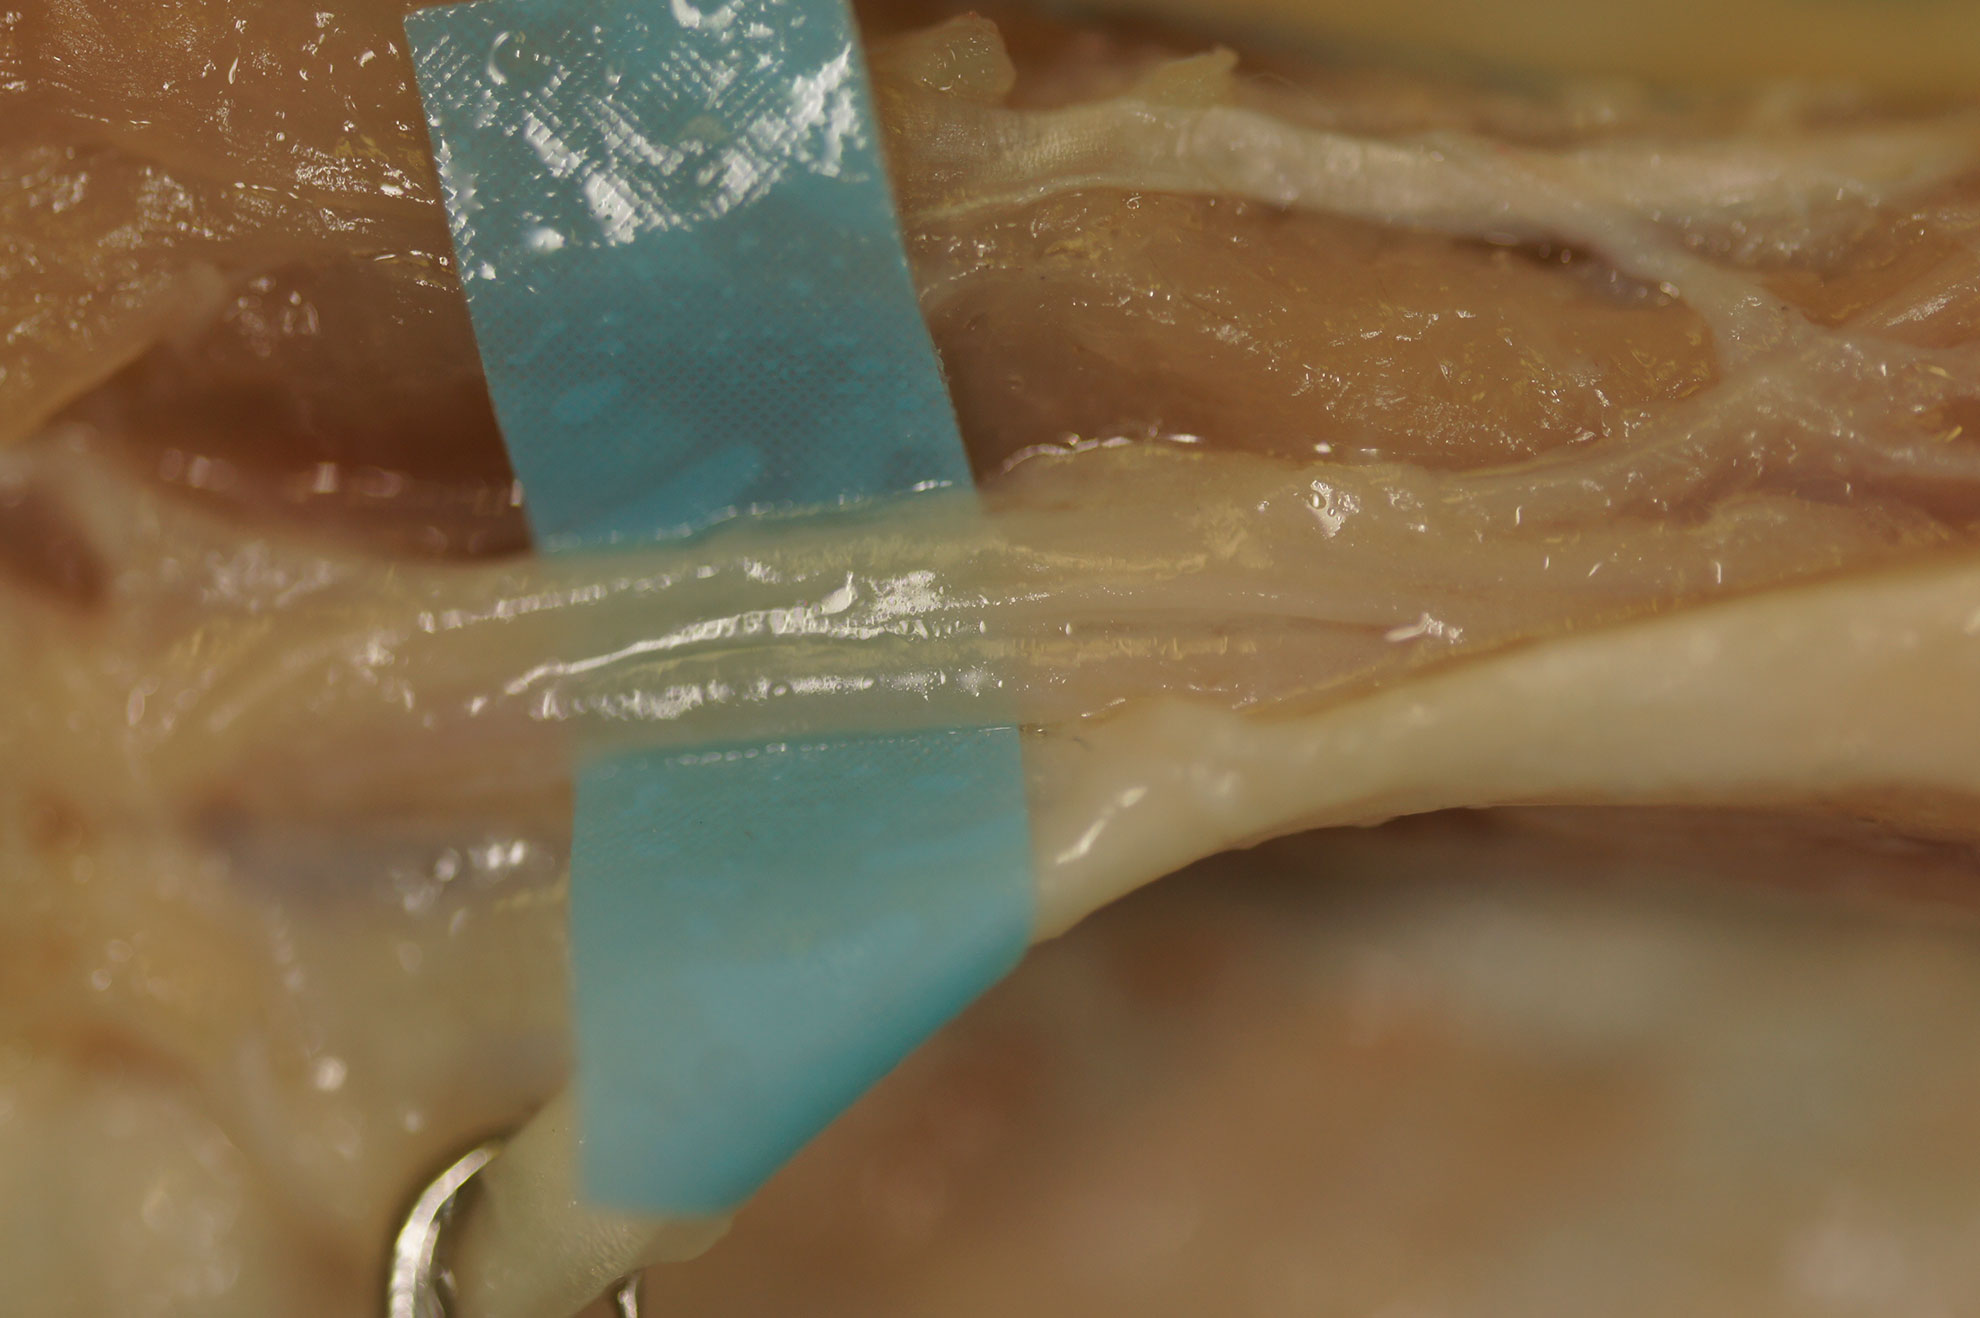
- Retract the common extensor tendon, use a silastic band as retractor, keep the tendon apart from the neurovascular bundle
- Expose the neurovascular bundle, using micro forceps and micro scissors.
- Preserve the nerve branches.
- Expose the artery with accolading veins.
- Separate the artery from the veins using preparating scissors
- Separate the artery from veins using Nr.11 blade
RubberCutting:
Consider the use of a surgical glove for the background material.
The background must have correct shape and correct size.
Avoid lacerations – the additional gaps might cause the thread trapping
Place with smooth surface up
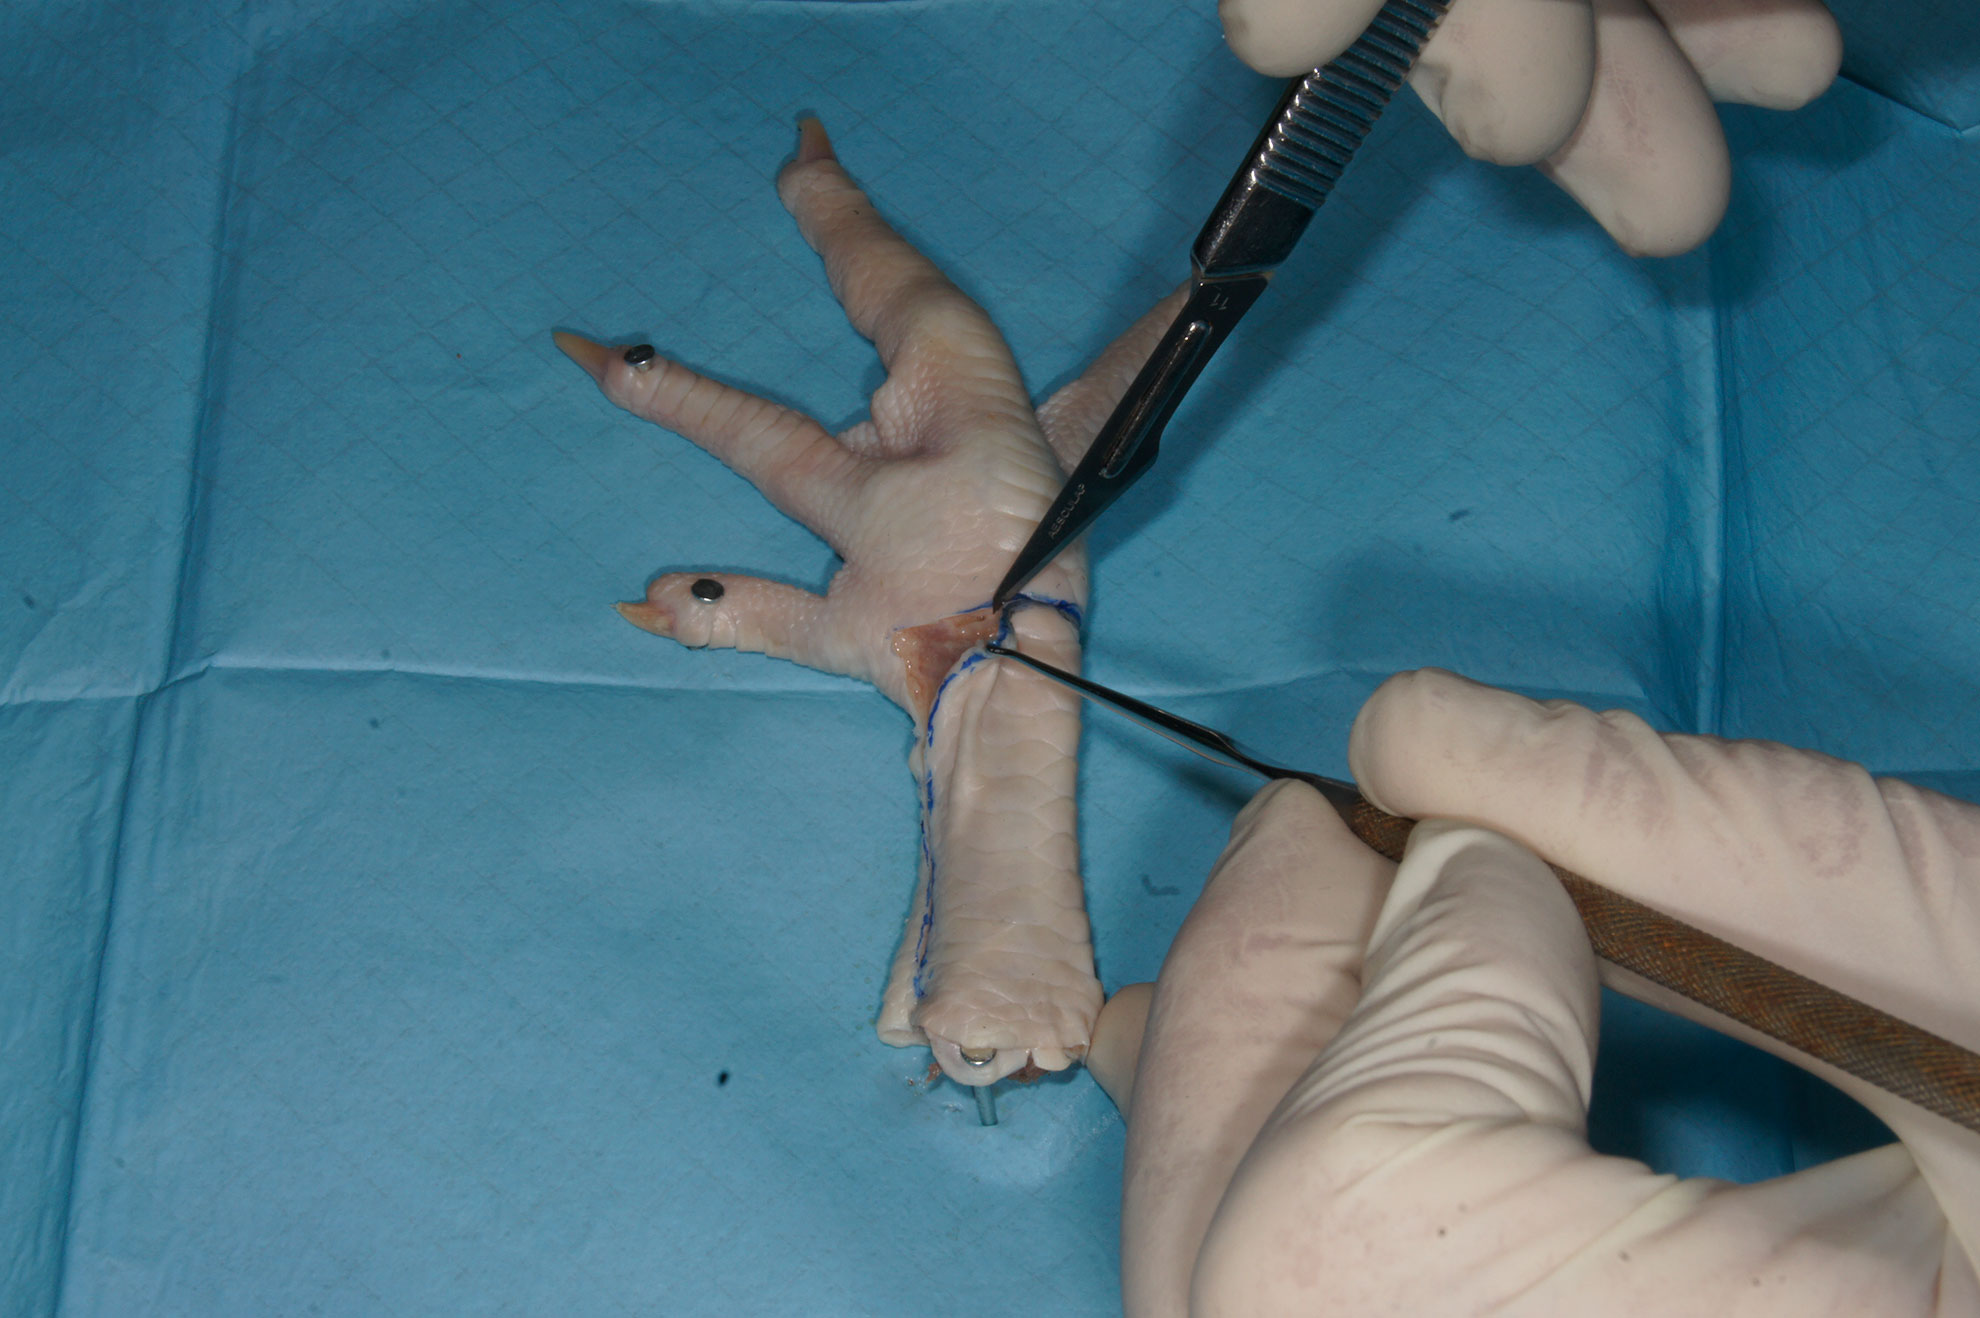
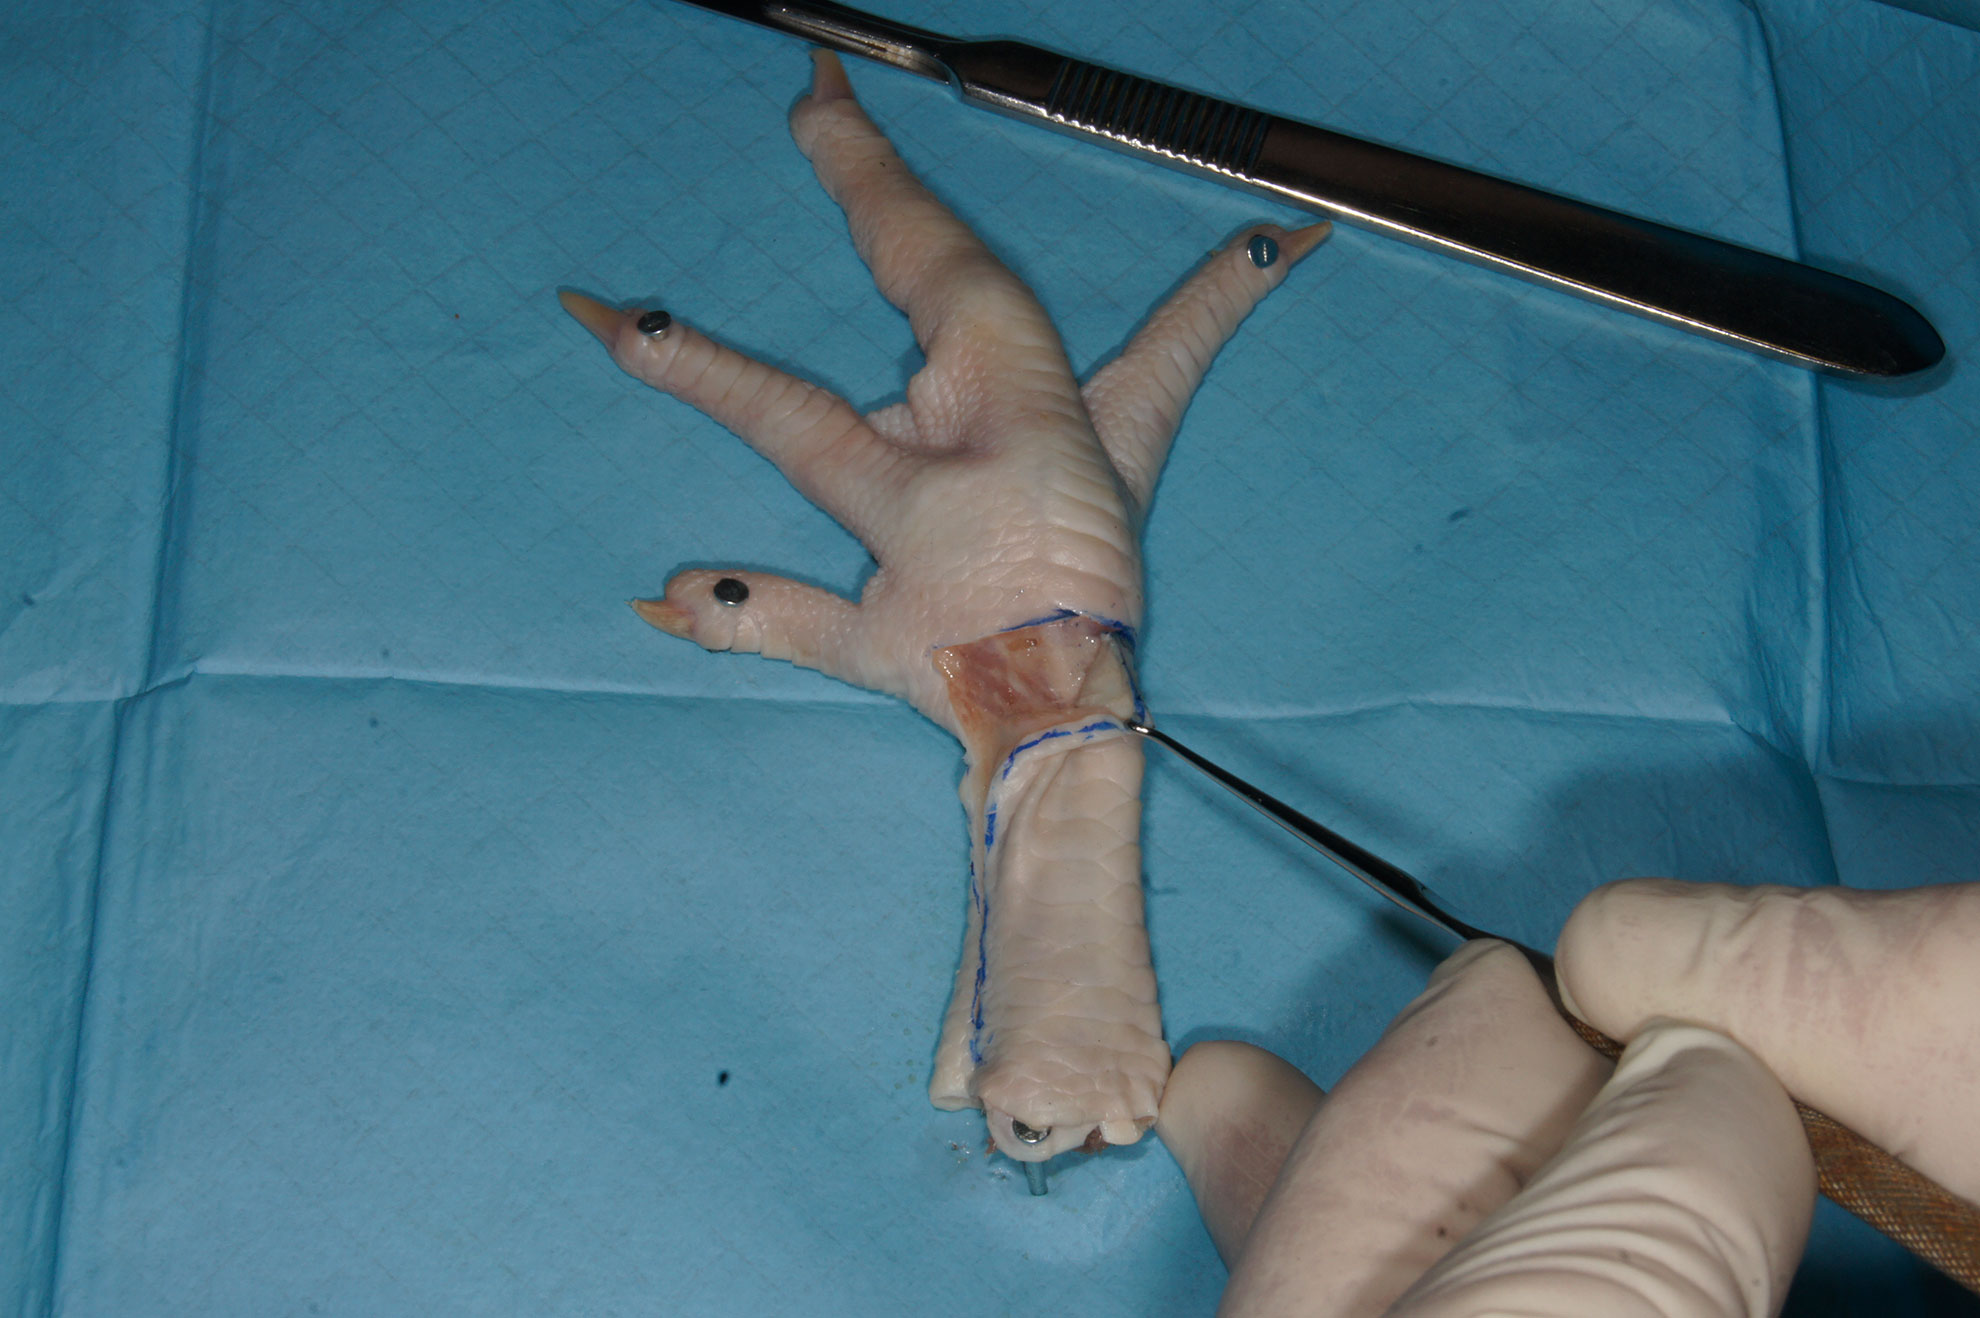
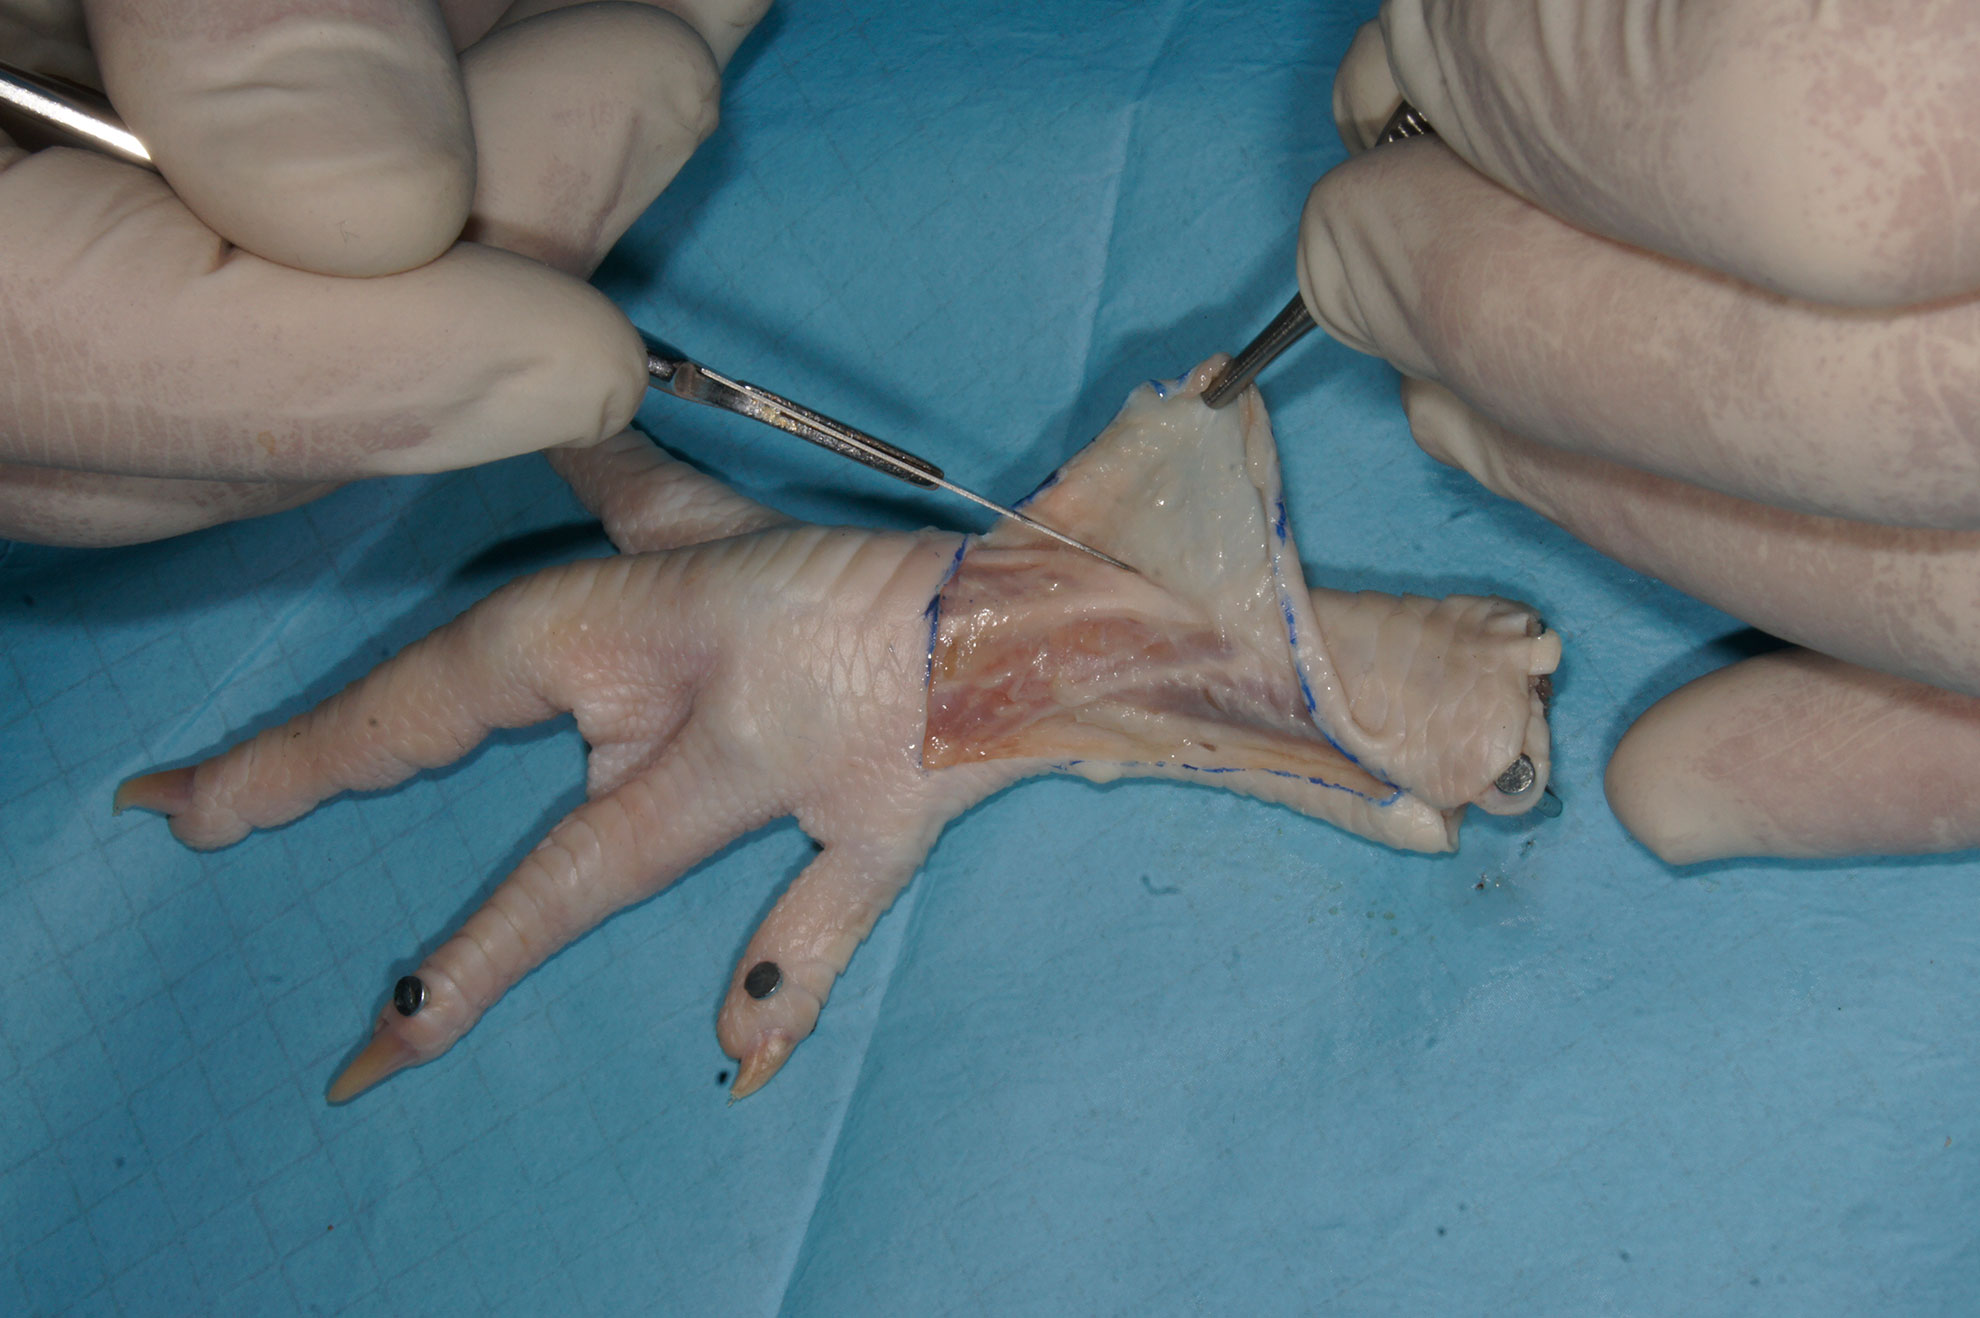
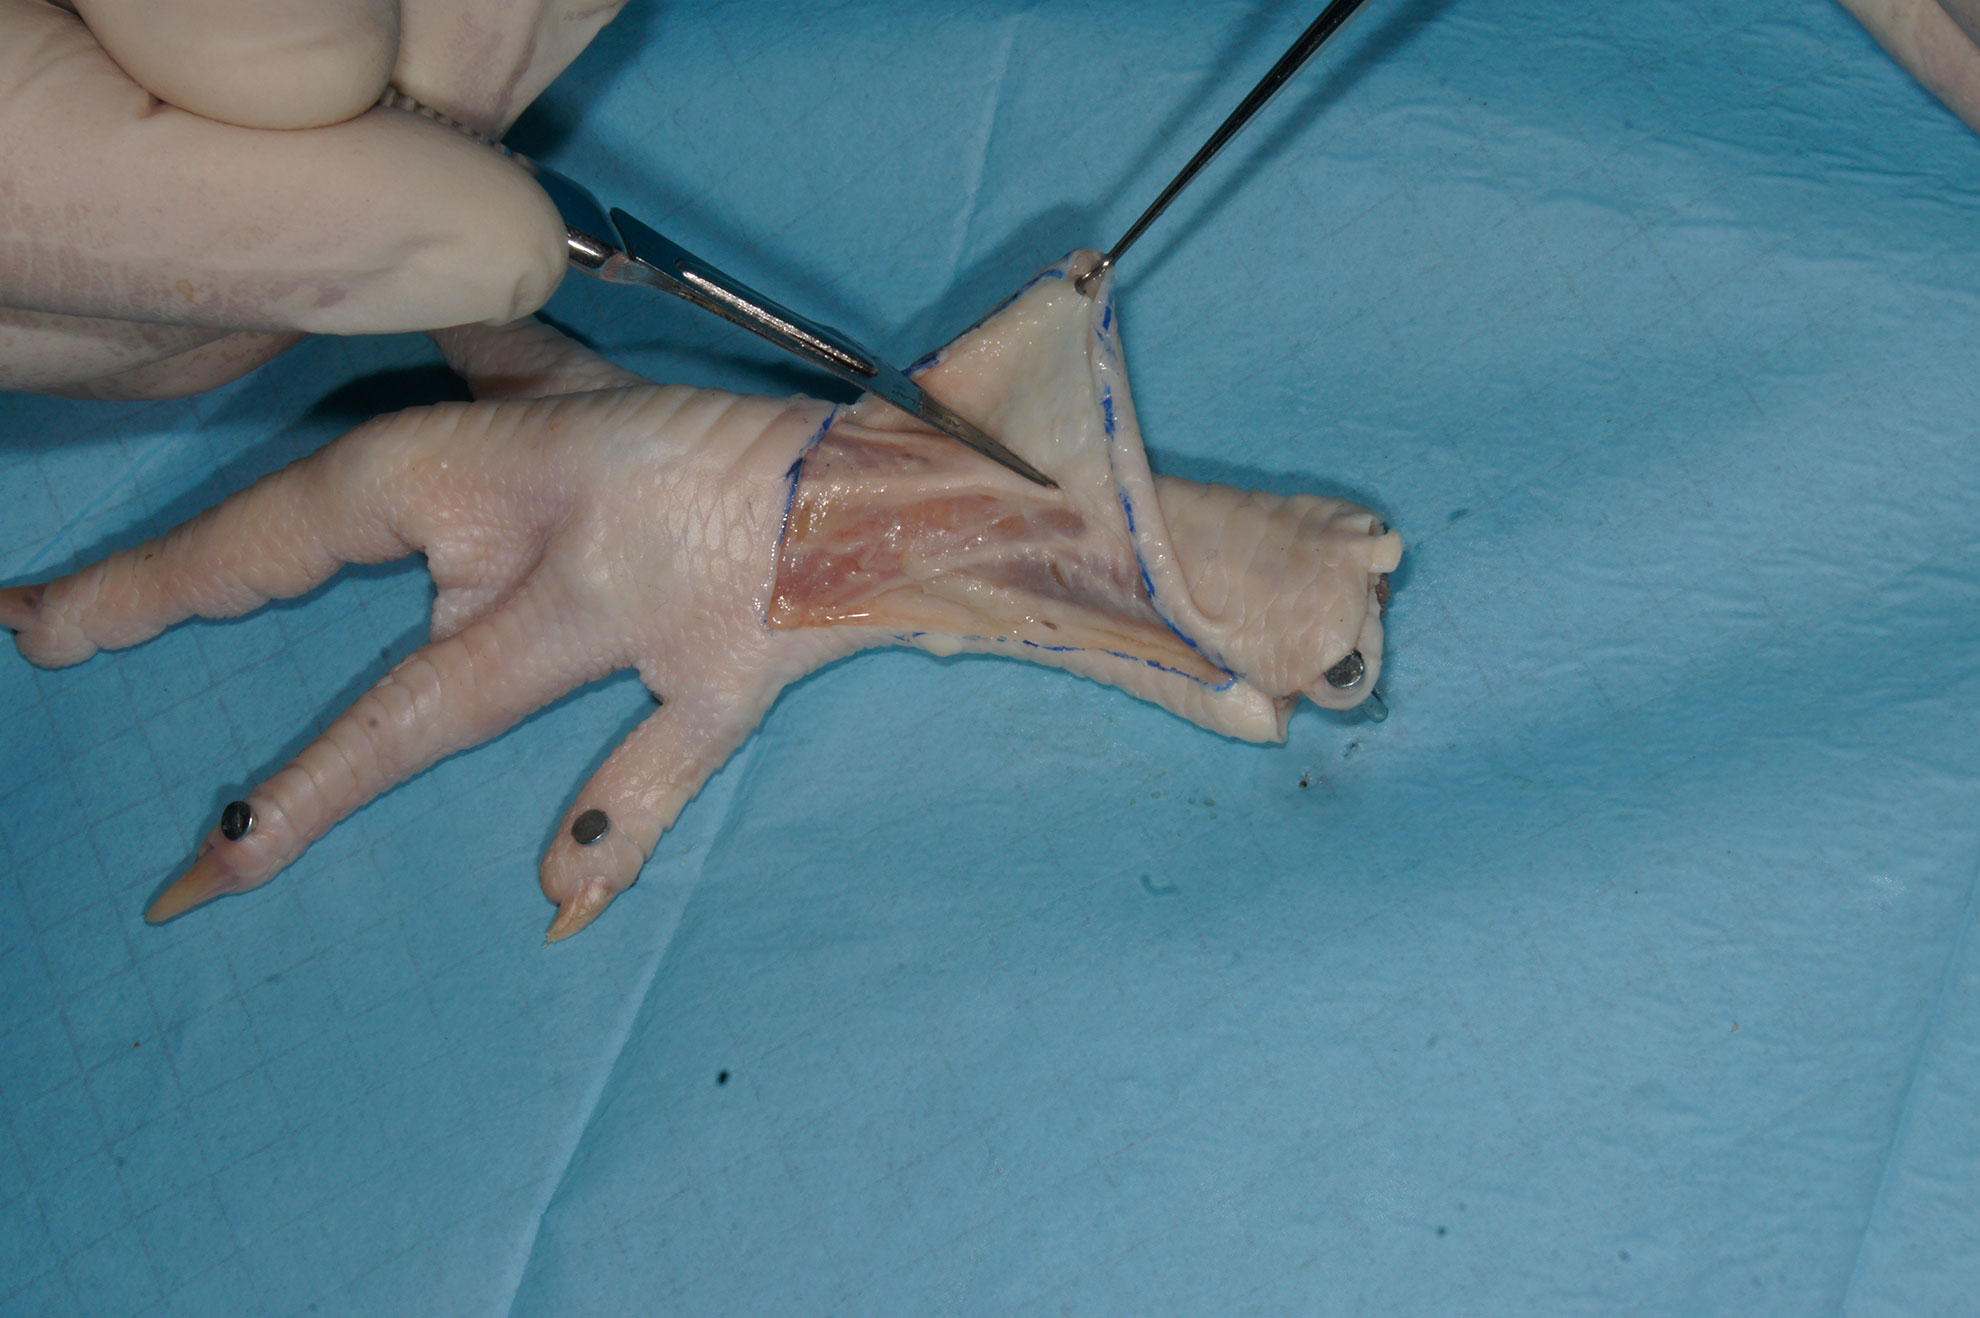
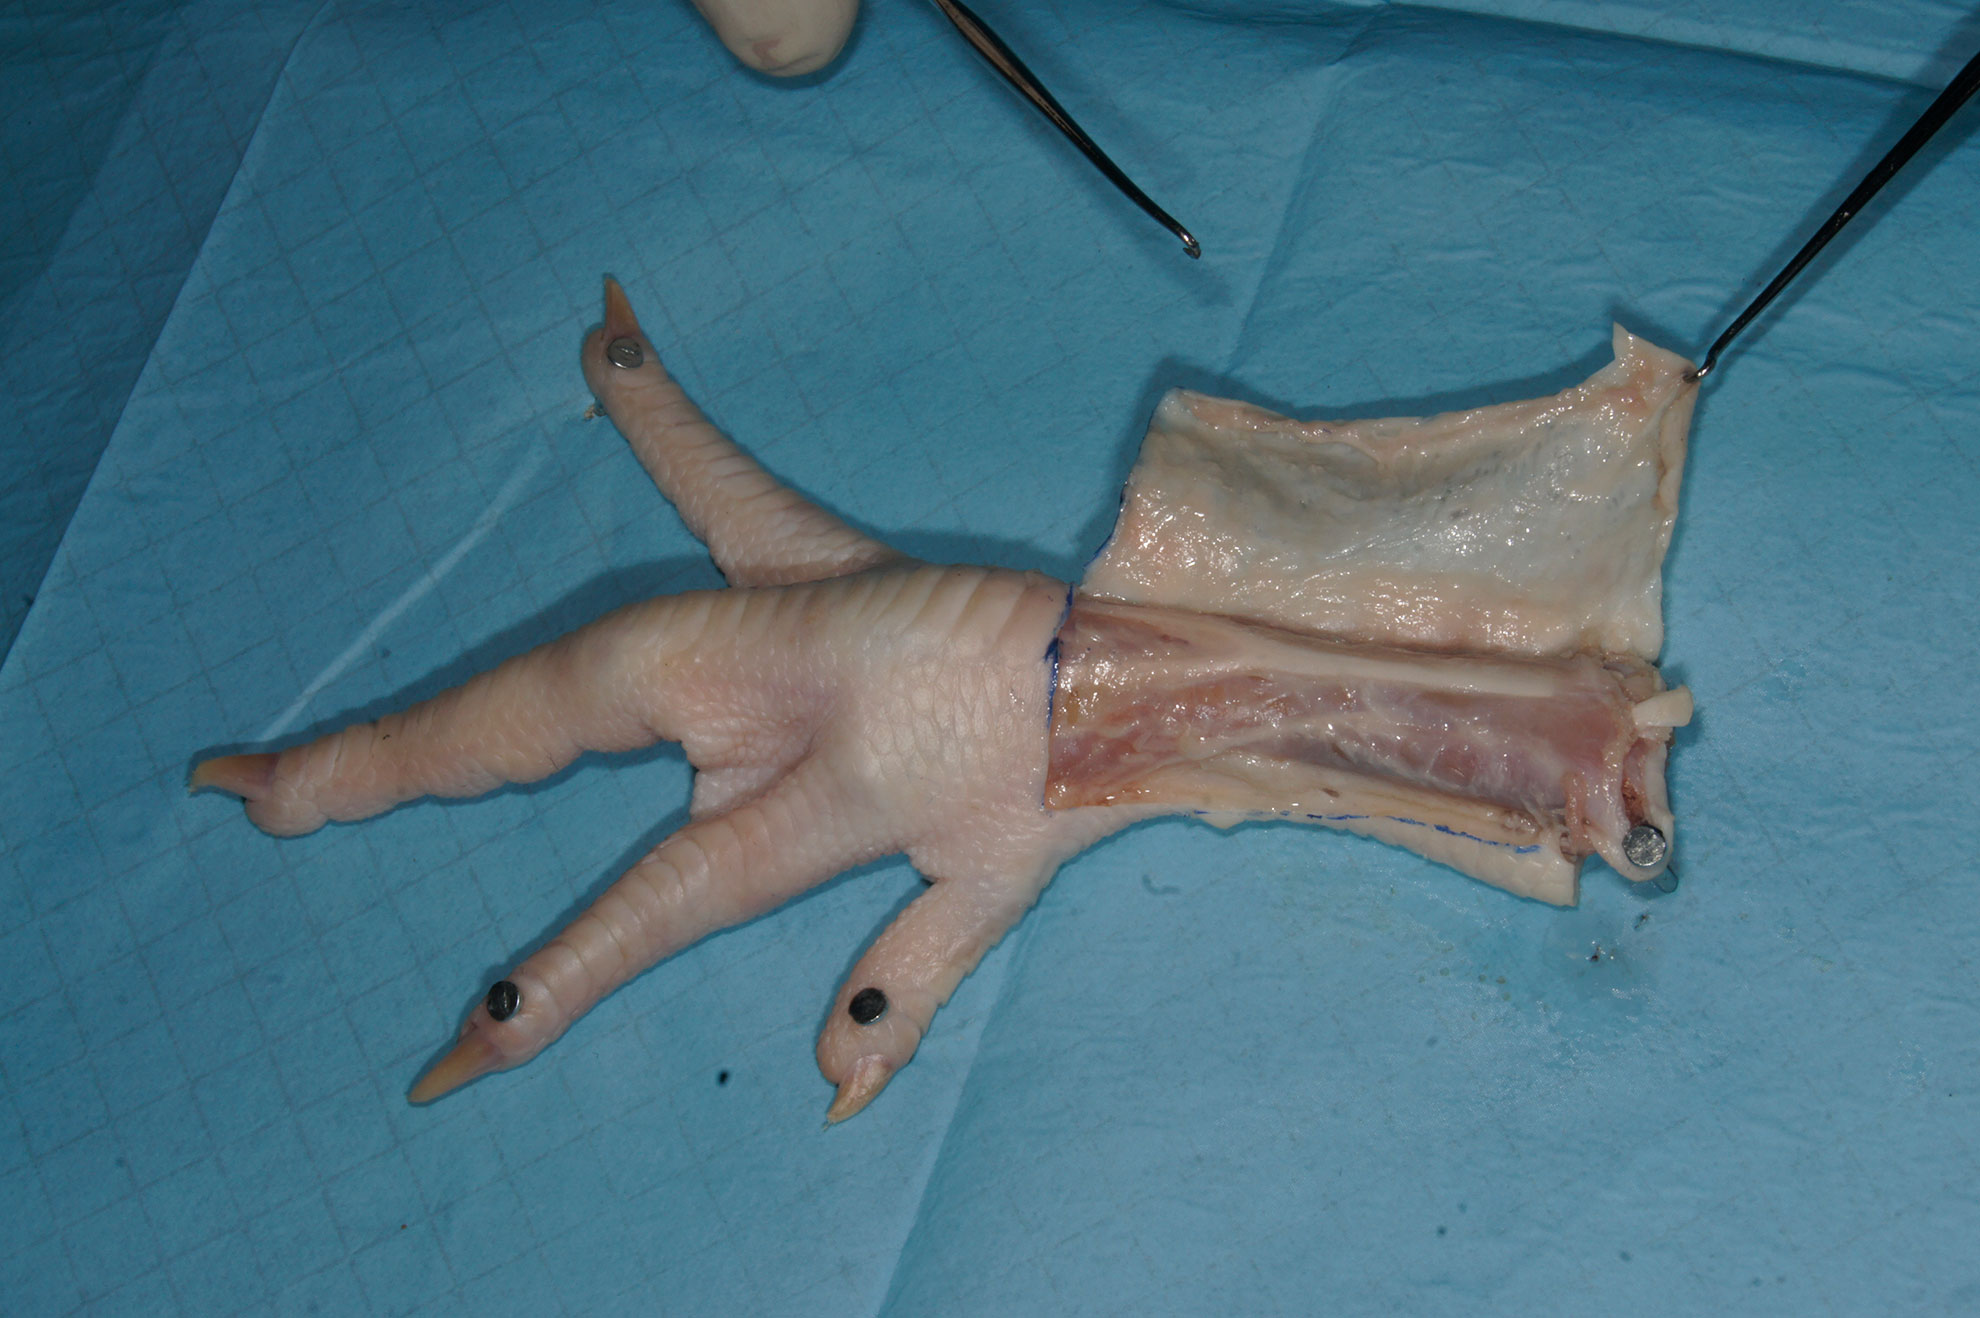
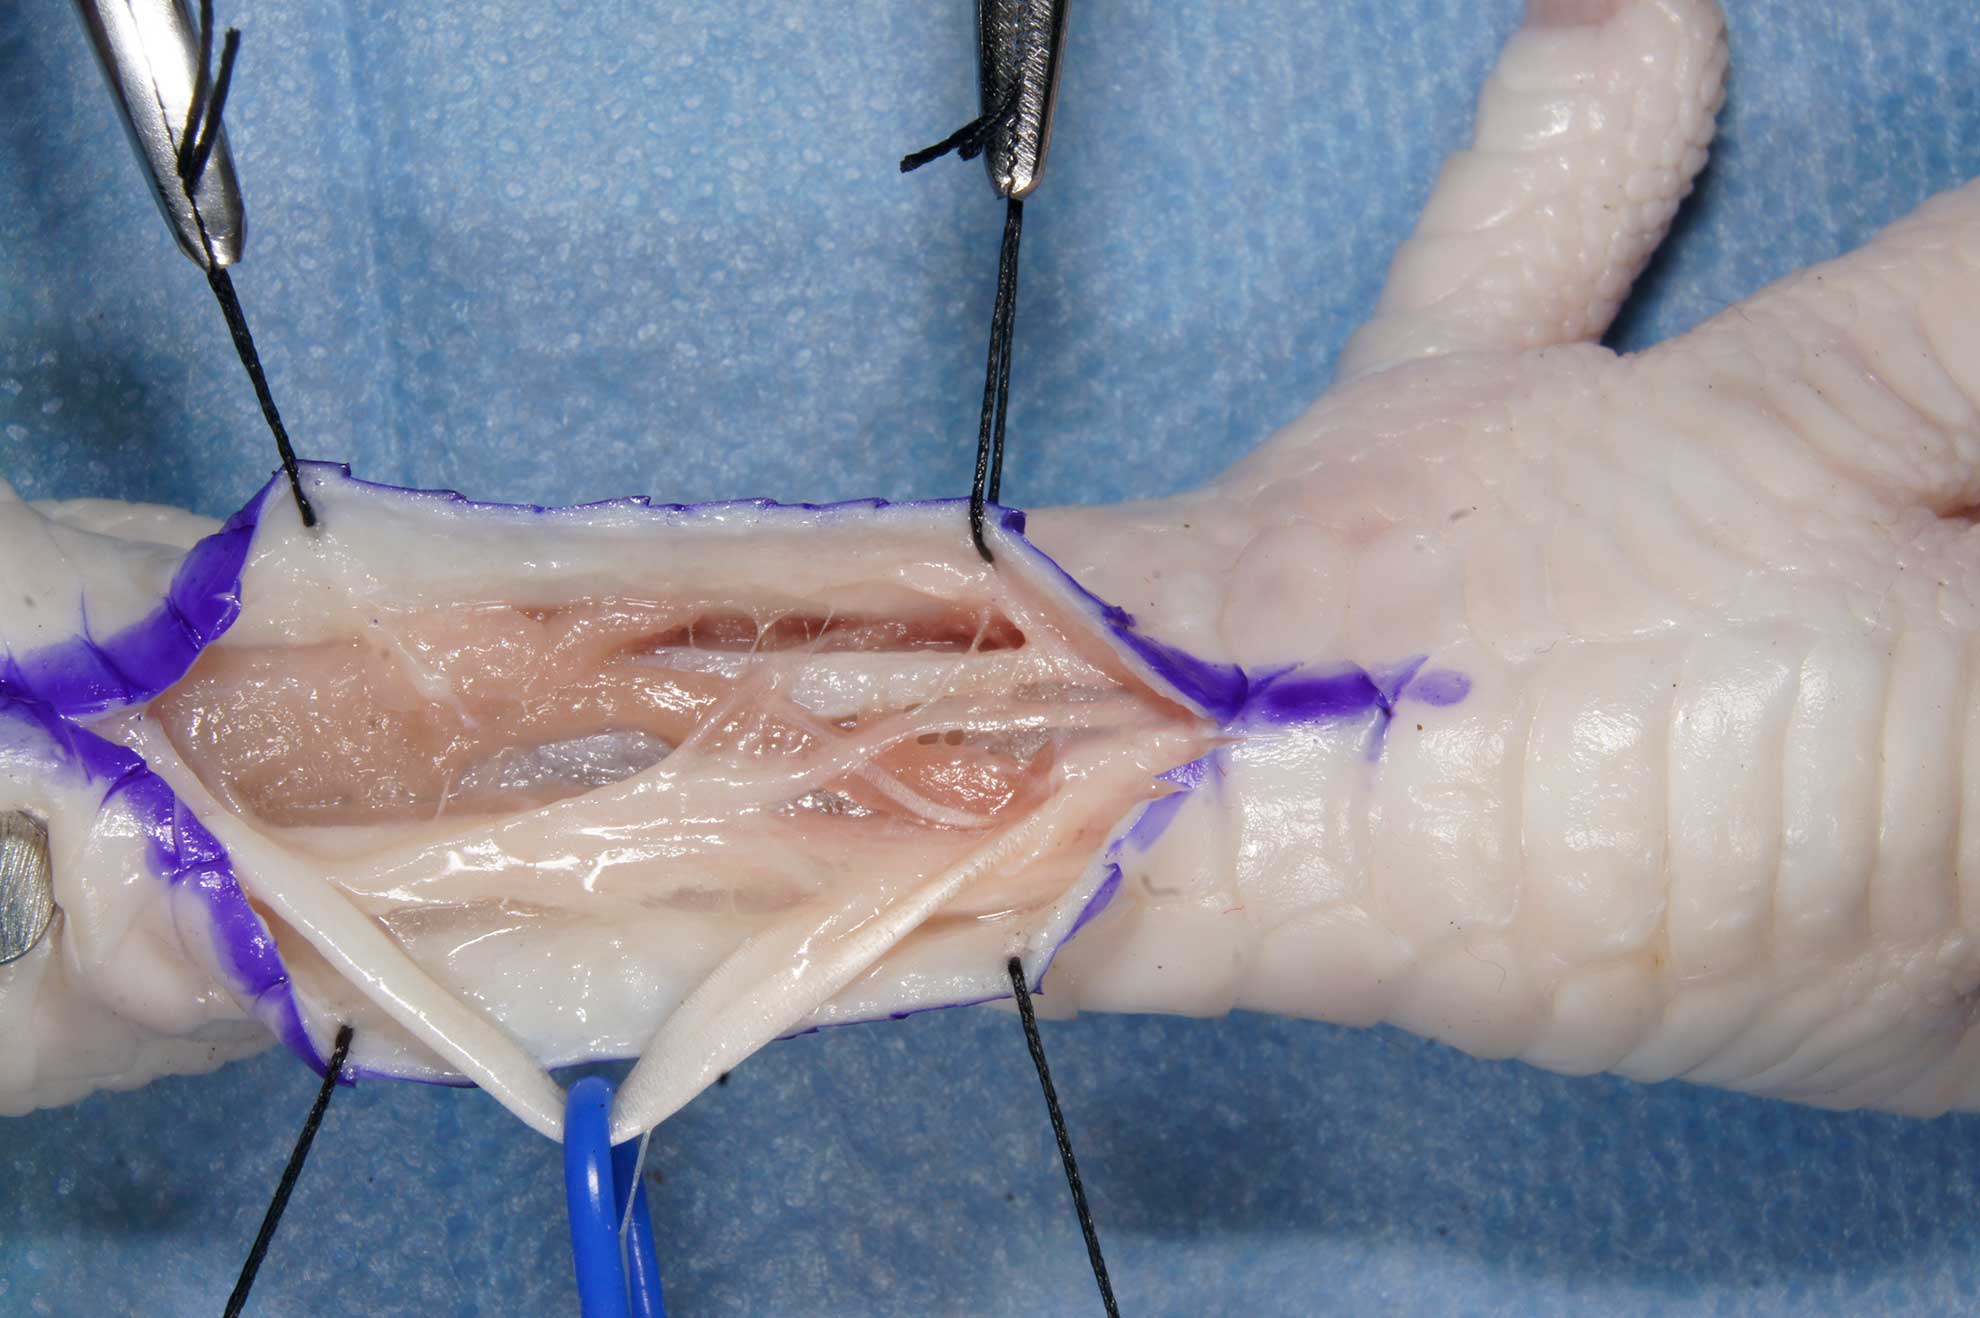
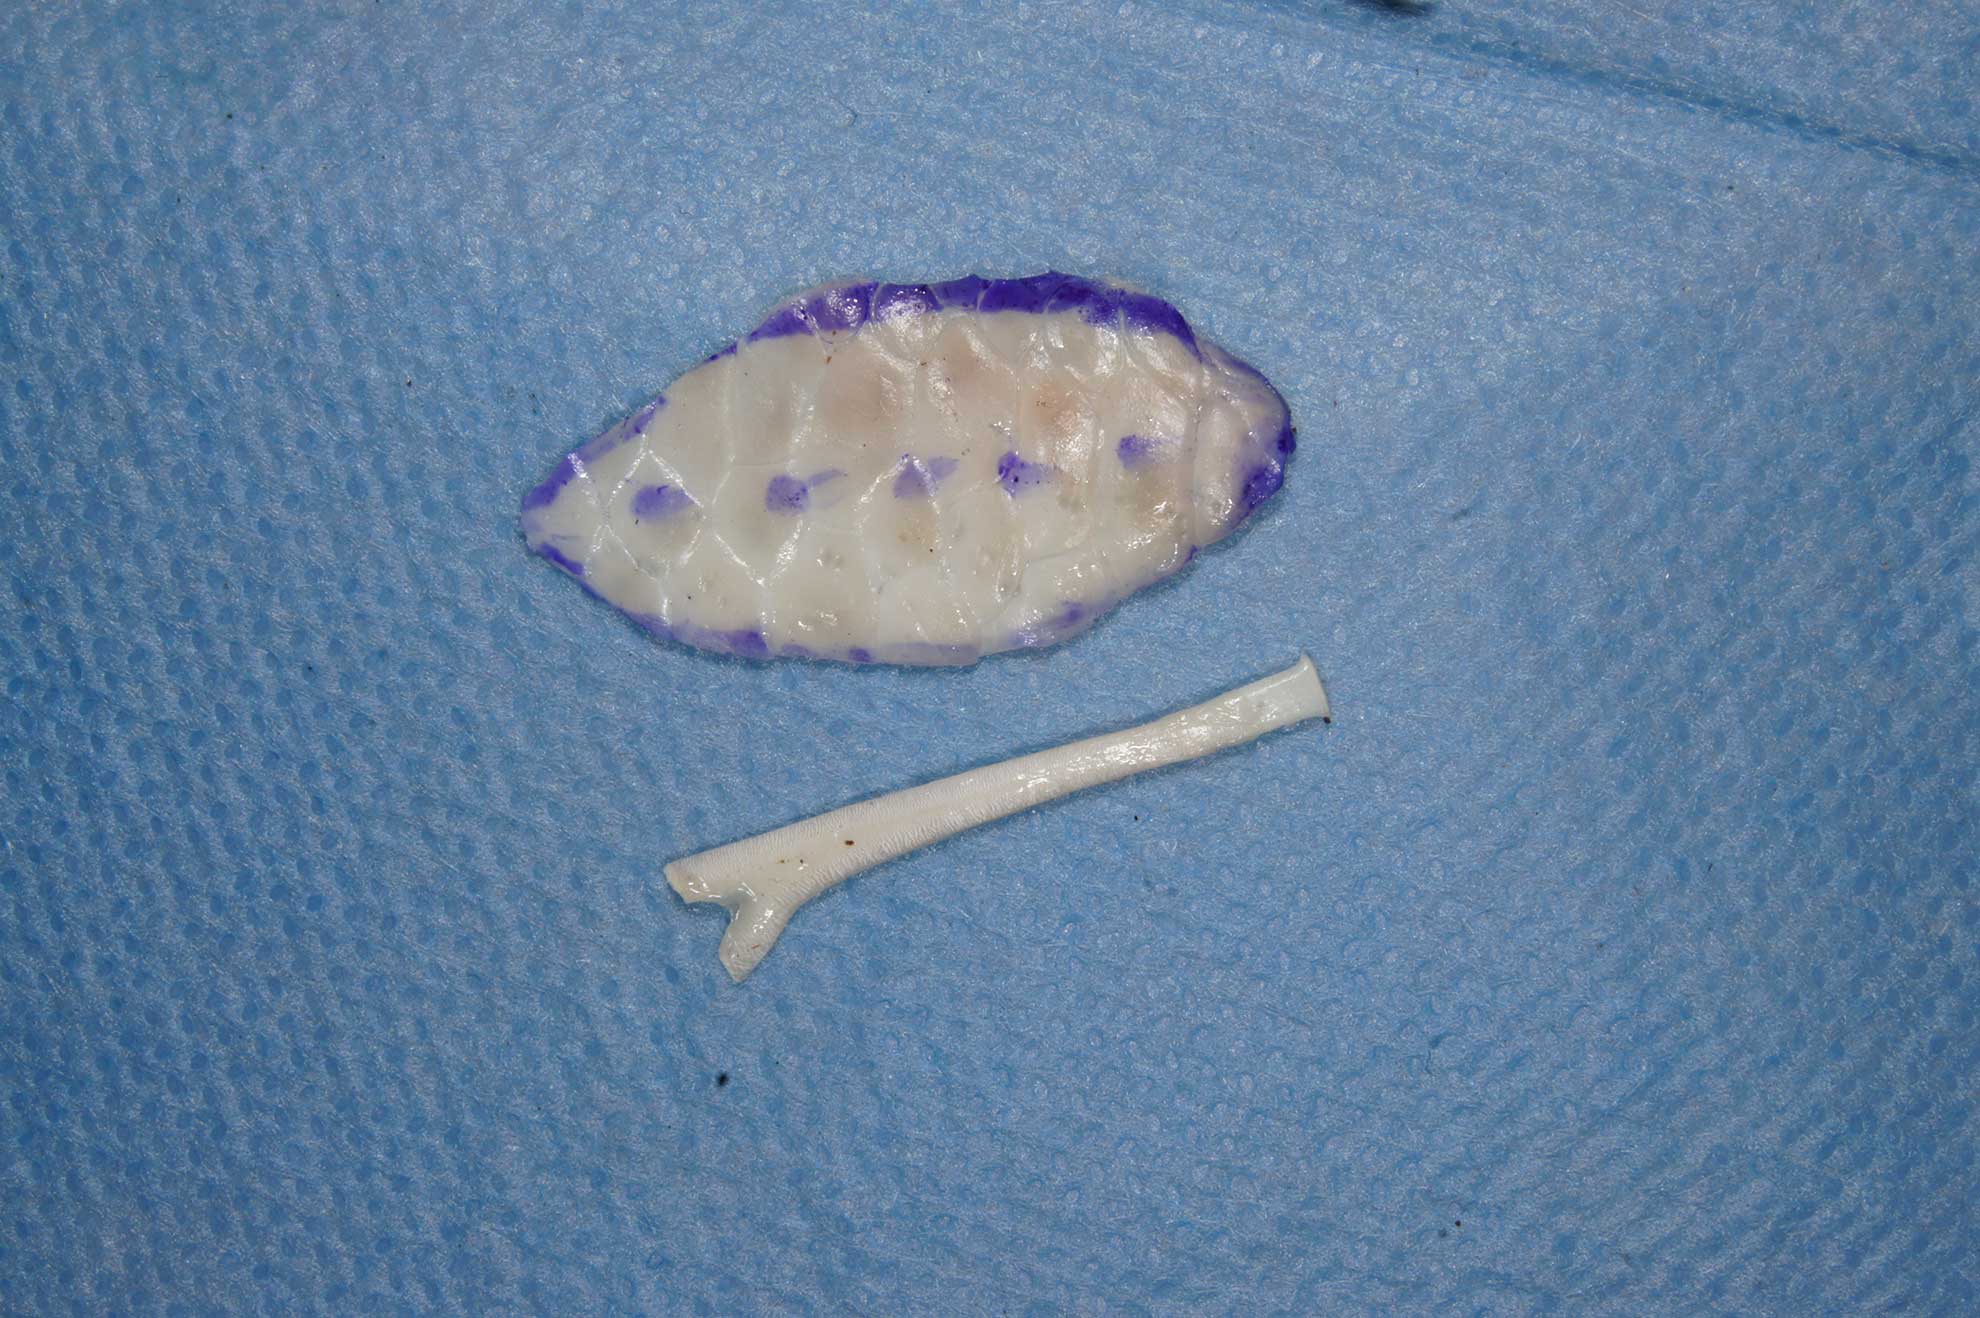
Version: Exposing the vessel plus taking of a skin graft and a tendon graft.
- Locate the common extensor tendon on the dorsal aspect of the tibia.
- Draw the projection of the neurovascular bundle.
- Draw elliptical figure over the projection of the neurovascular bundle, symmetrically to previously marked line
- Using Nr.11 Scalpel blade remove an elliptical skin graft.
- Excise the common extensor tendon.
The importance of the commitant veins. During preparation the small and gentle veins must be preserved, instead removed together with adventitia. Of course, several damages will be happened on the first attempts. But the student is guided to note and care small, fragile structures, develop precise, atraumatic technique and intuition. The elements of skill, gained at the first and basic task, will be useful in later educations, starting to work with structures below 0,5 mm in diameter.
- Expose the neurovascular bundle, perform your exercises.
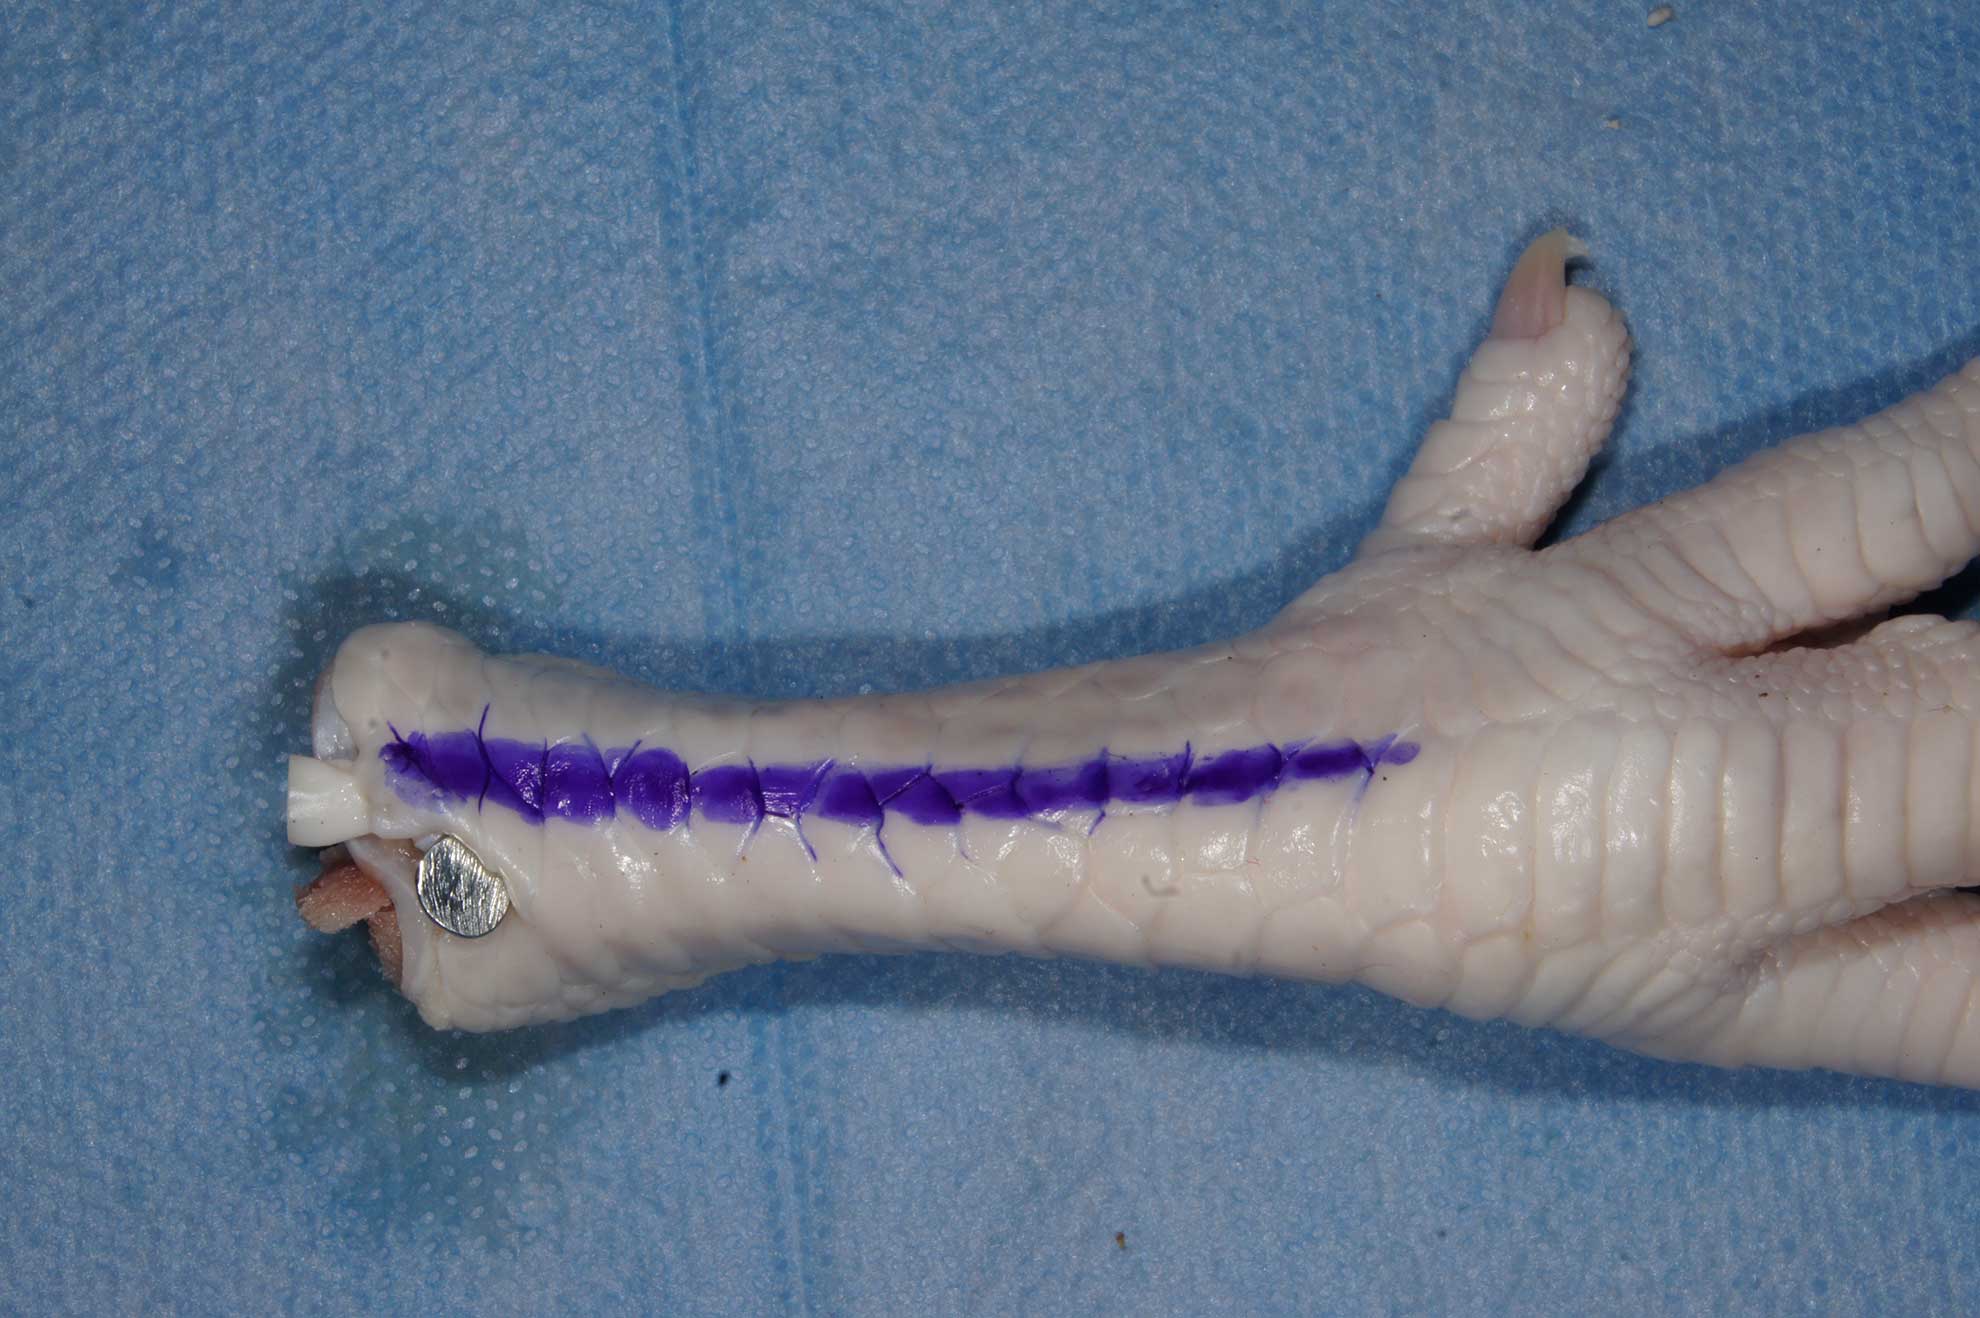
III. Constructing of an anastomosis.
Warming up.
To spare expensive suture material, we recommend a set of exercises before to the construction of an real anastomosis.
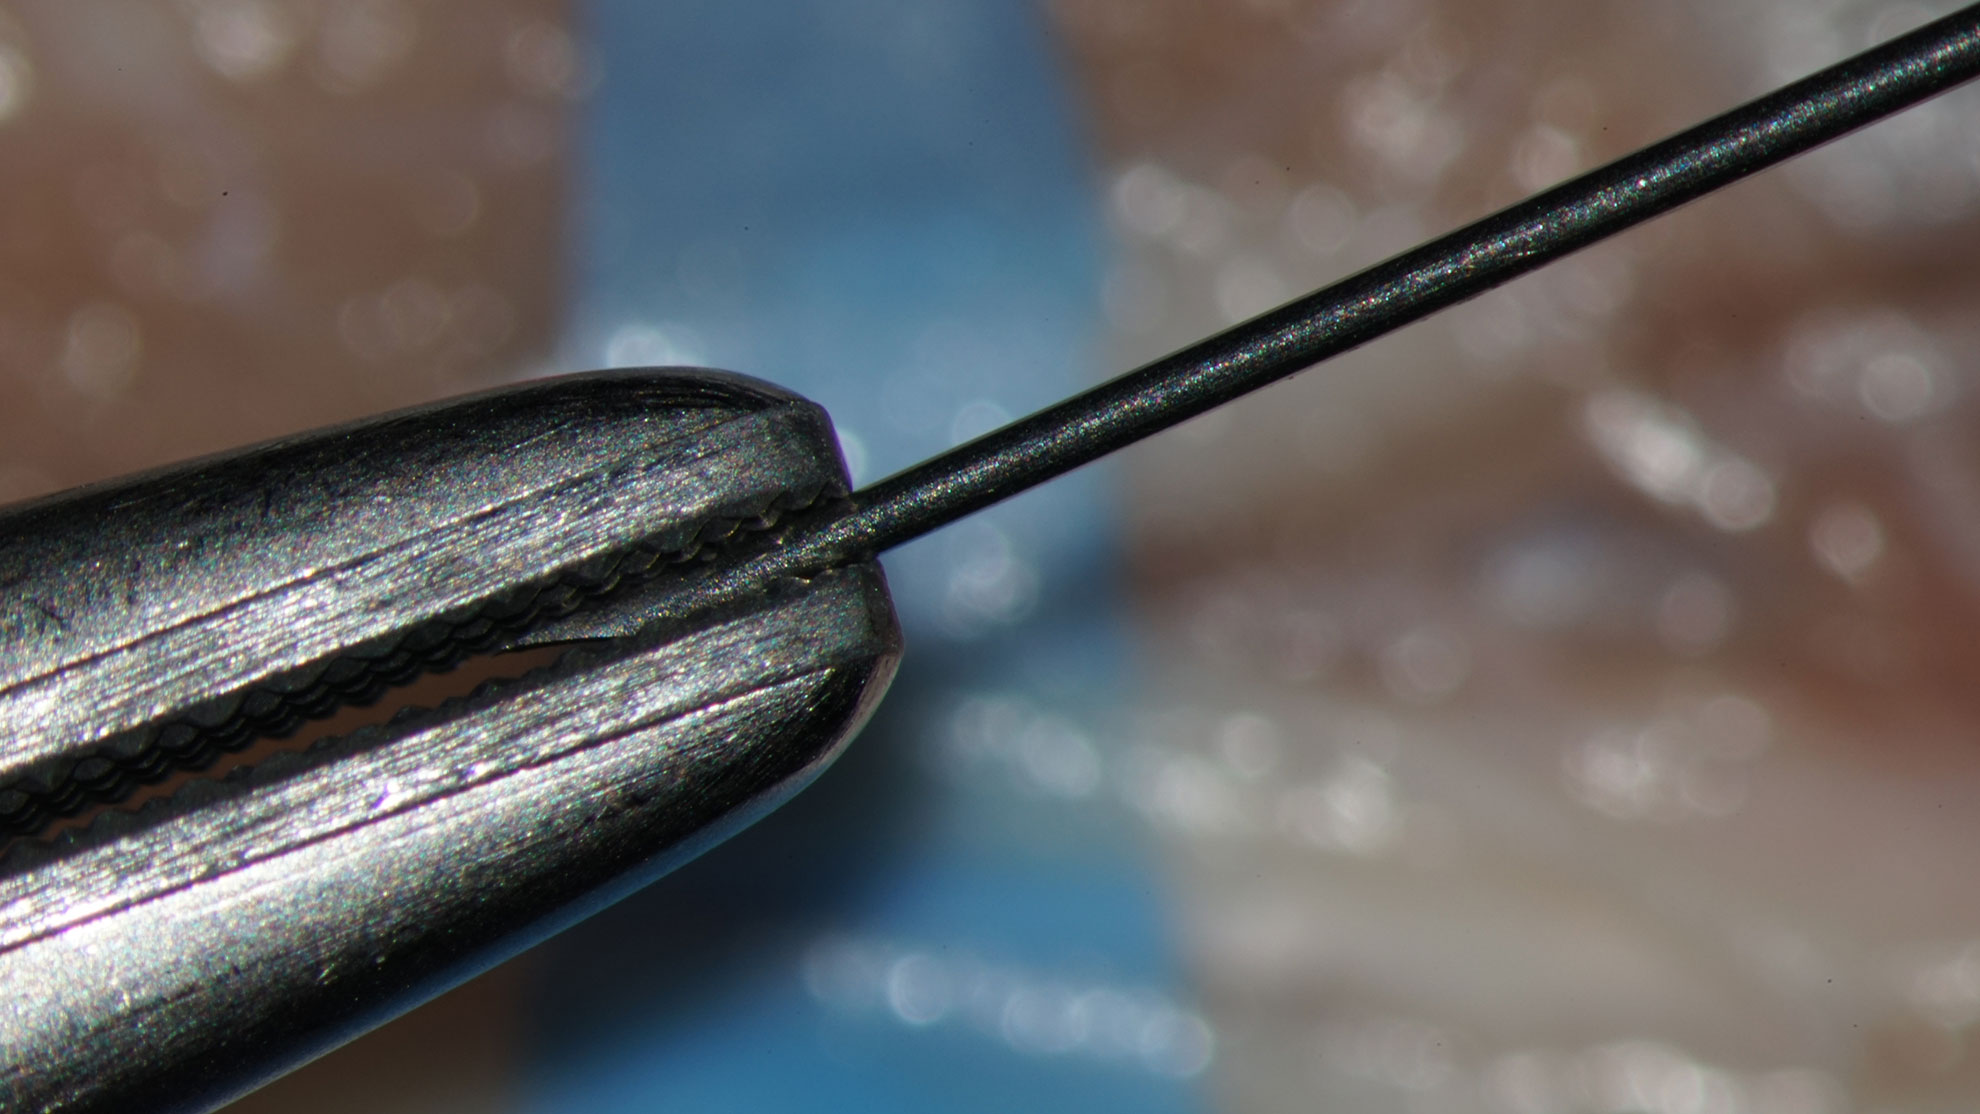
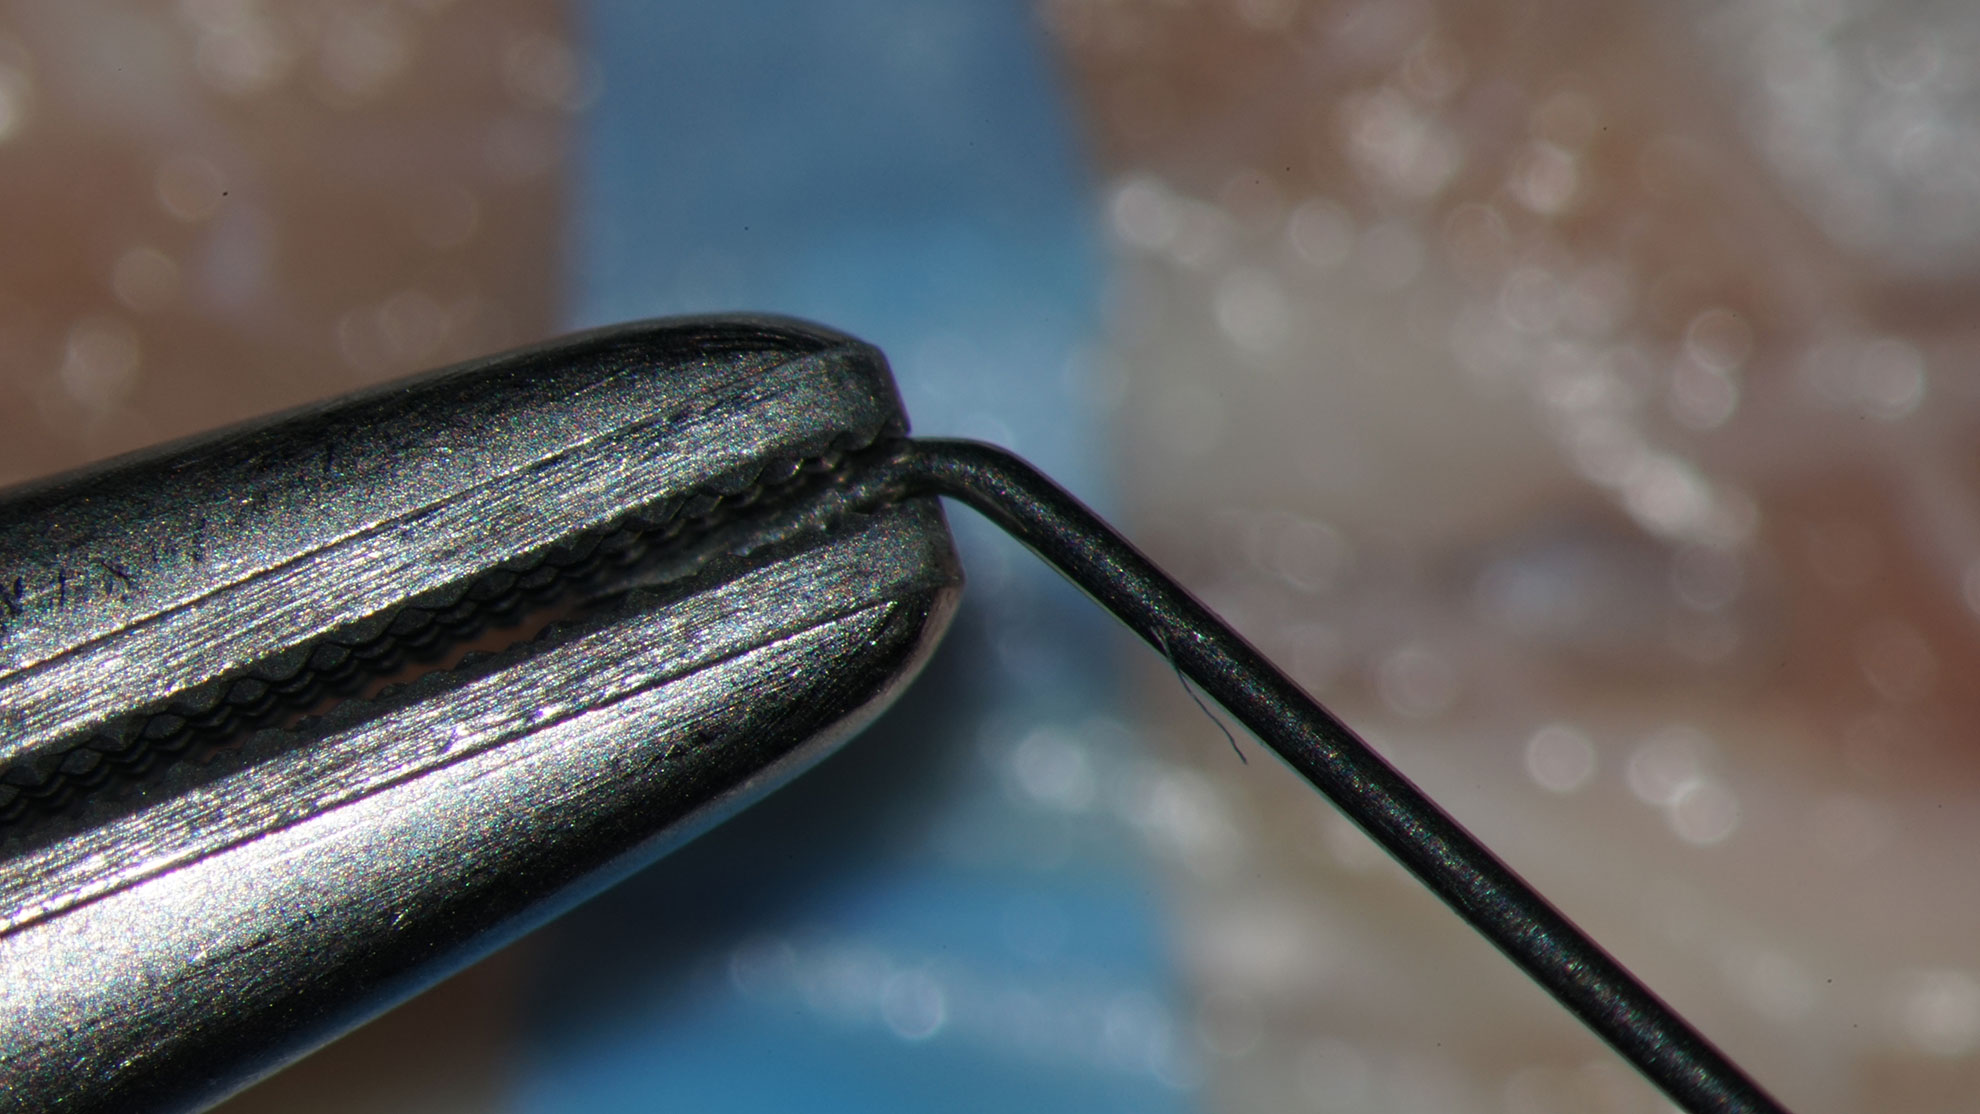
- Penetrate the vessel end with the one branch of your forceps 10 times;
- Using a spared needle from the atraumatic suture (when the thread- is used for other purposes or accidentally abandoned) to entry the lumen and insert in the vessel wall, mimicking the maneuver of the suture placement – 10 times, checking accuracy and needle/vessel control, maintaining the optimal point of the insertion of the needle;
- Repeat the maneuver from the outside of the vessel – (more difficult in small size vessel, but essential) – 10 times.
General considerations.
- The anastomosis has comfortable and uncomfortable positions for the placement of sutures.
- The front side of the anastomosis is comfortable
- The backside of the anastomosis should be considered to be uncomfortable
- The uncomfortable positions must be closed first or the situation must manage in the way to make uncomfortable positions comfortable.
- The proposed technique divides the anastomosis in upper two thirds and lower third. The sutures between upper part and lower third are considered to be the almost uncomfortable and must be inserted first.
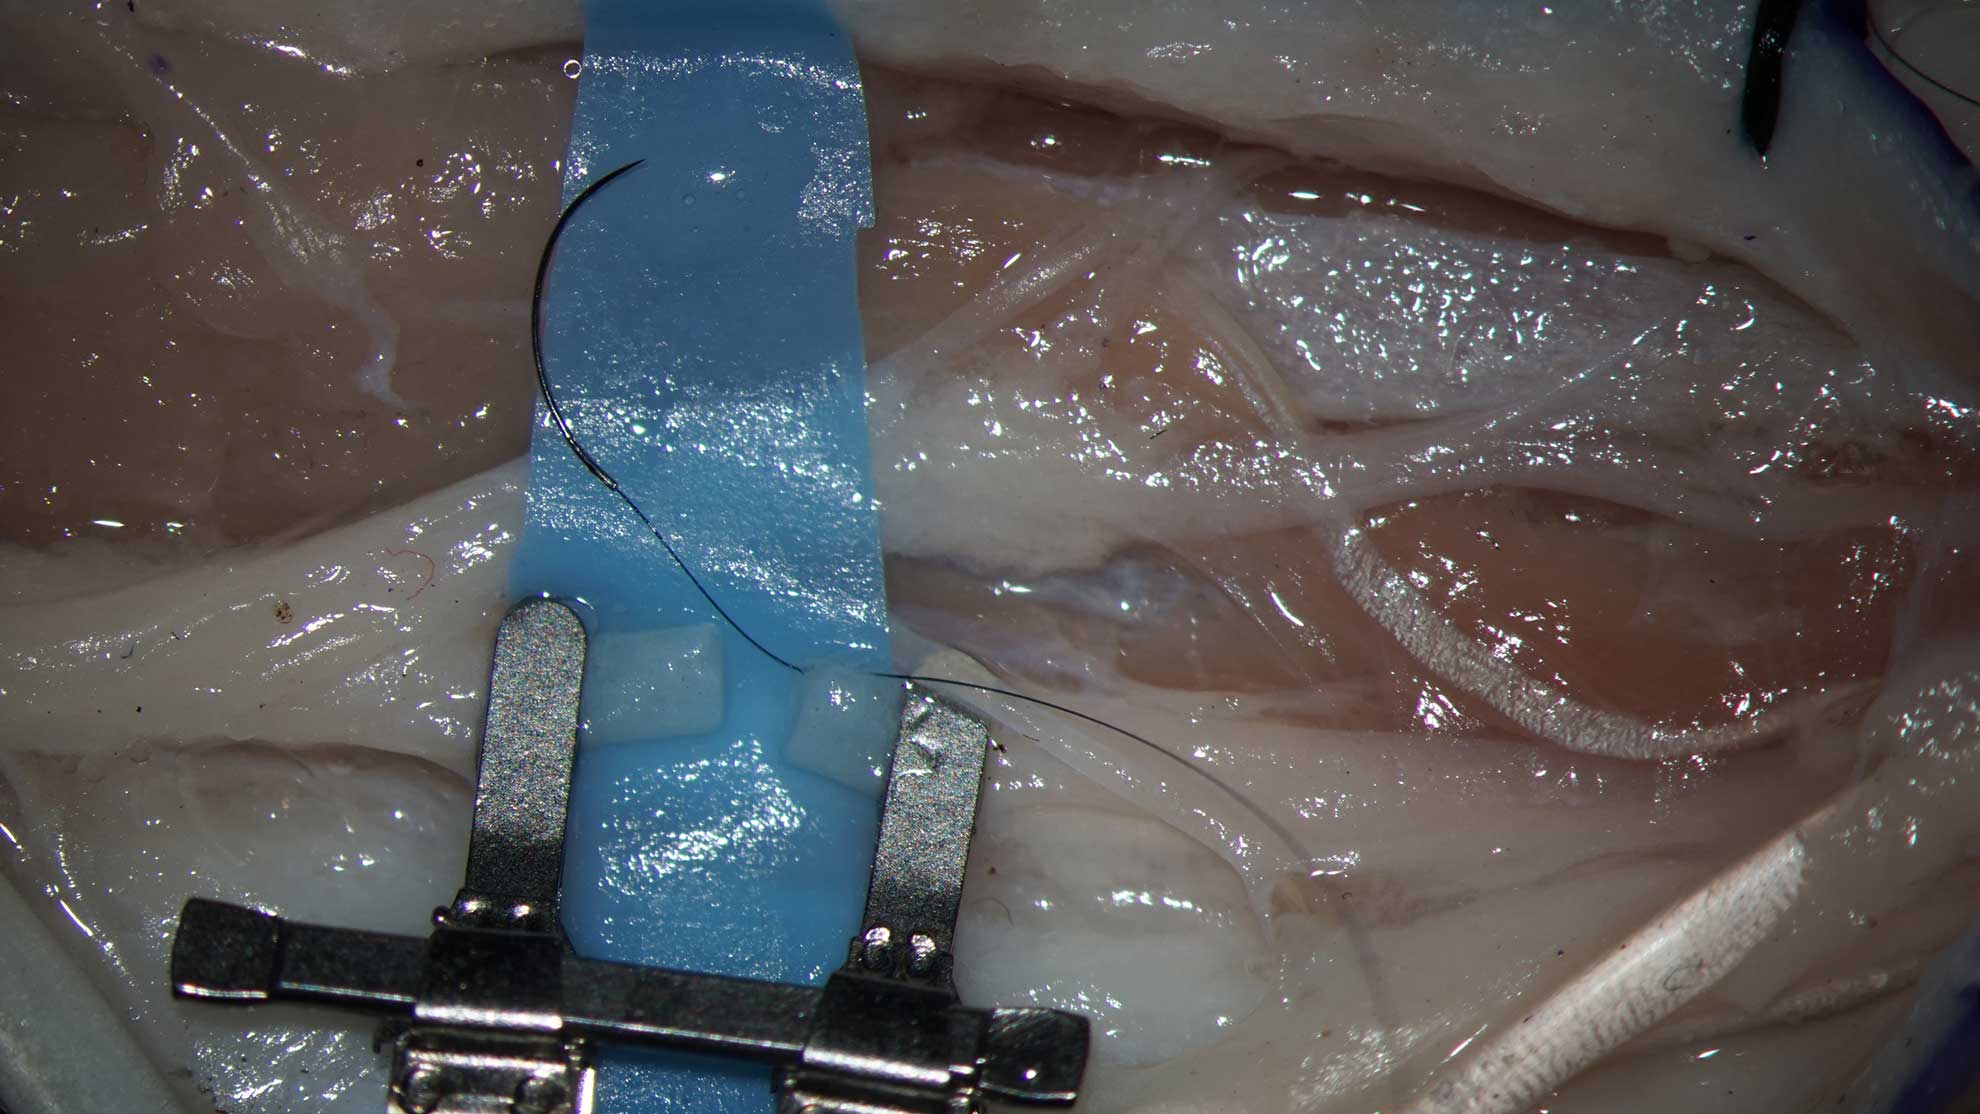
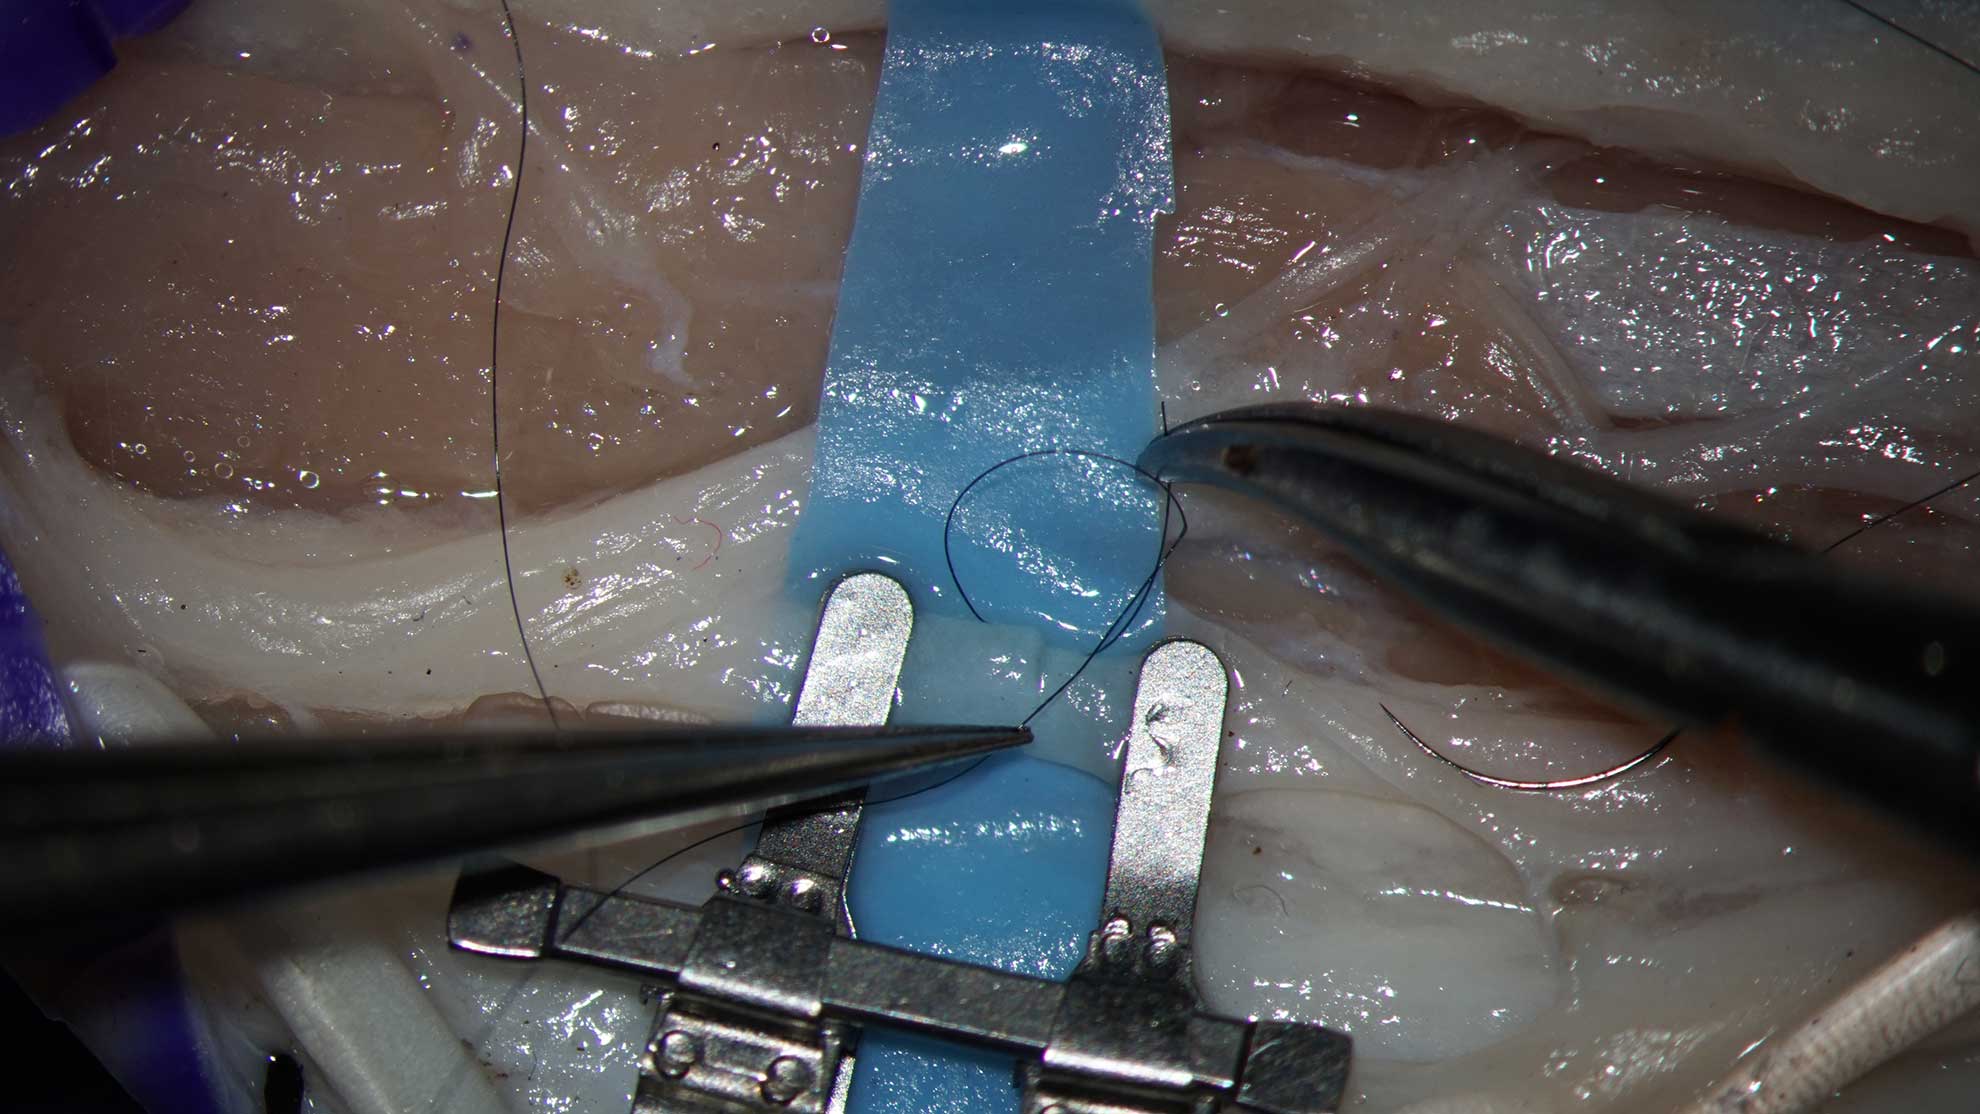
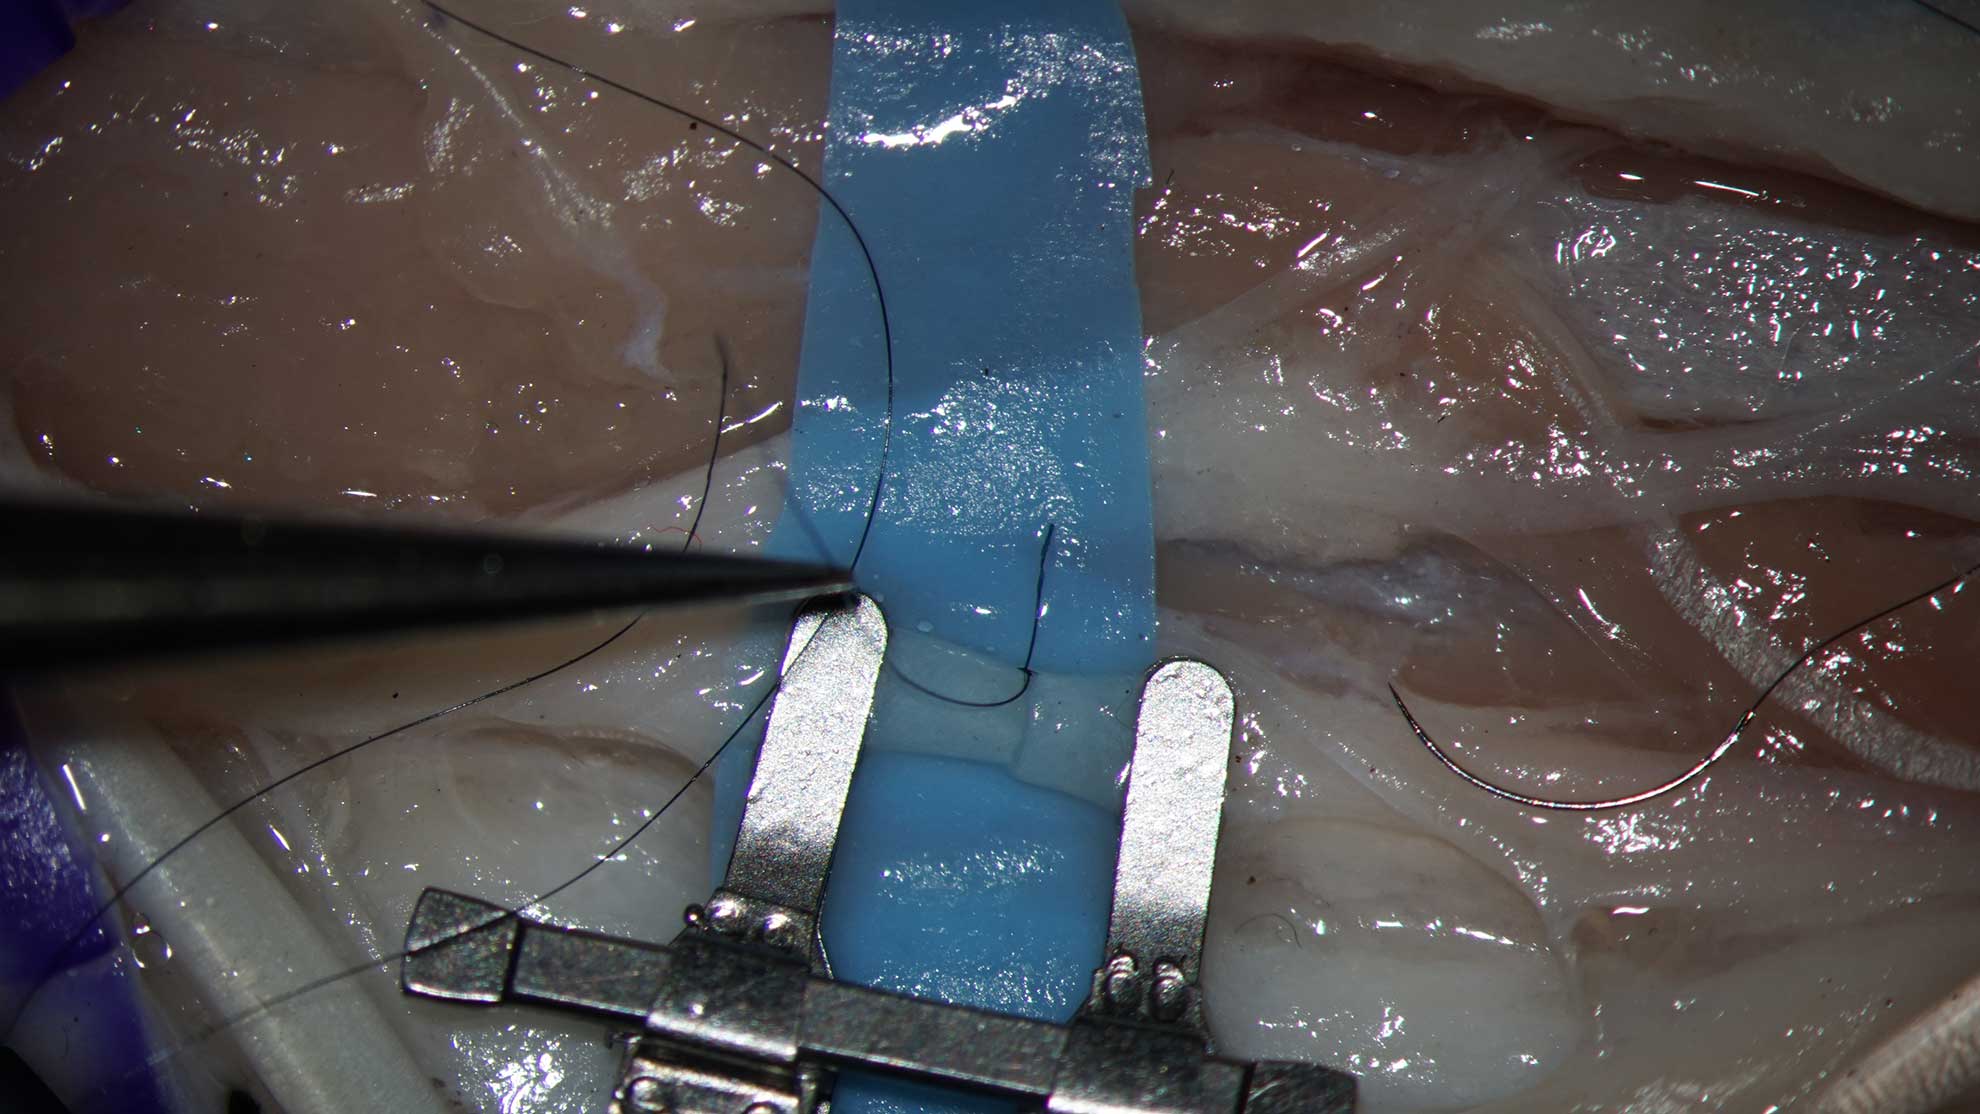
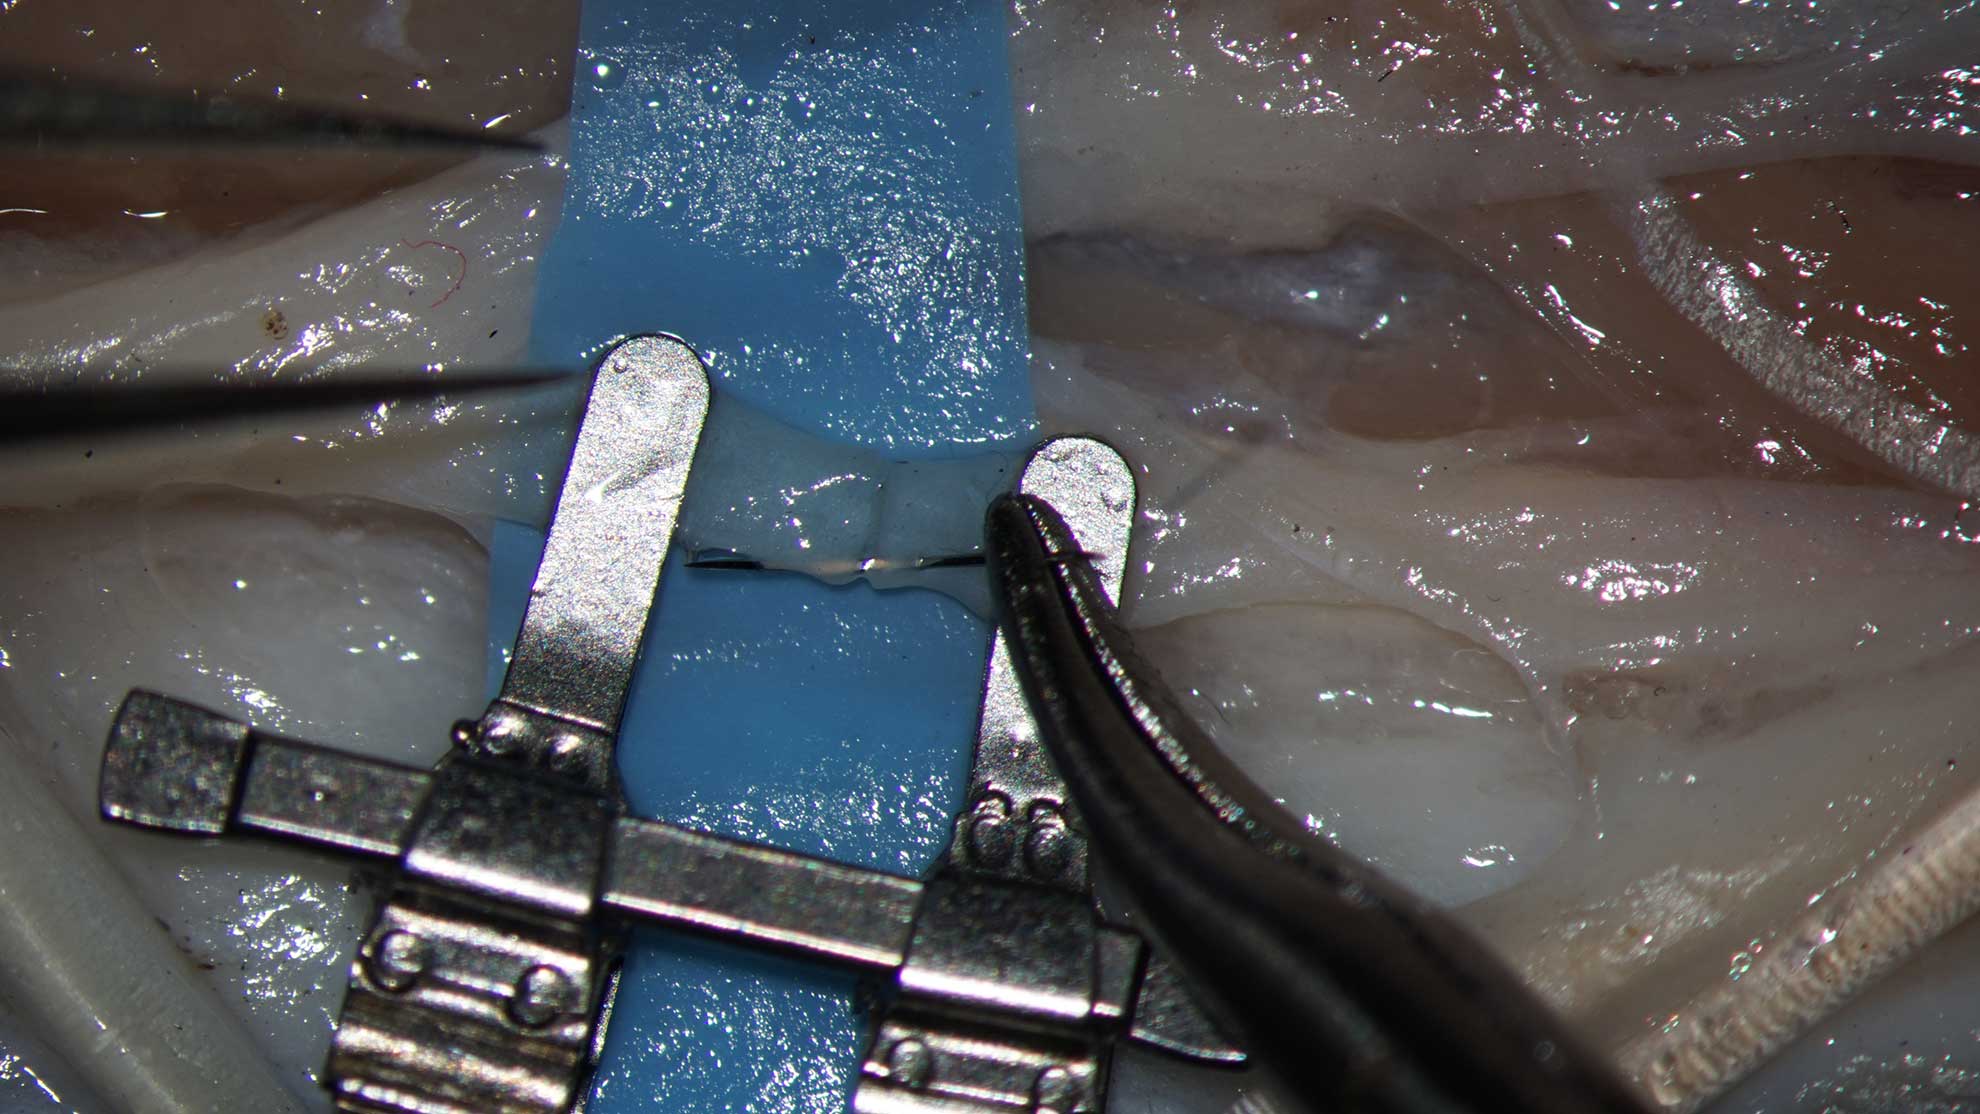
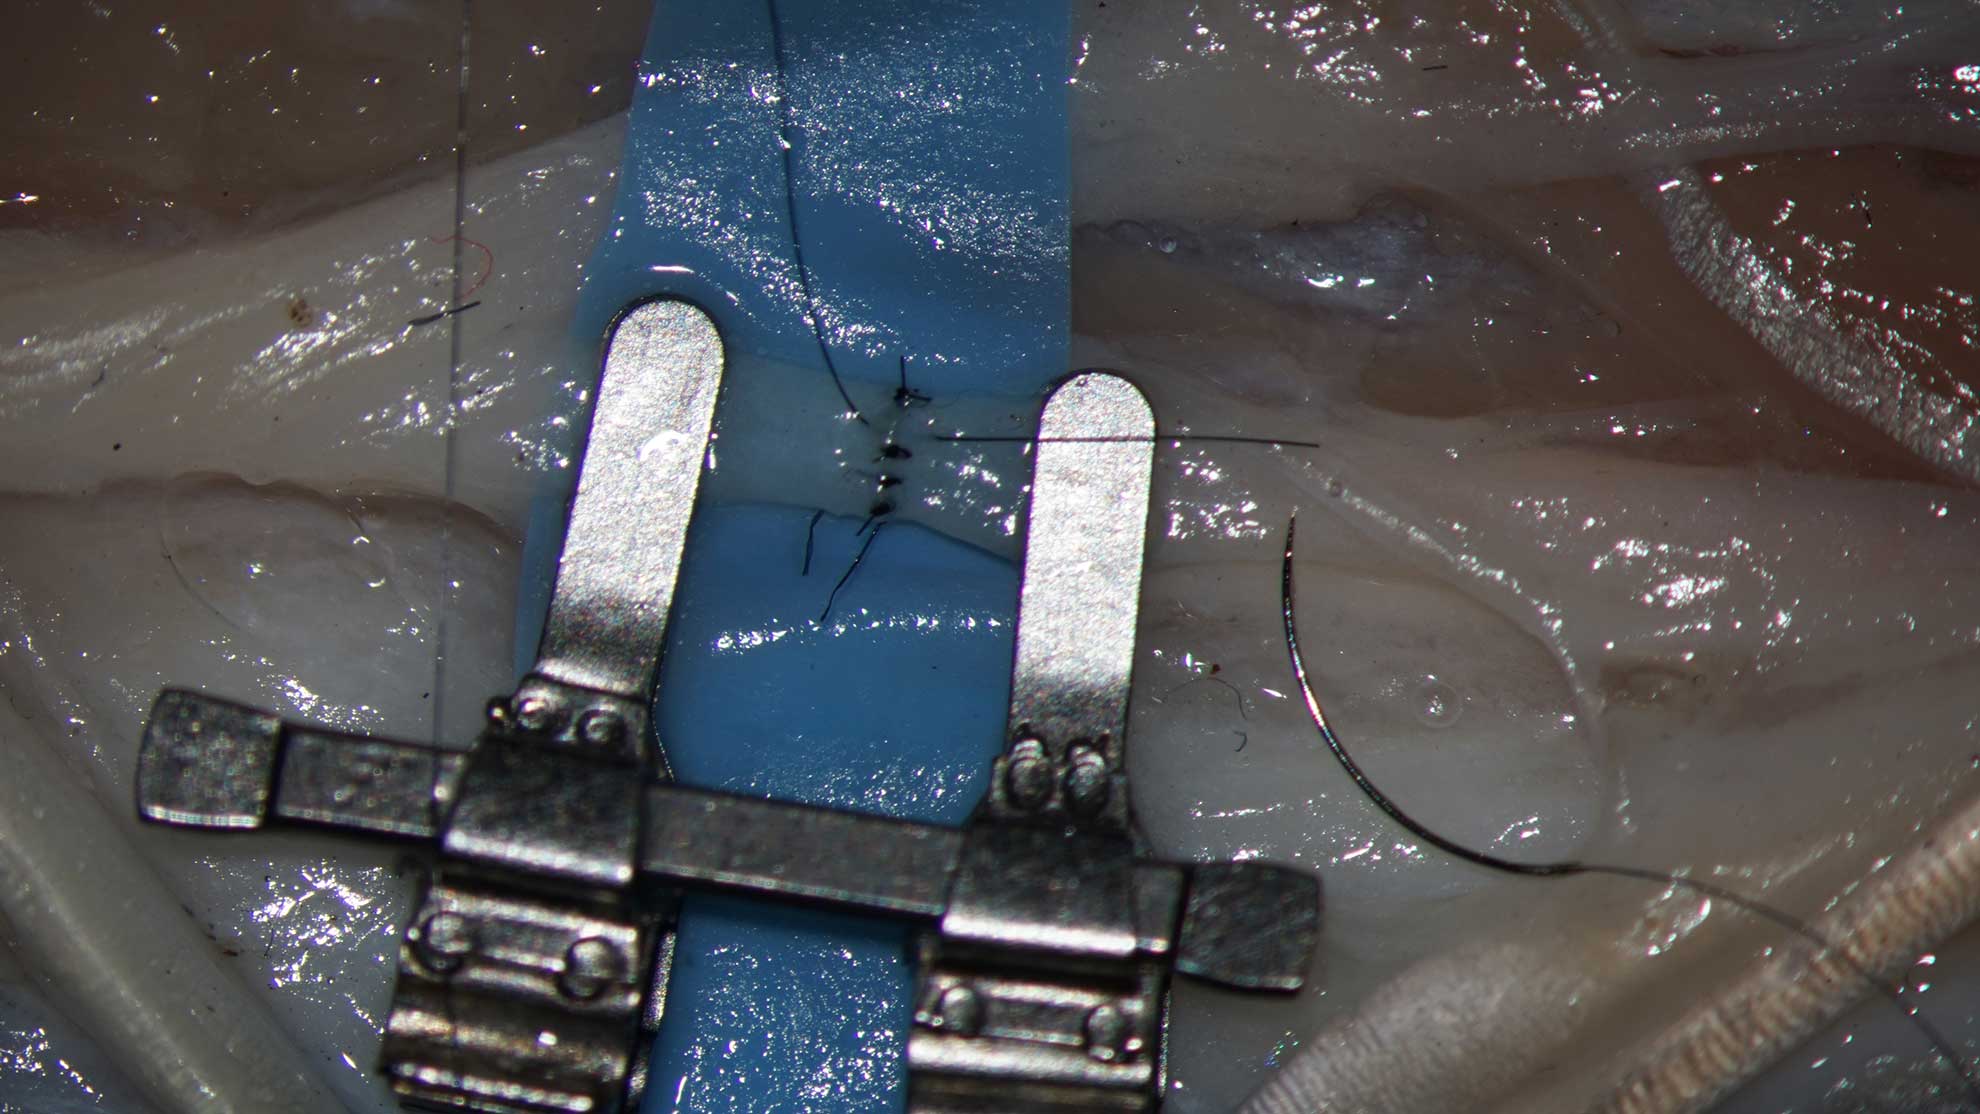
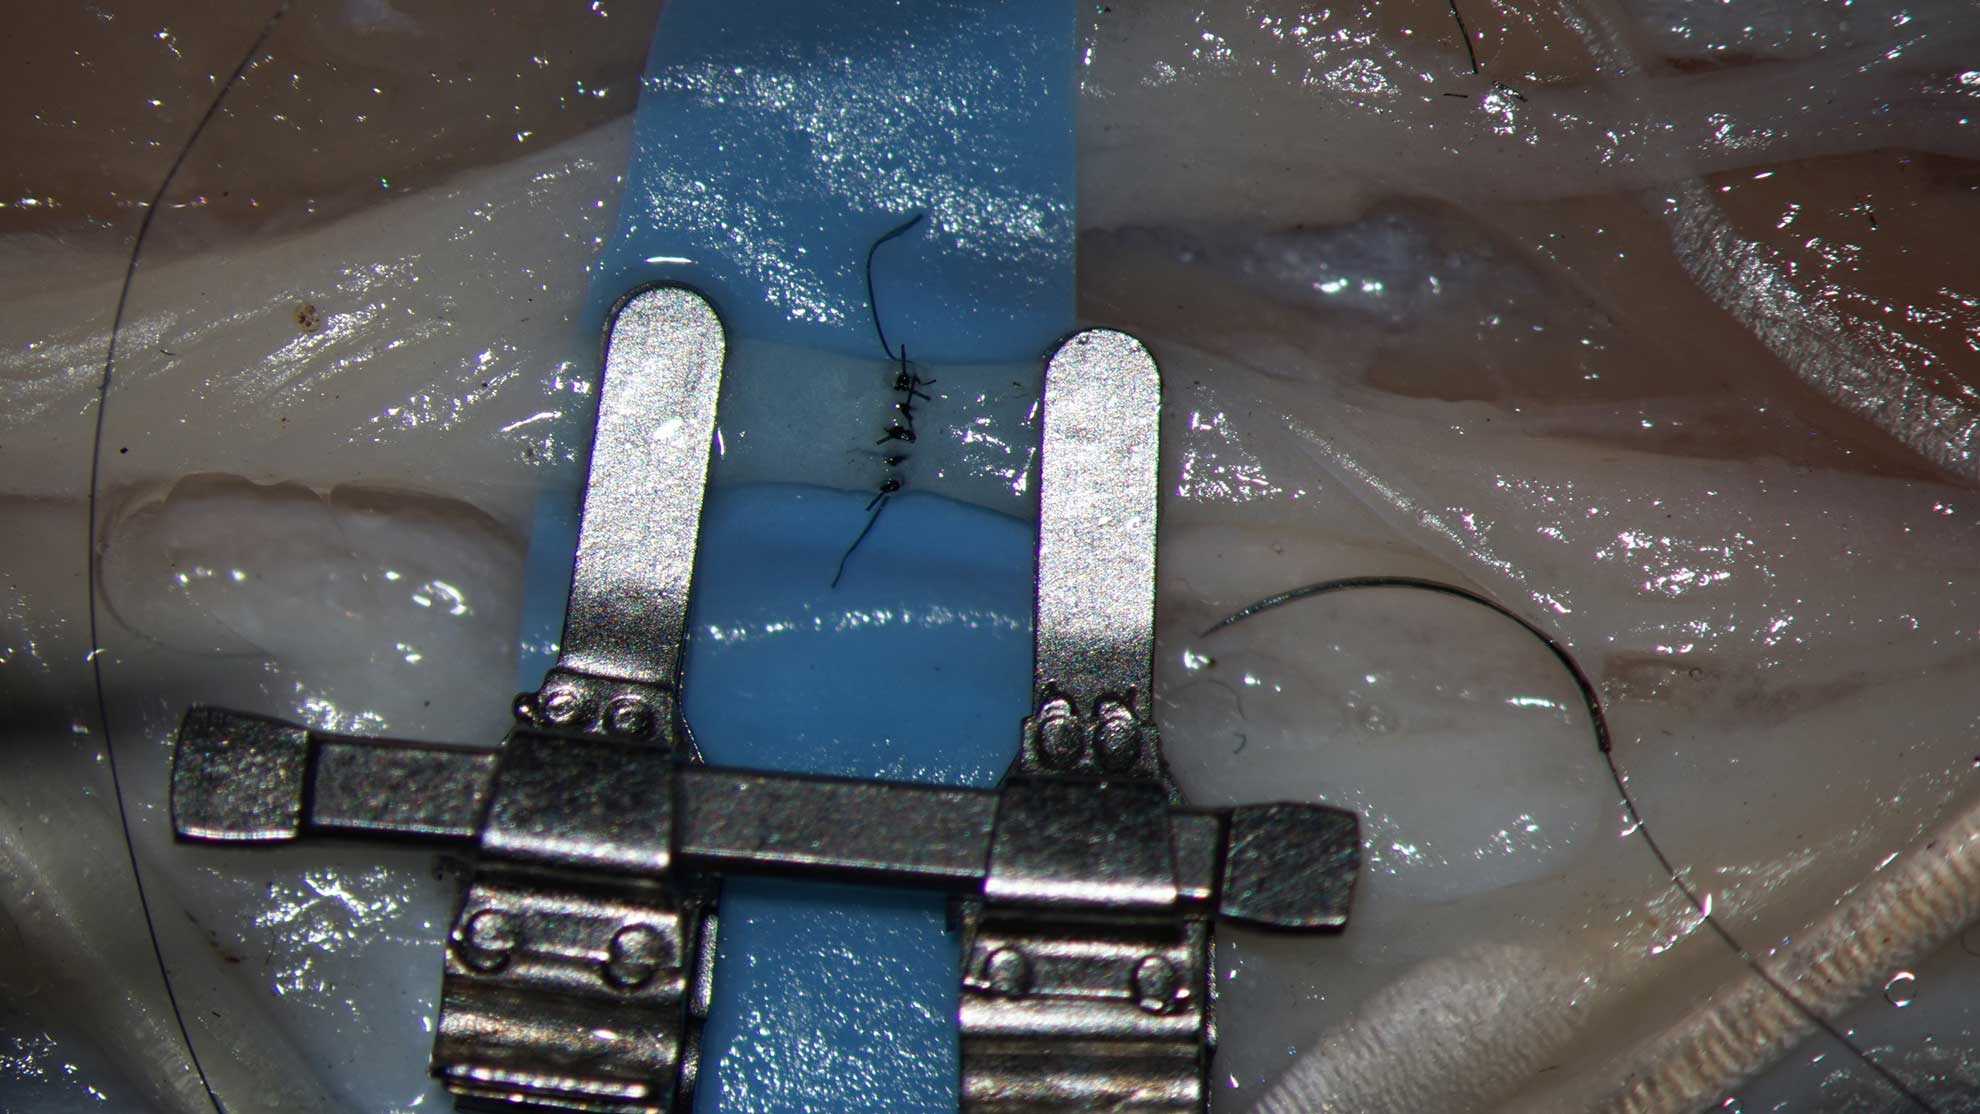
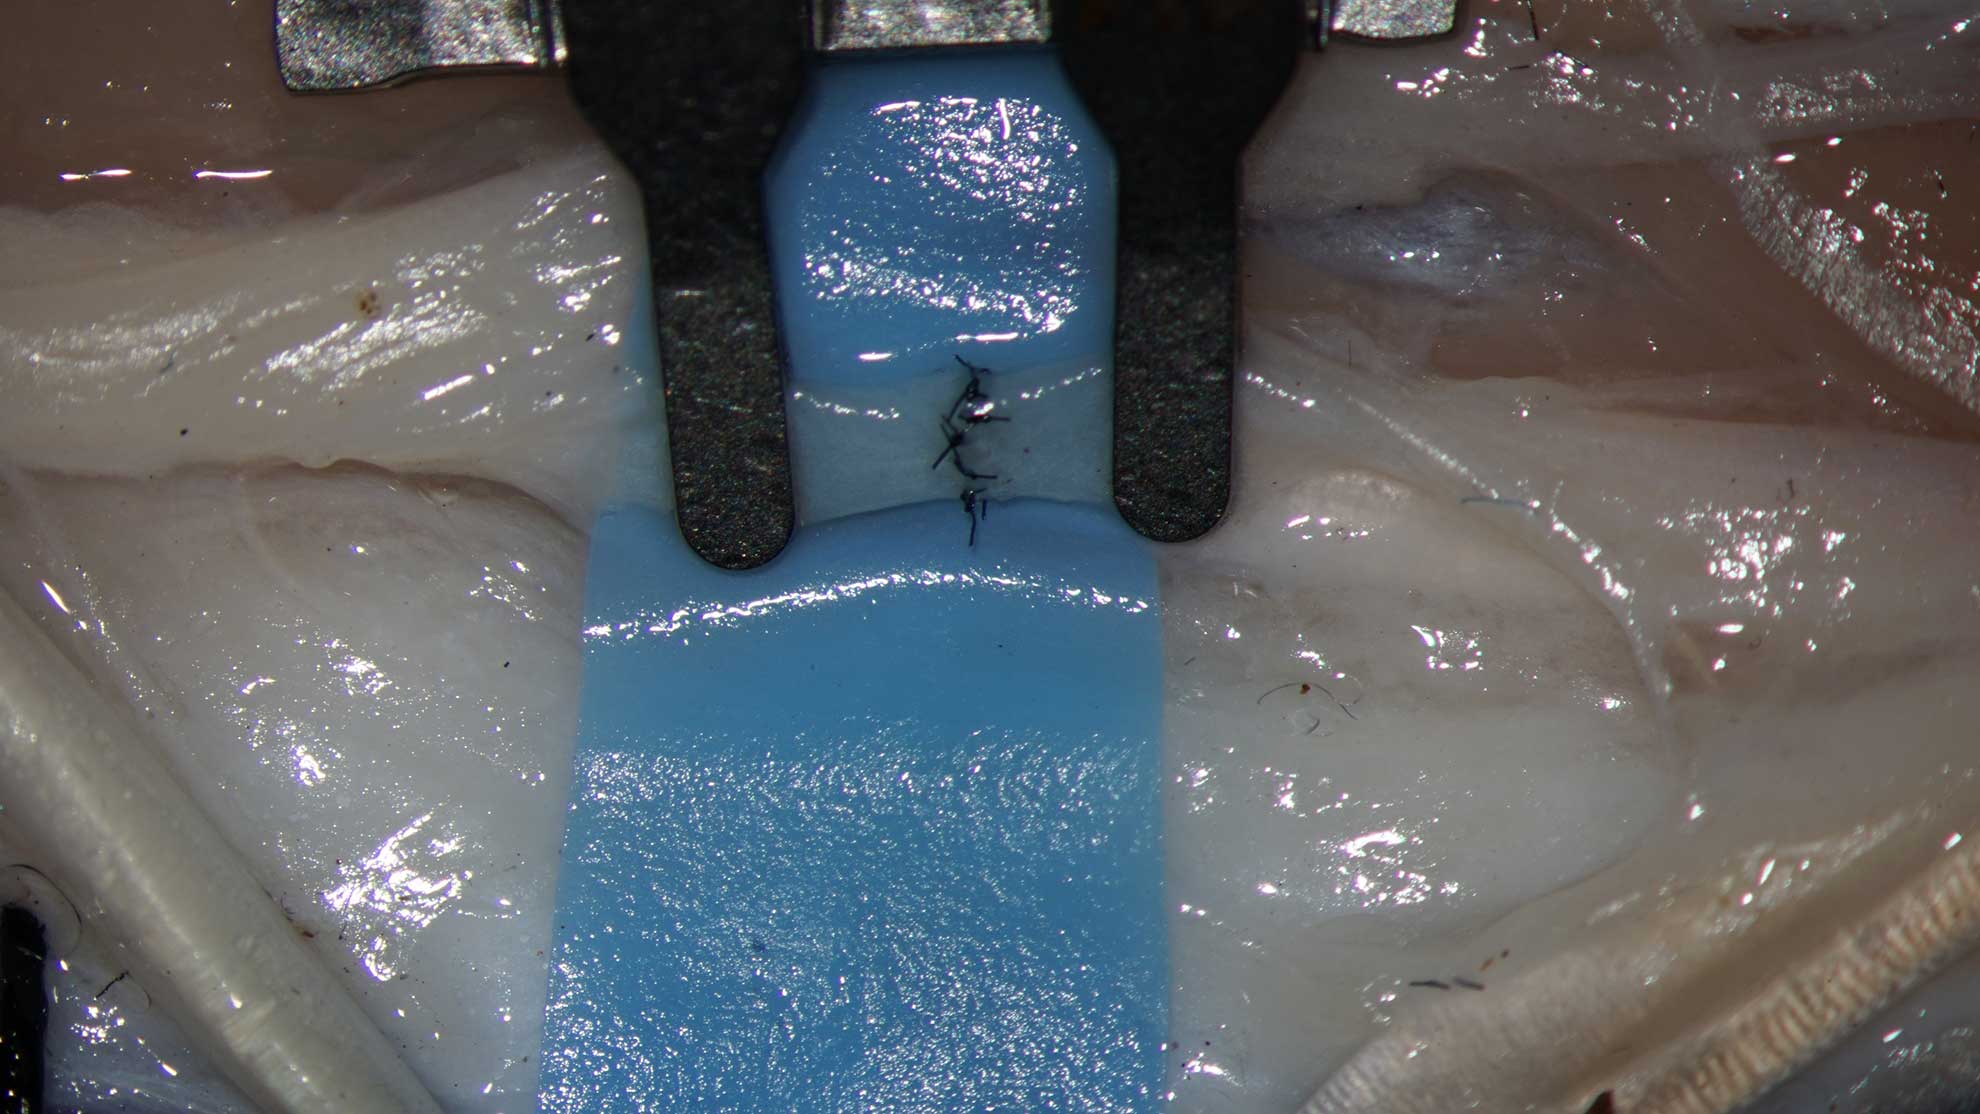
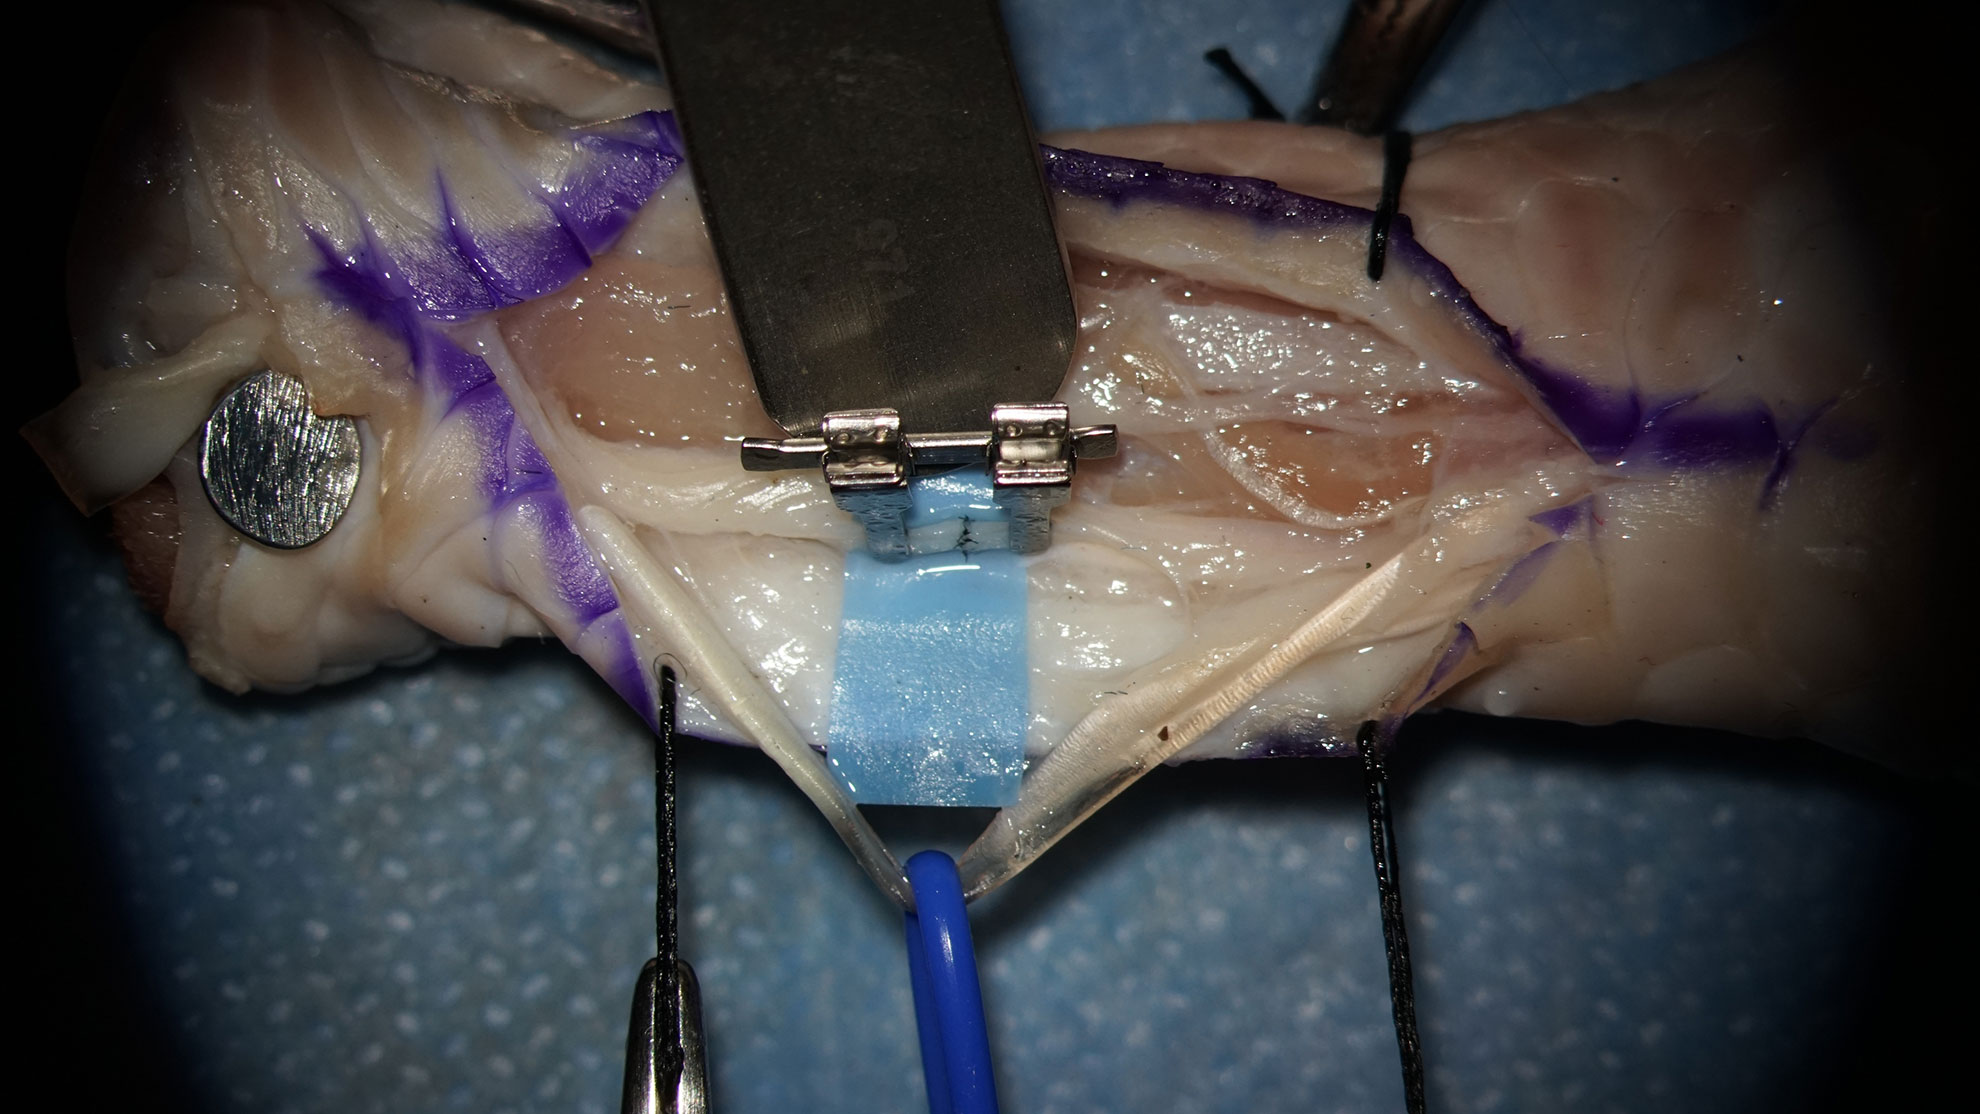
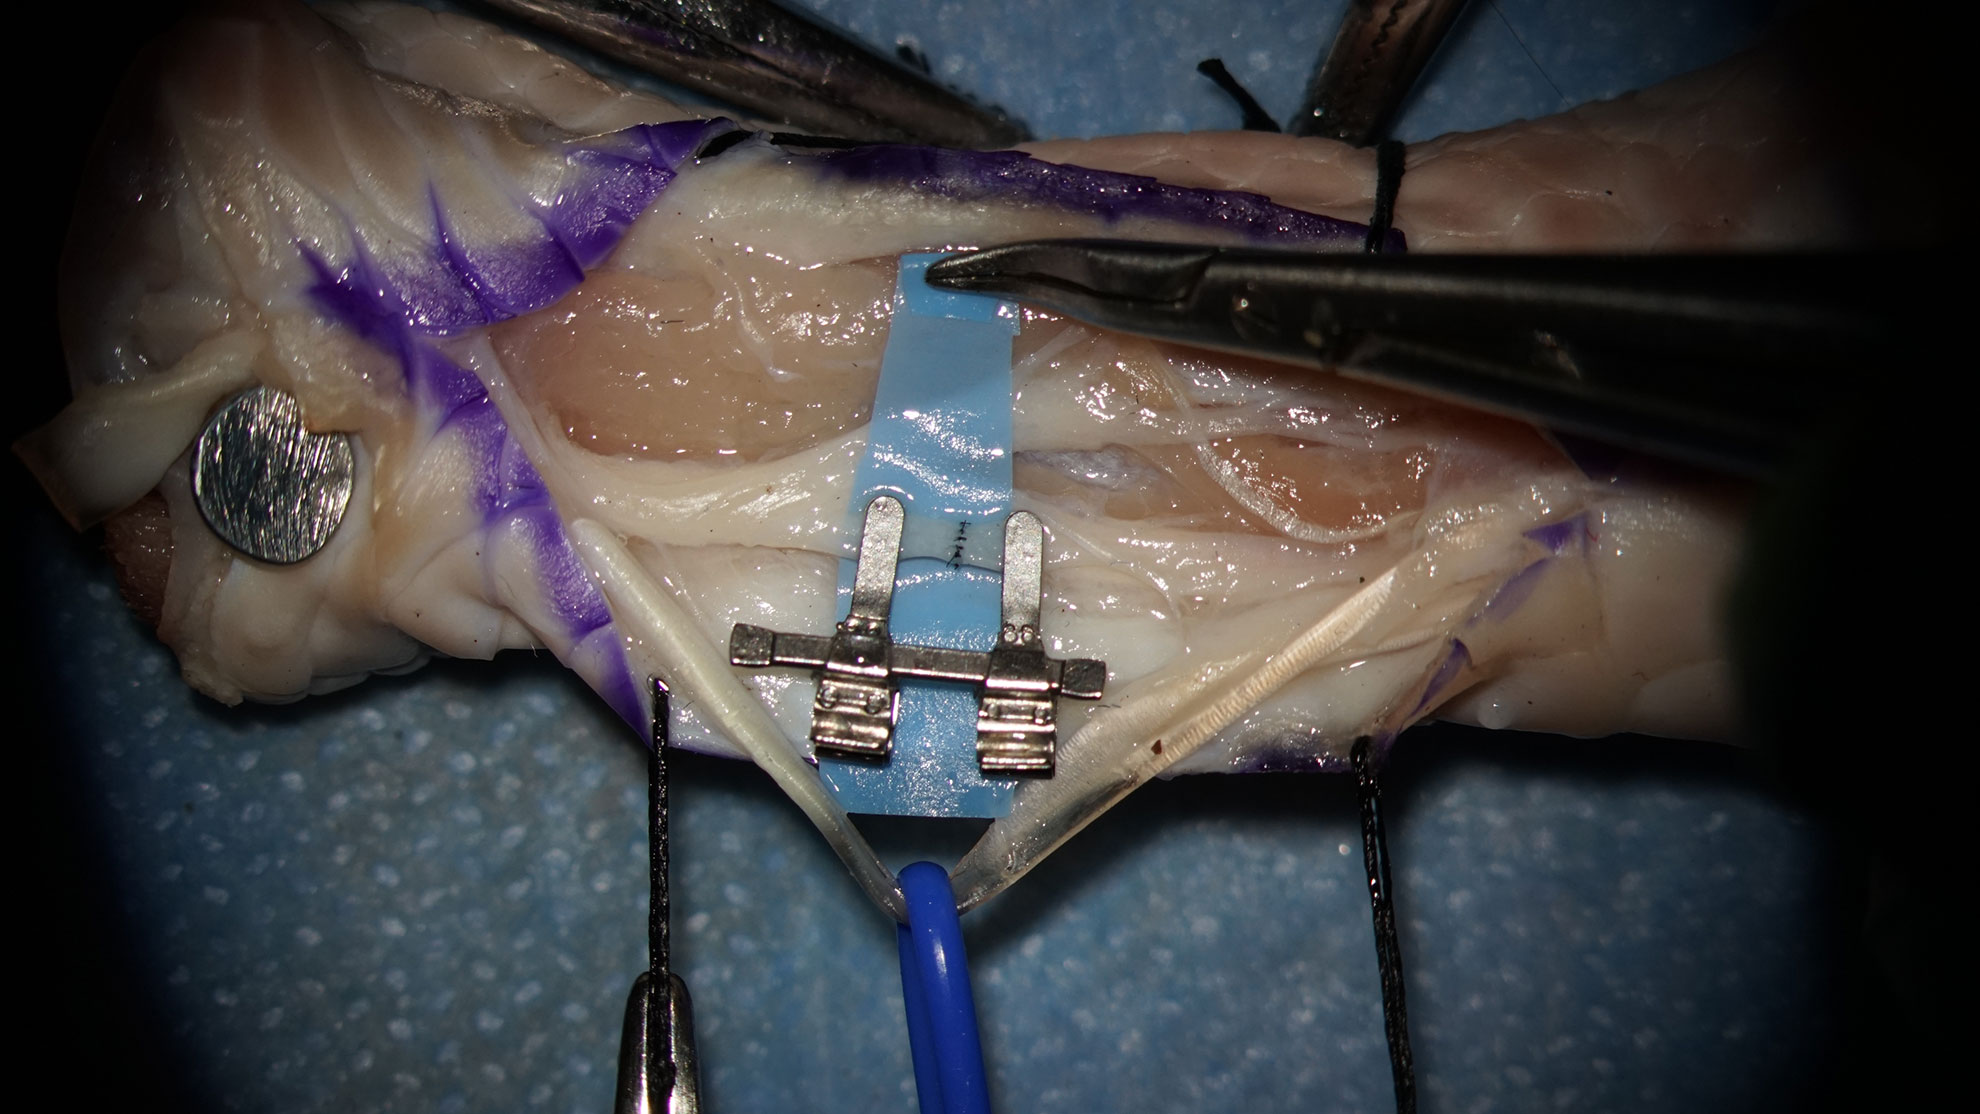
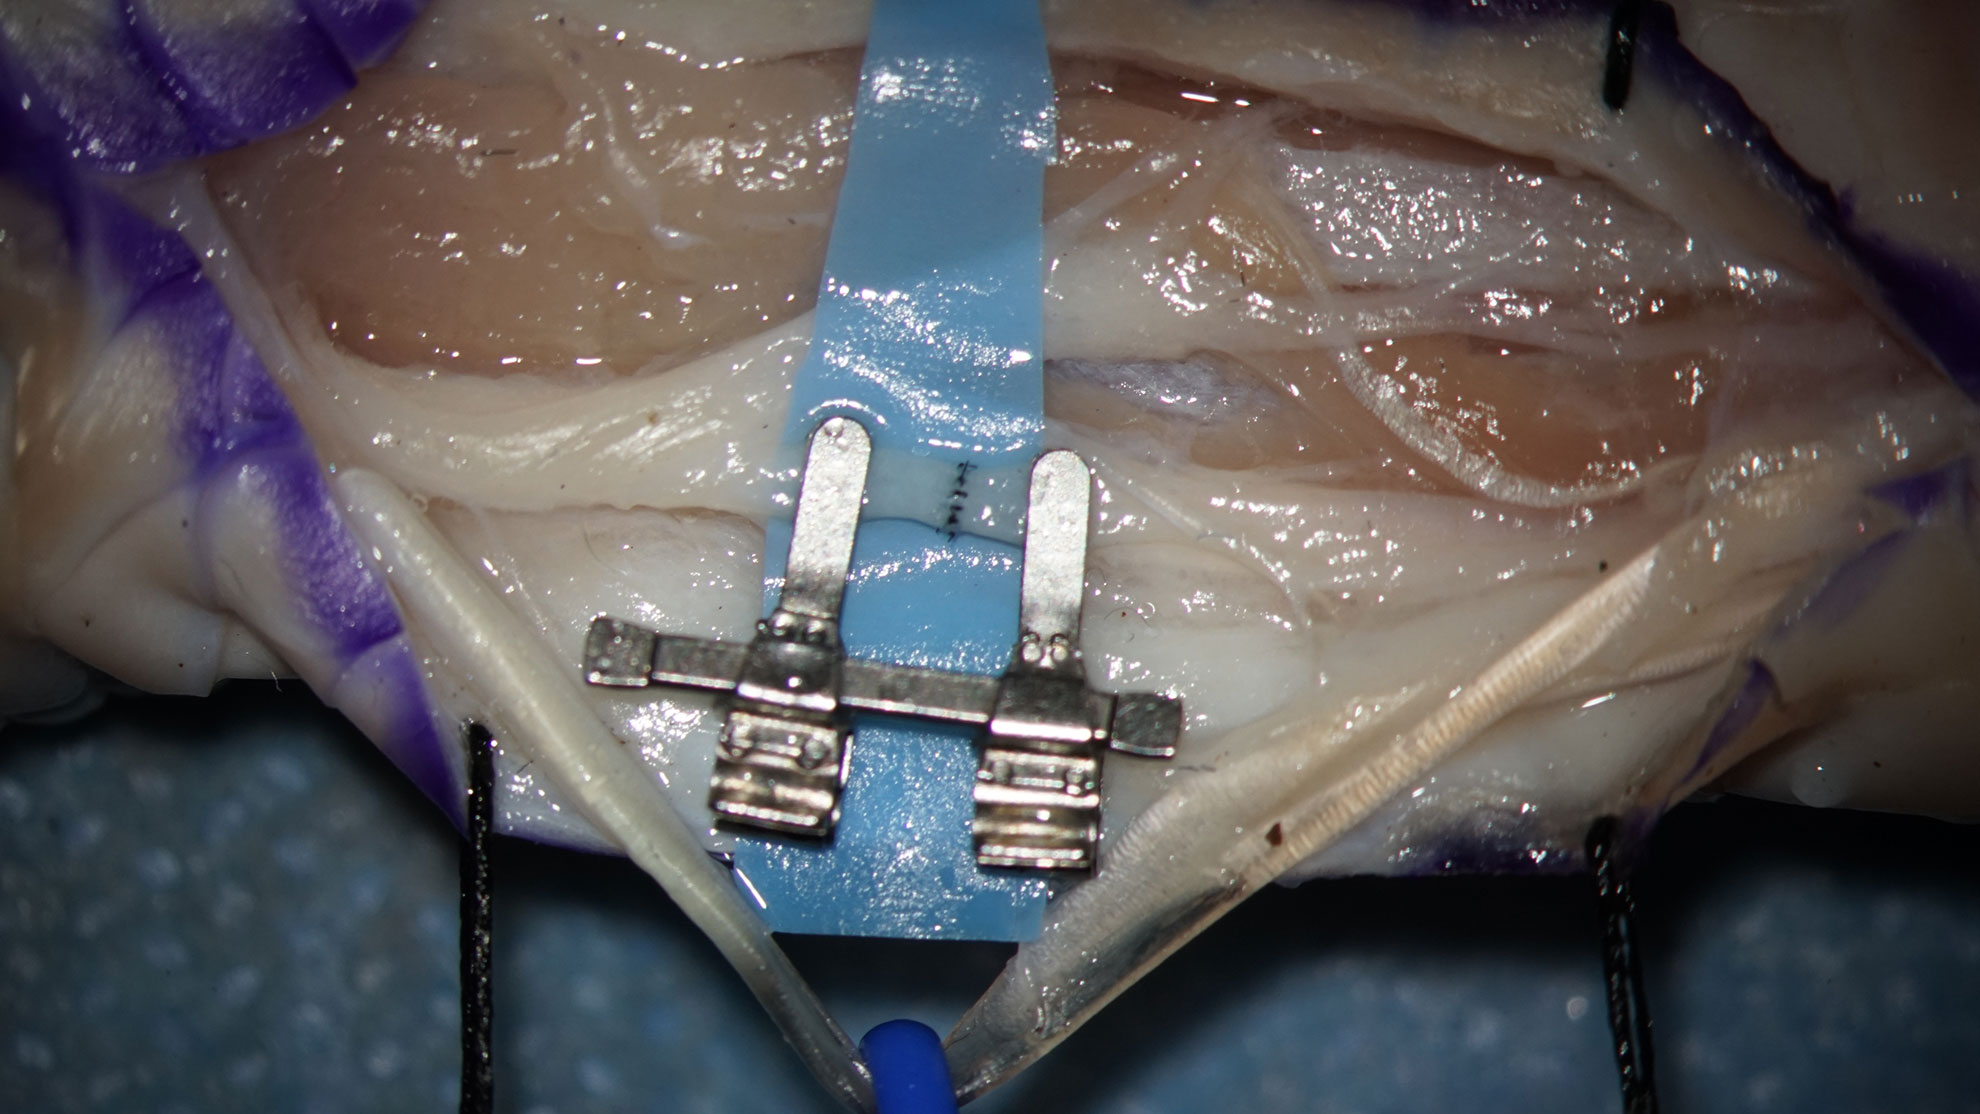
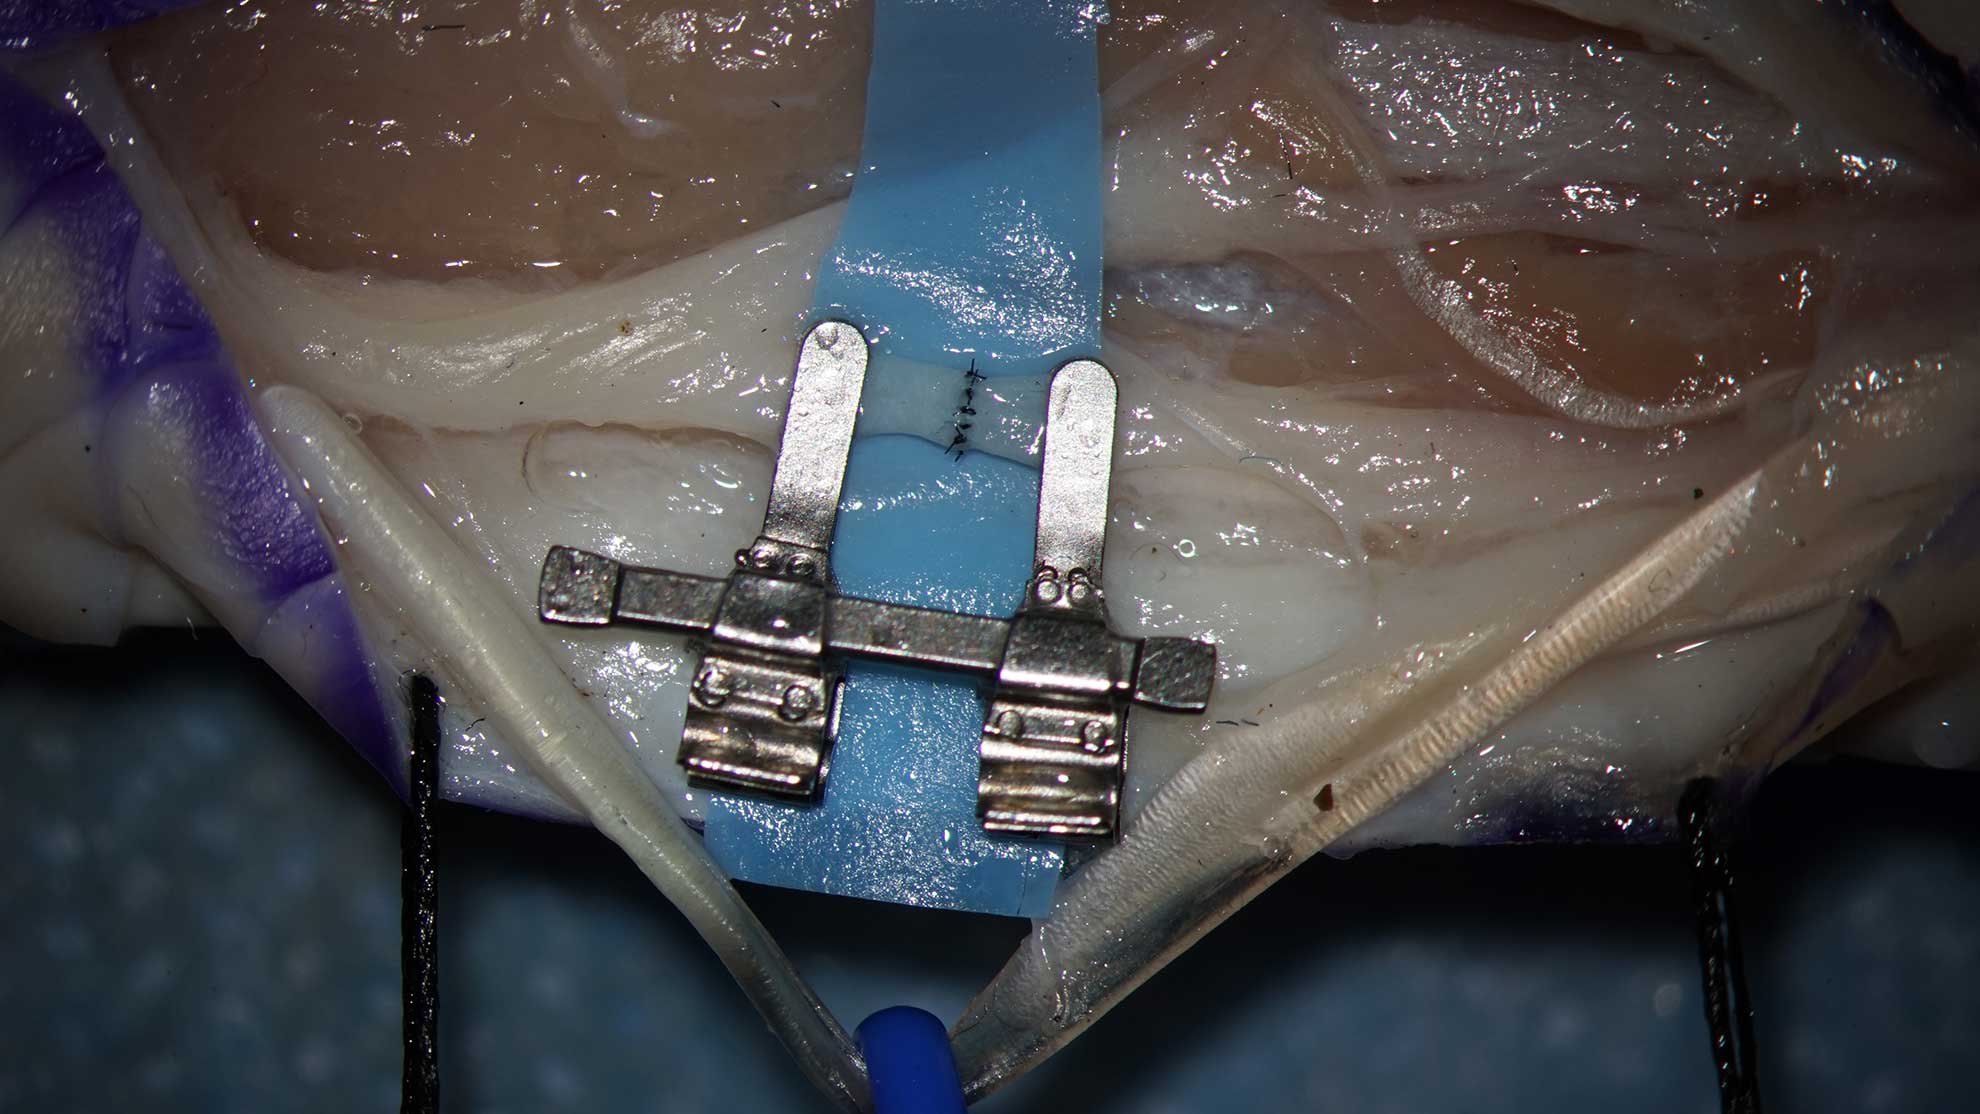
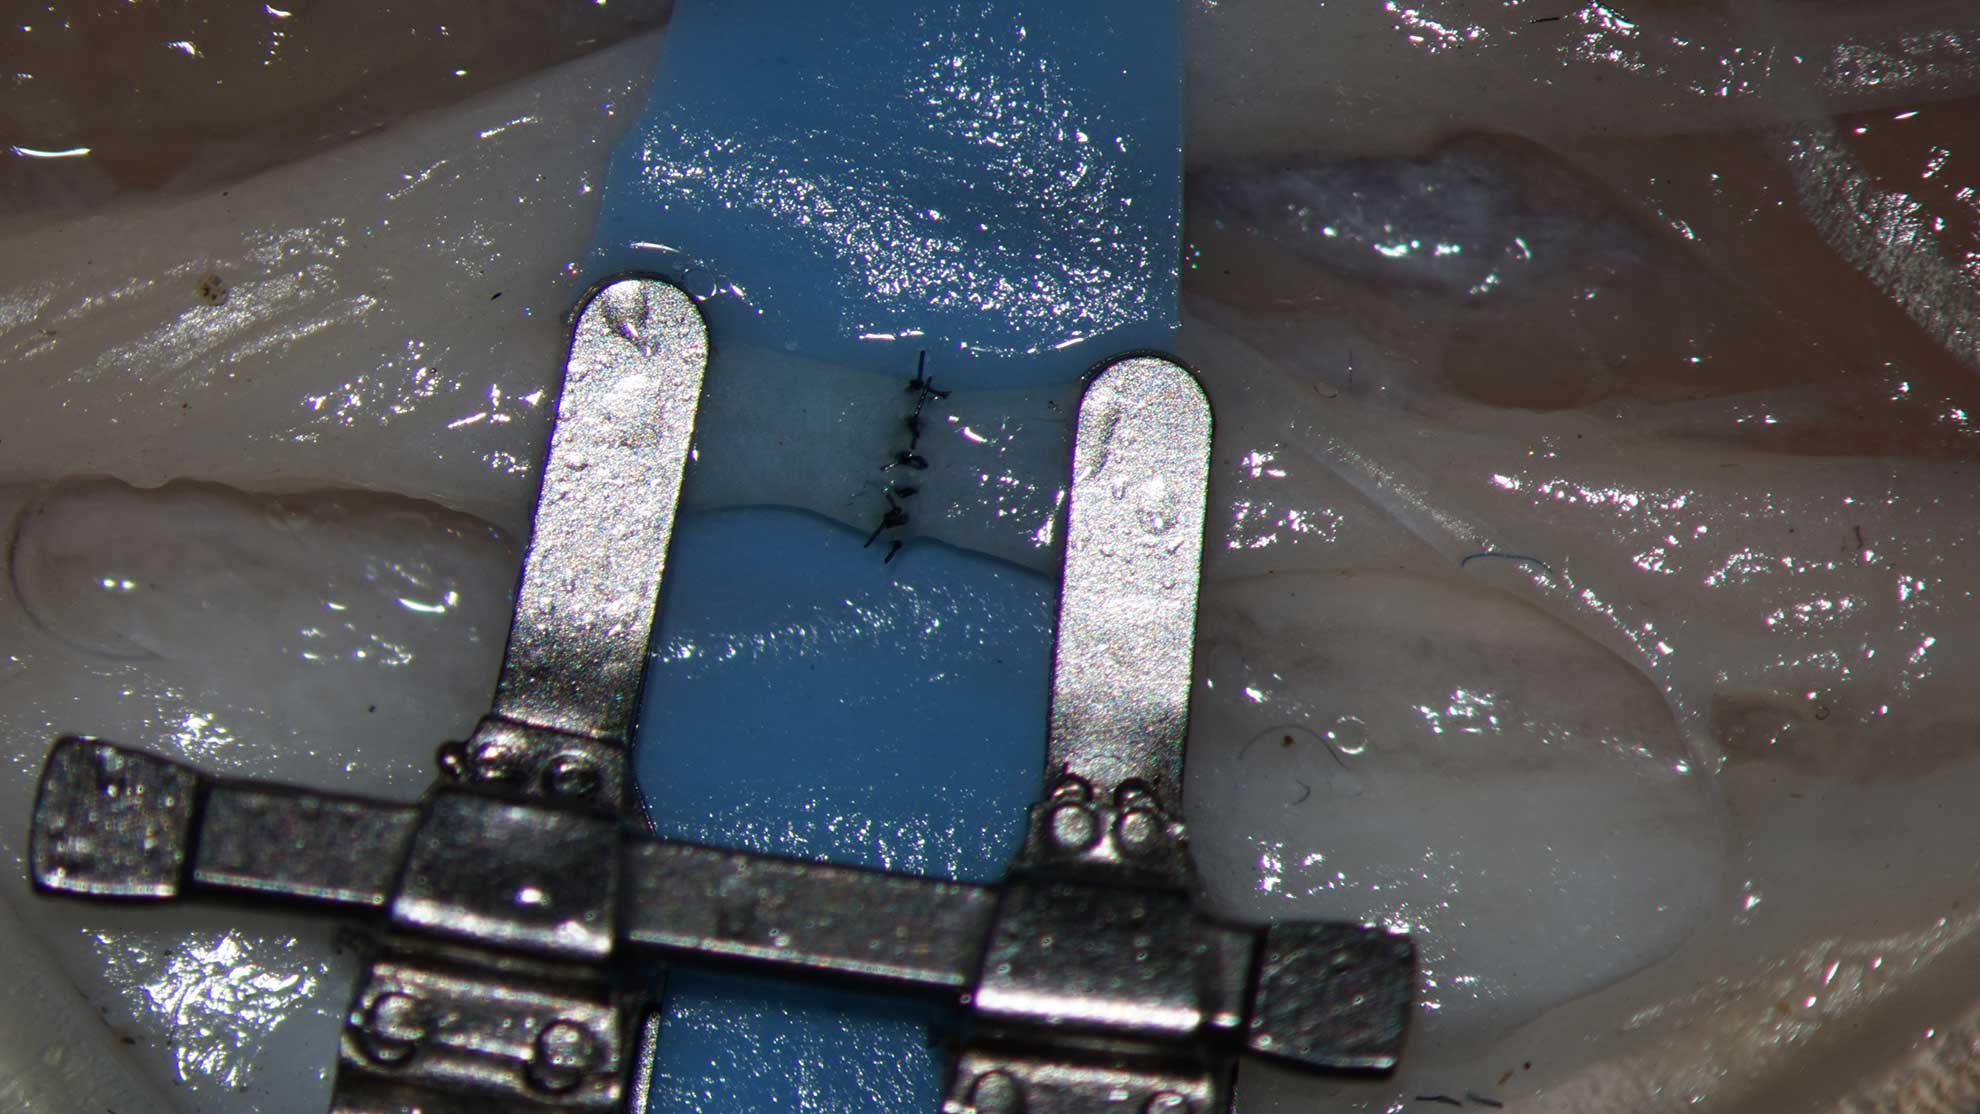
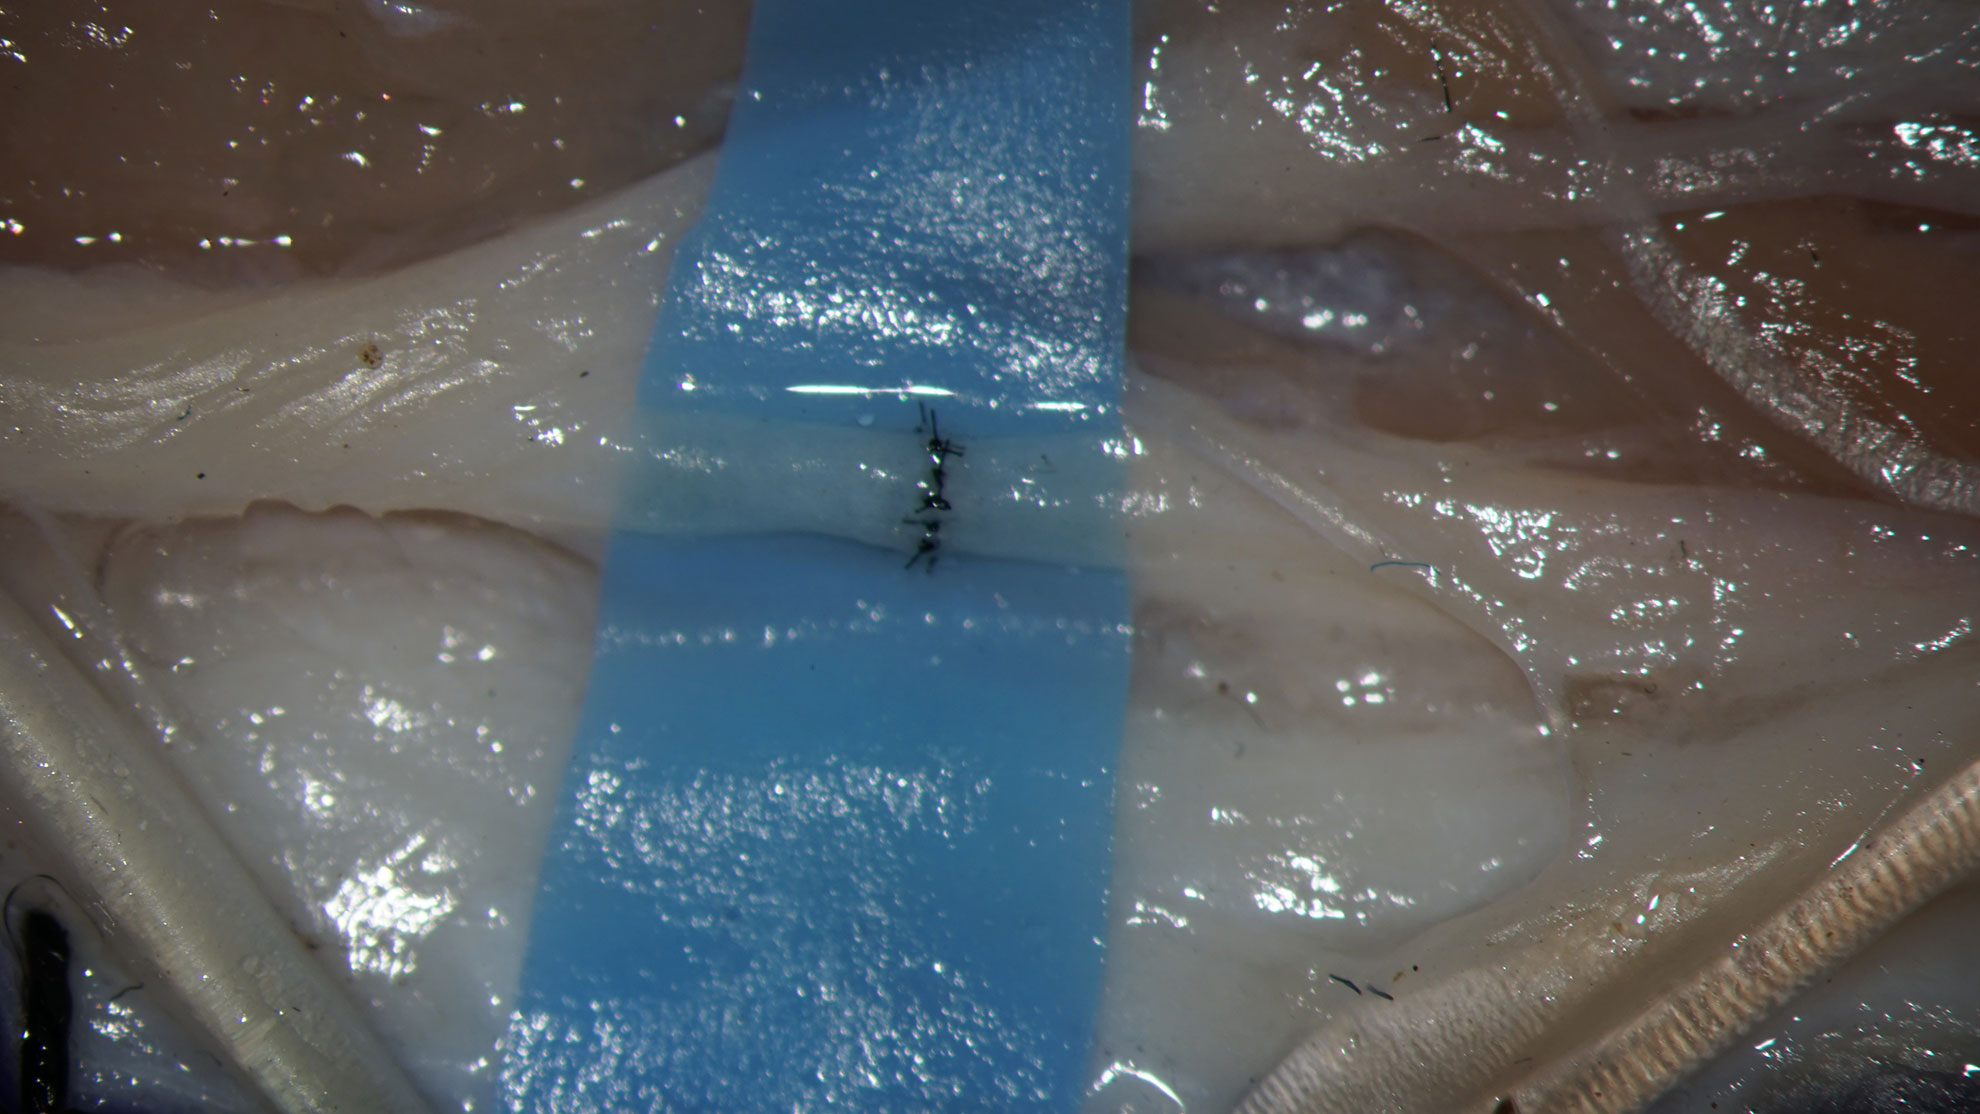
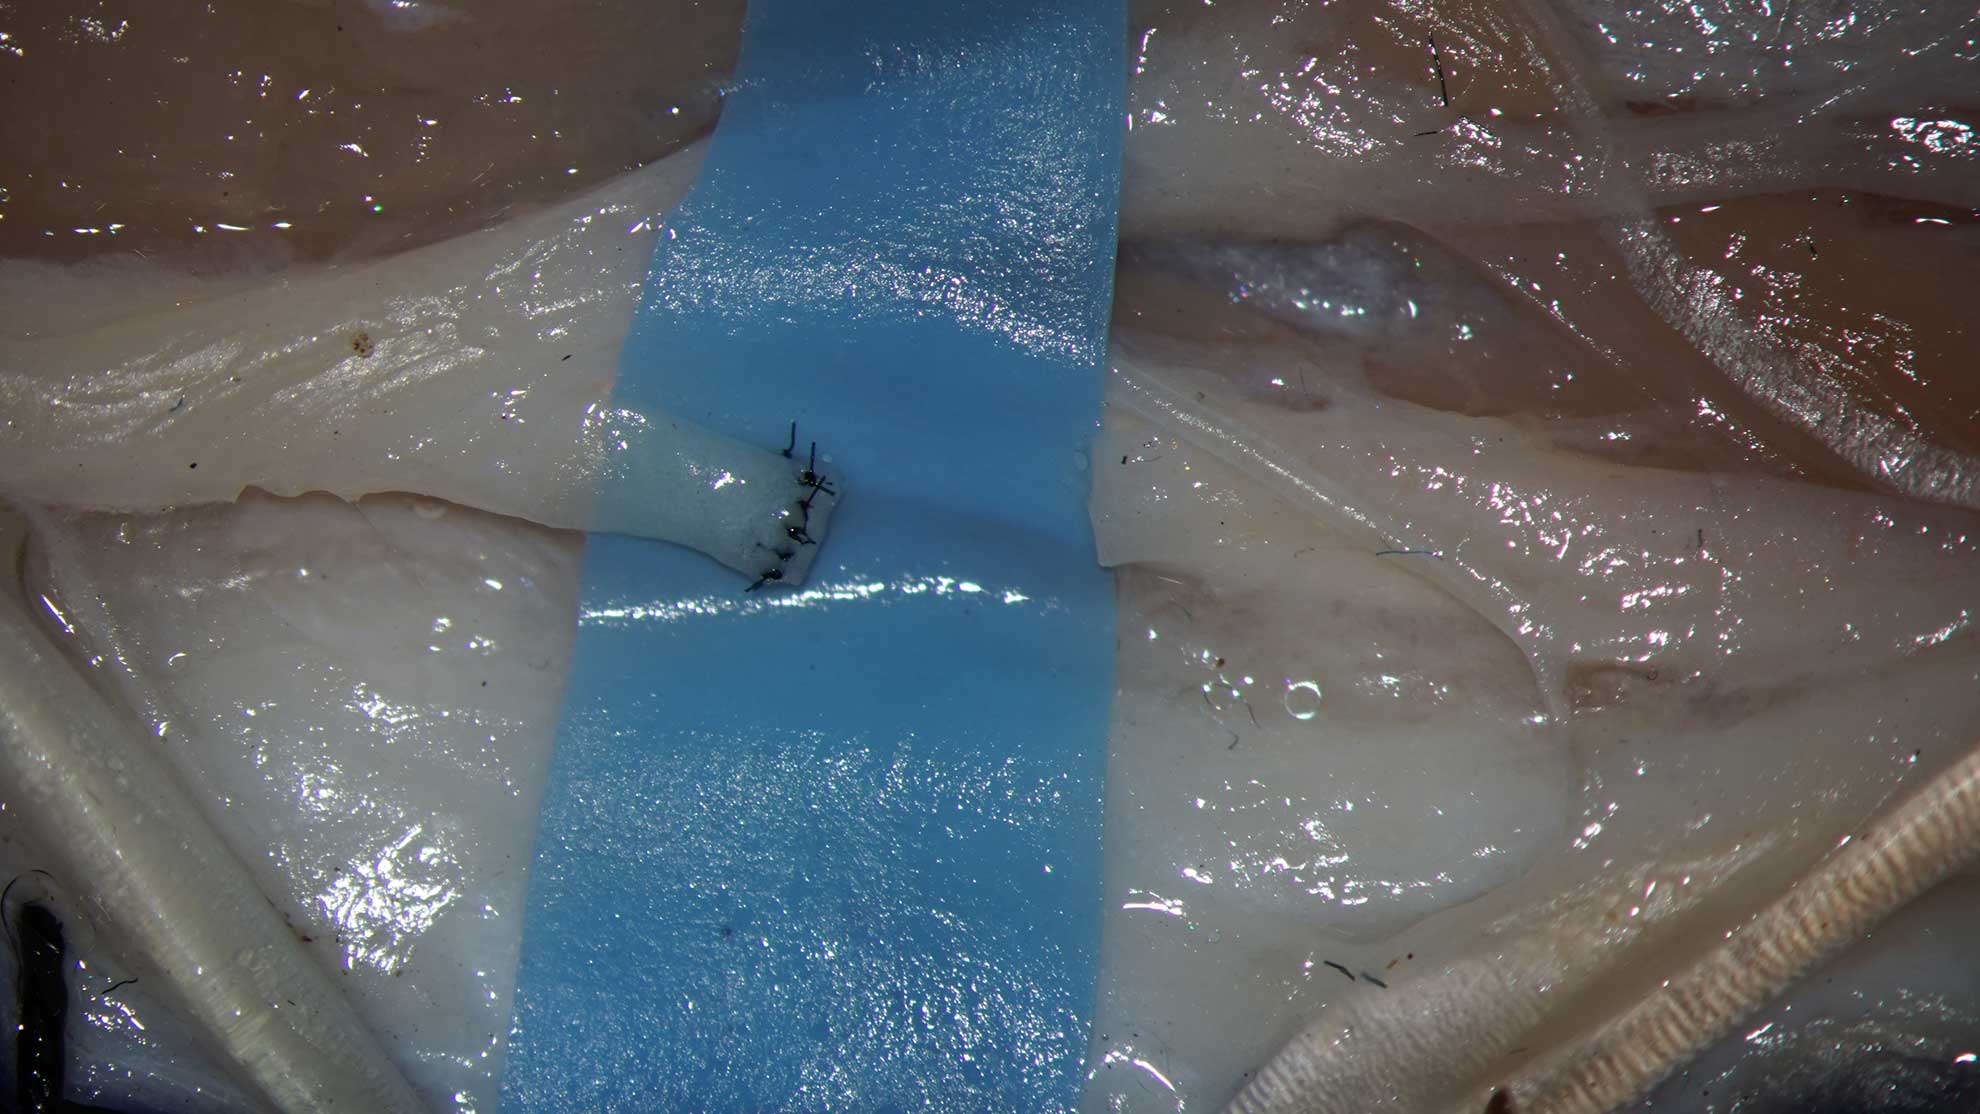
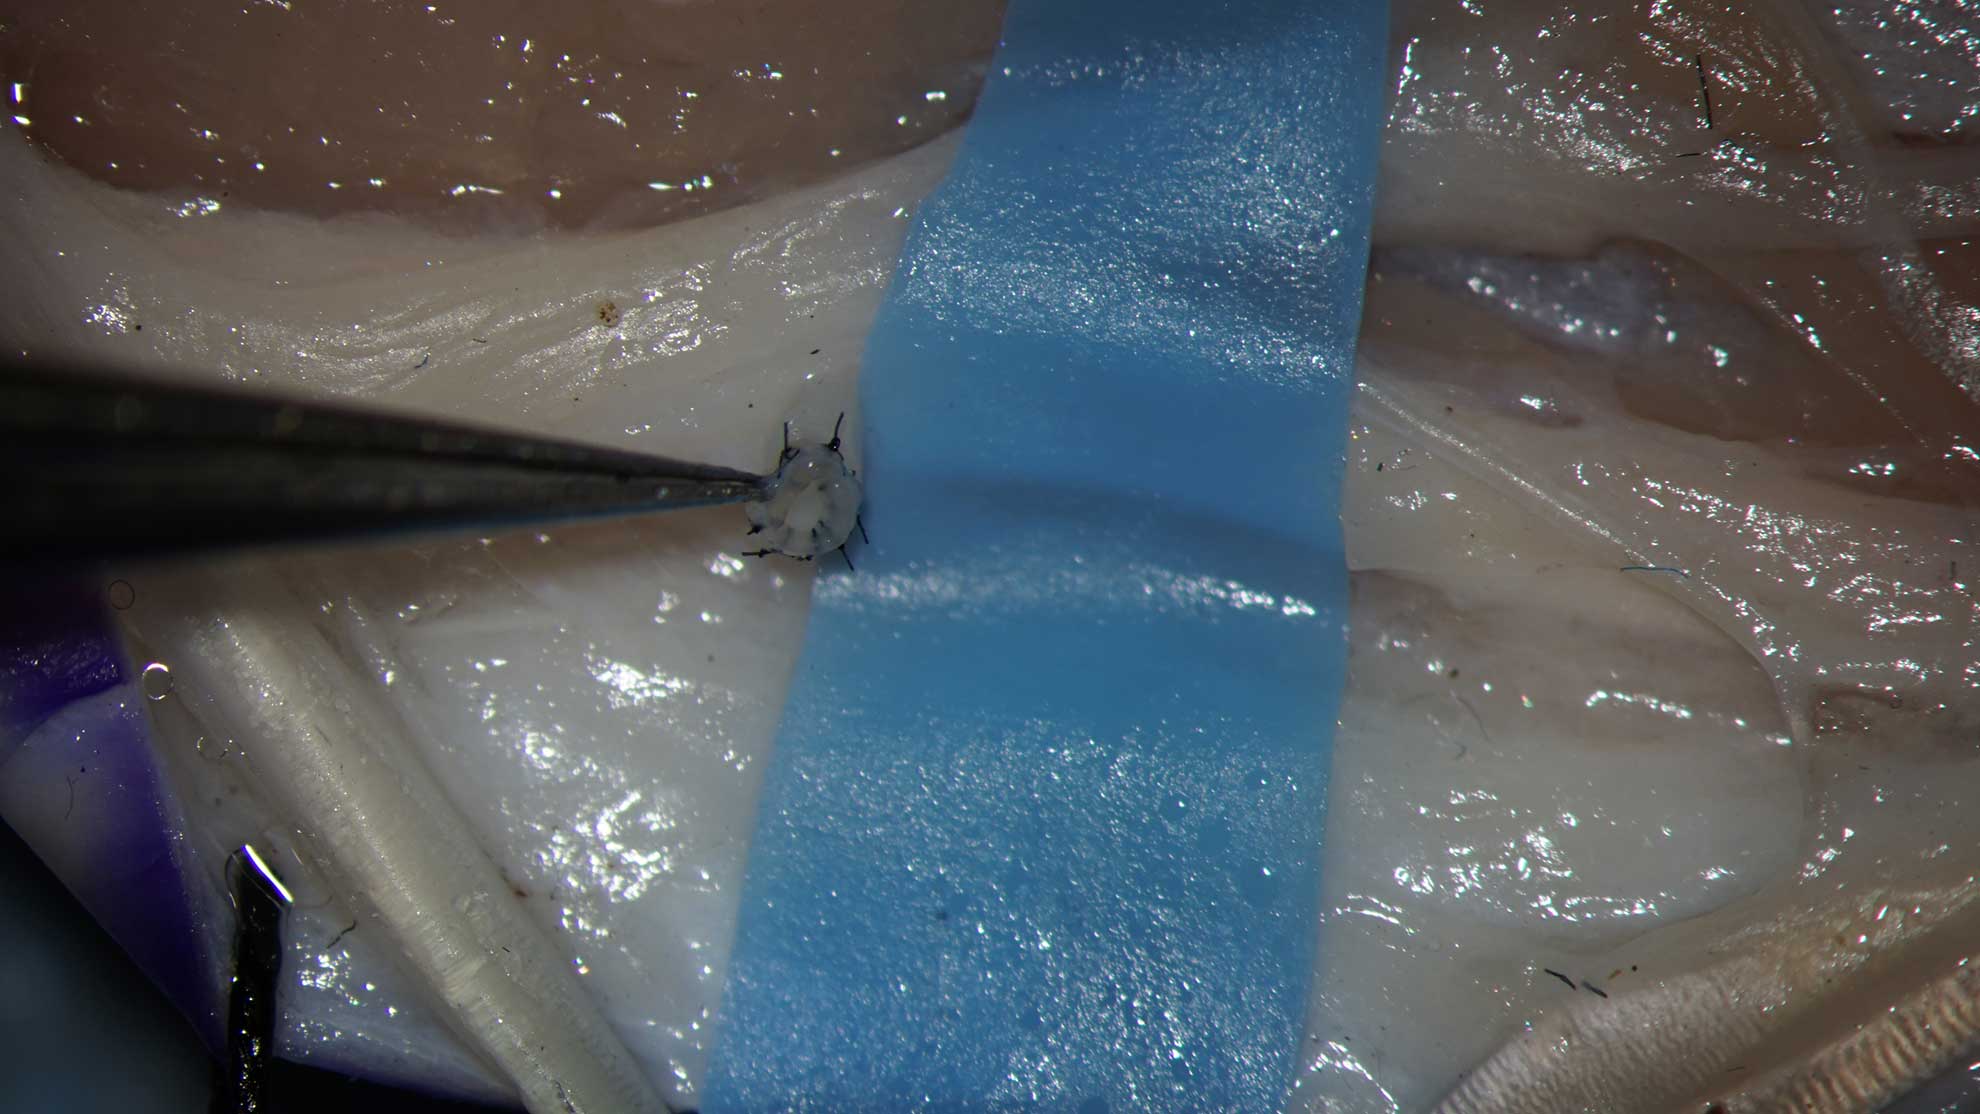
Constructing of the anastomosis: end-to-end. Vessels about 1,2 mm in diameter.
Use the Acland clamp for the end – to – end anastomosis. The bar of the clamp must be placed on the side of the surgeon. Place the first suture on the most approachable point on the opposite part of the vessel. The second suture should be at the last comfortable point in proximity to the surgeon
When inserting a stich, try to feel the endothelium with the tip of your needle, instead to control of the needle by placing of the forceps in the lumen. This technique develops intuition and helps, when dealing with vessel below 0,5 mm in diameter.
Technique
Illustrative materials: ChickenLeg-MetatarsalArtery-EndToEnd
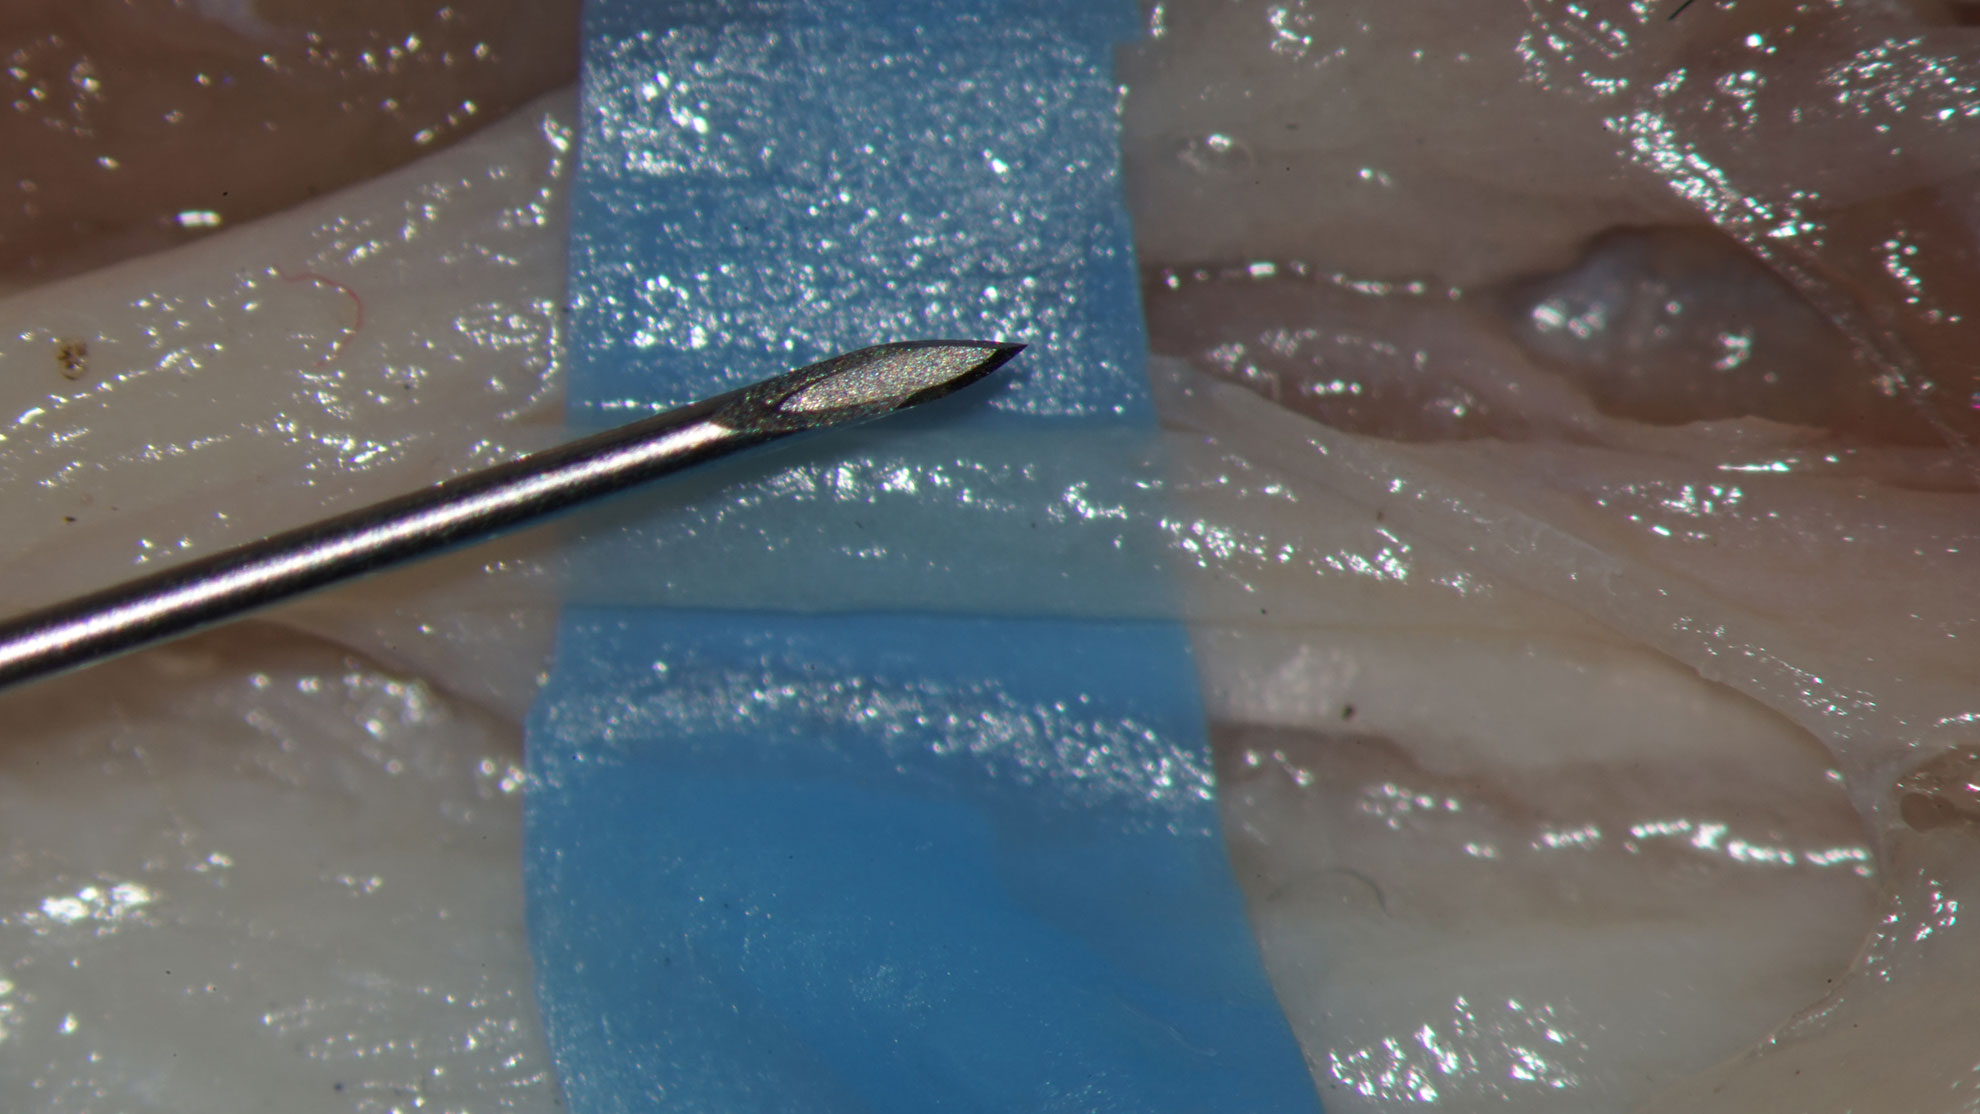
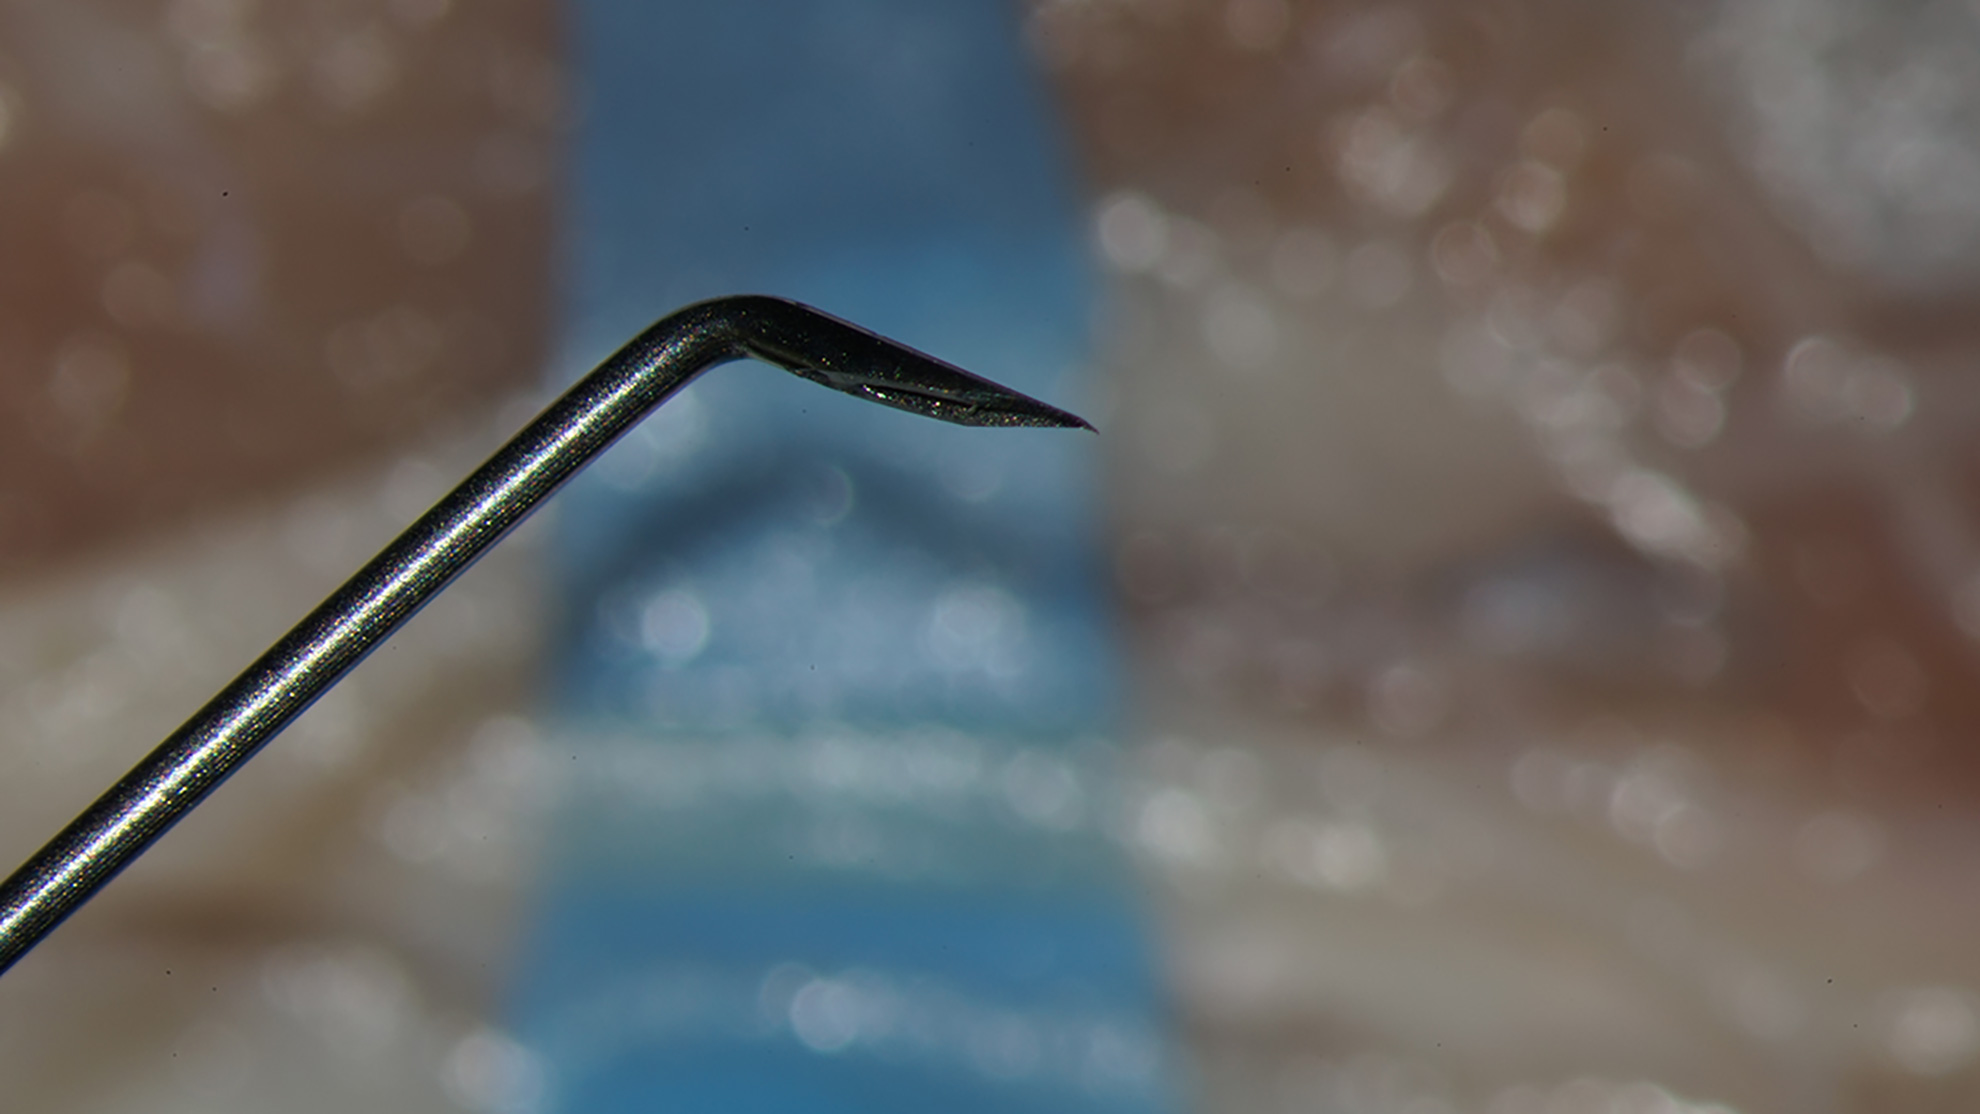
Make a hockey stick form irrigation needle from a 0,45 mm injection needle
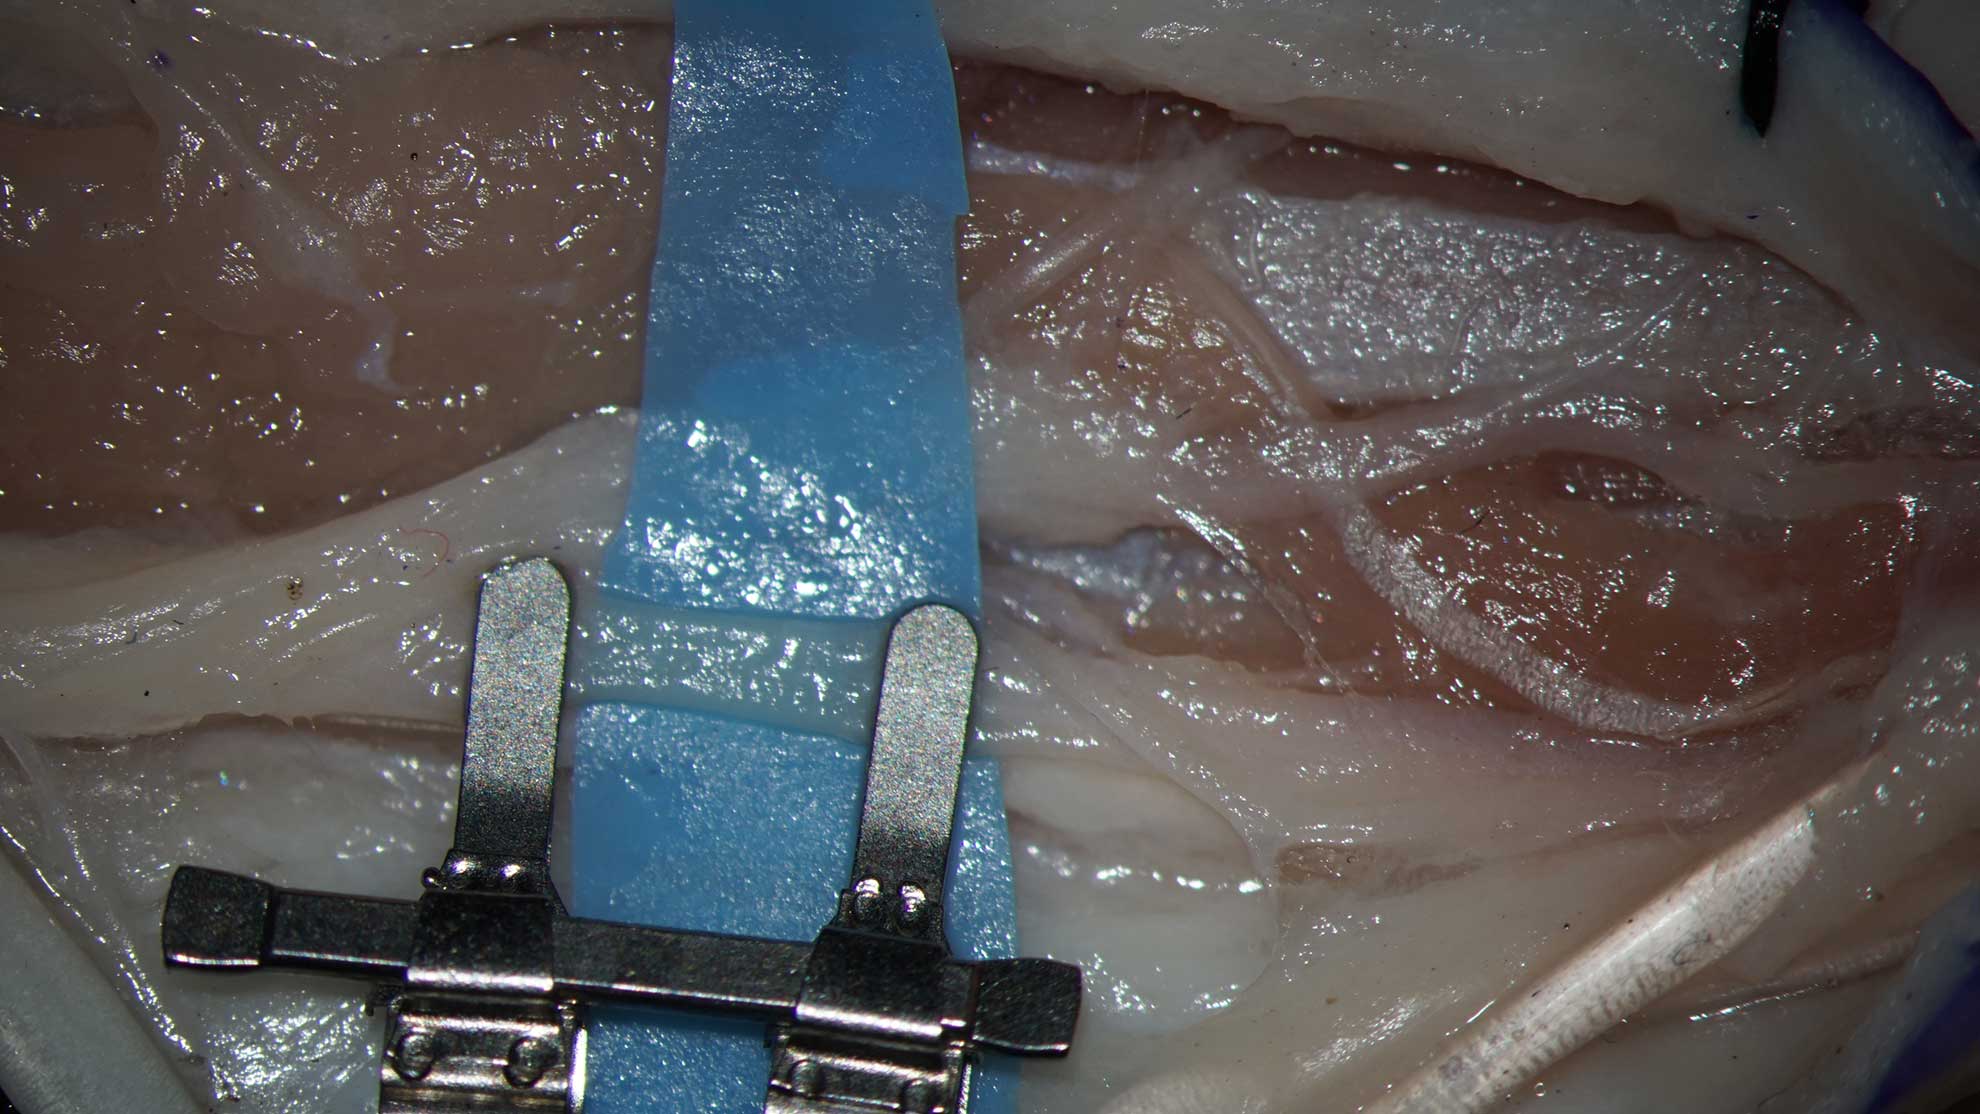
- Using Adson Brown forceps, apply a double Acland Clamp on the vessel.
- The Acland Clamp should be placed with the bar above and the bar opposite to the operator
- Adjust the distance between clamps using a small Mosquito
- Cut the vessel in the middle of the distance between clamps
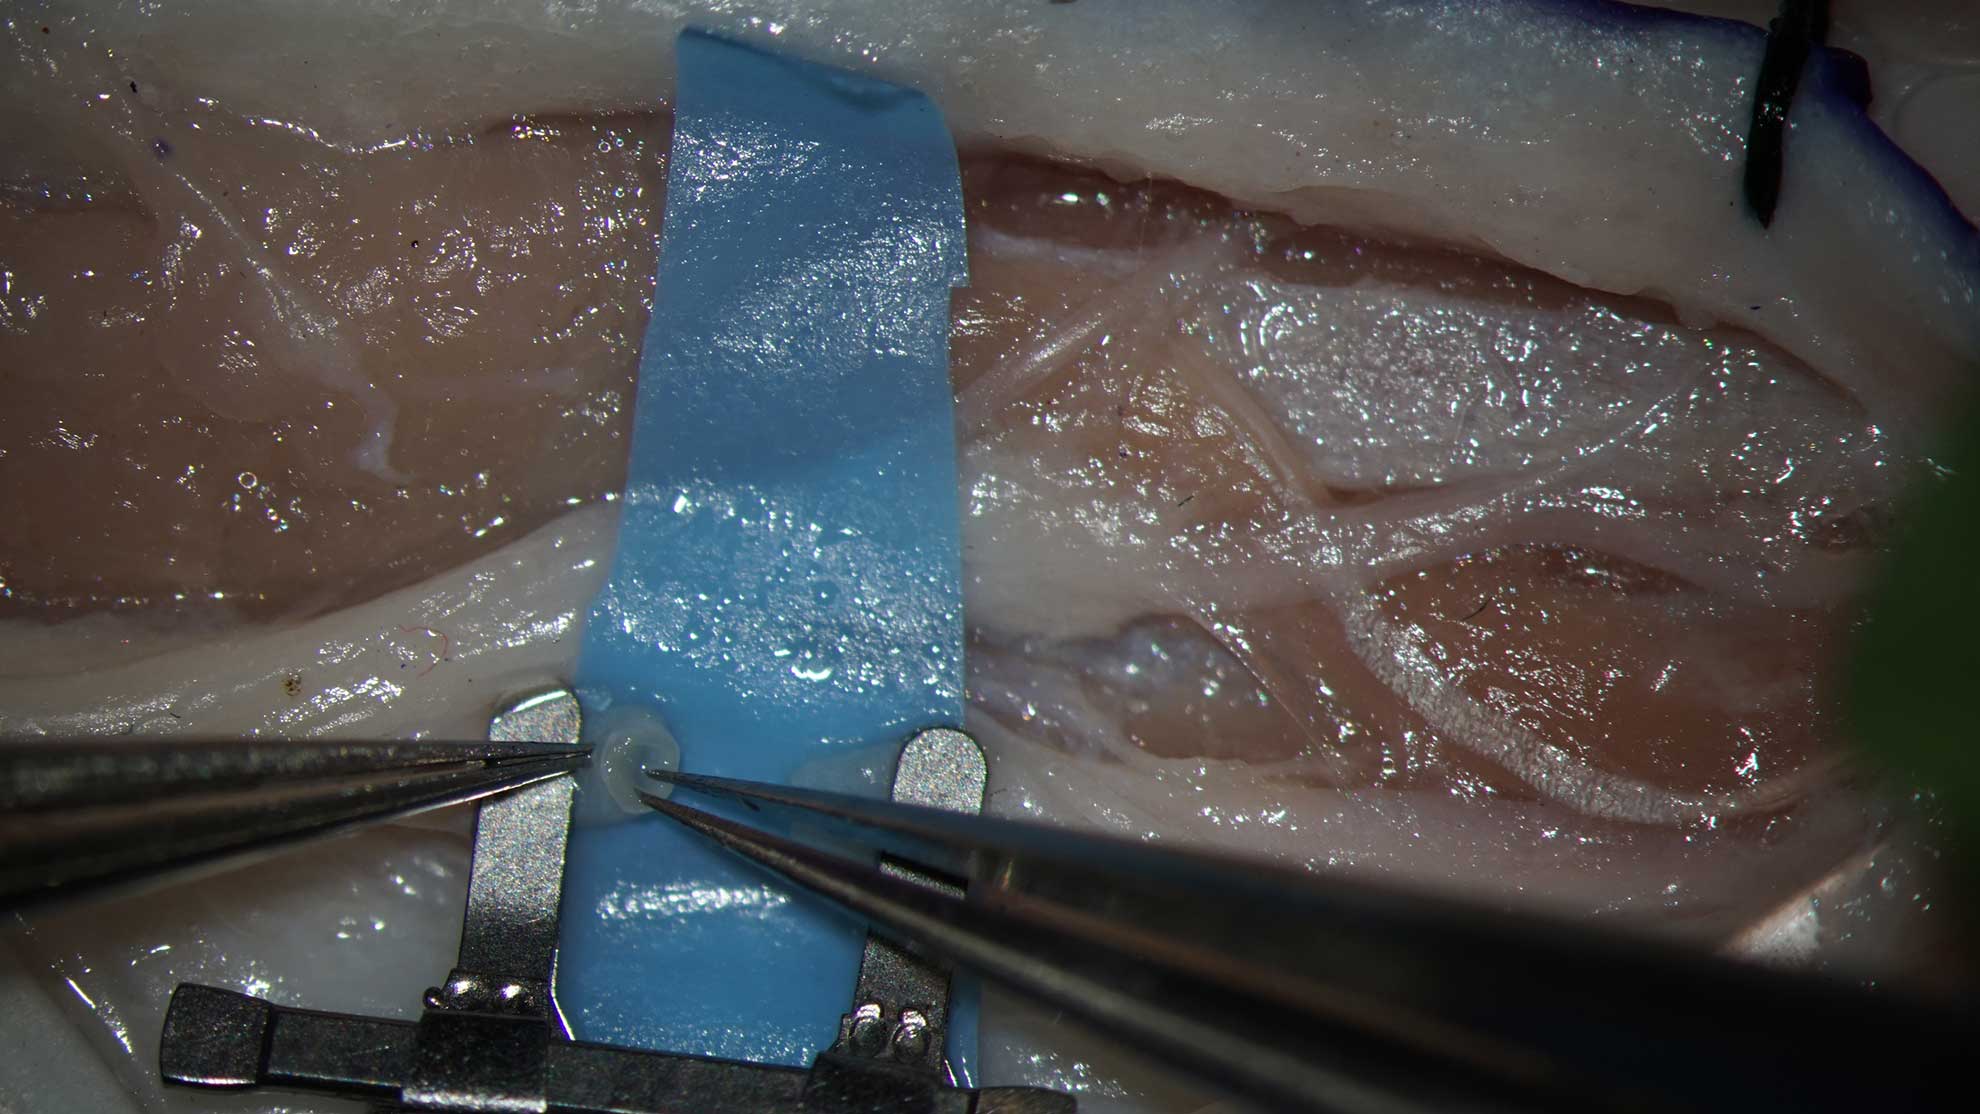
- Open the lumen with micro forceps
- Irrigate the lumen by the injection needle. Avoid the contact between the needle and the intima
- Consider the number of stiches and distance from stich to the suture line
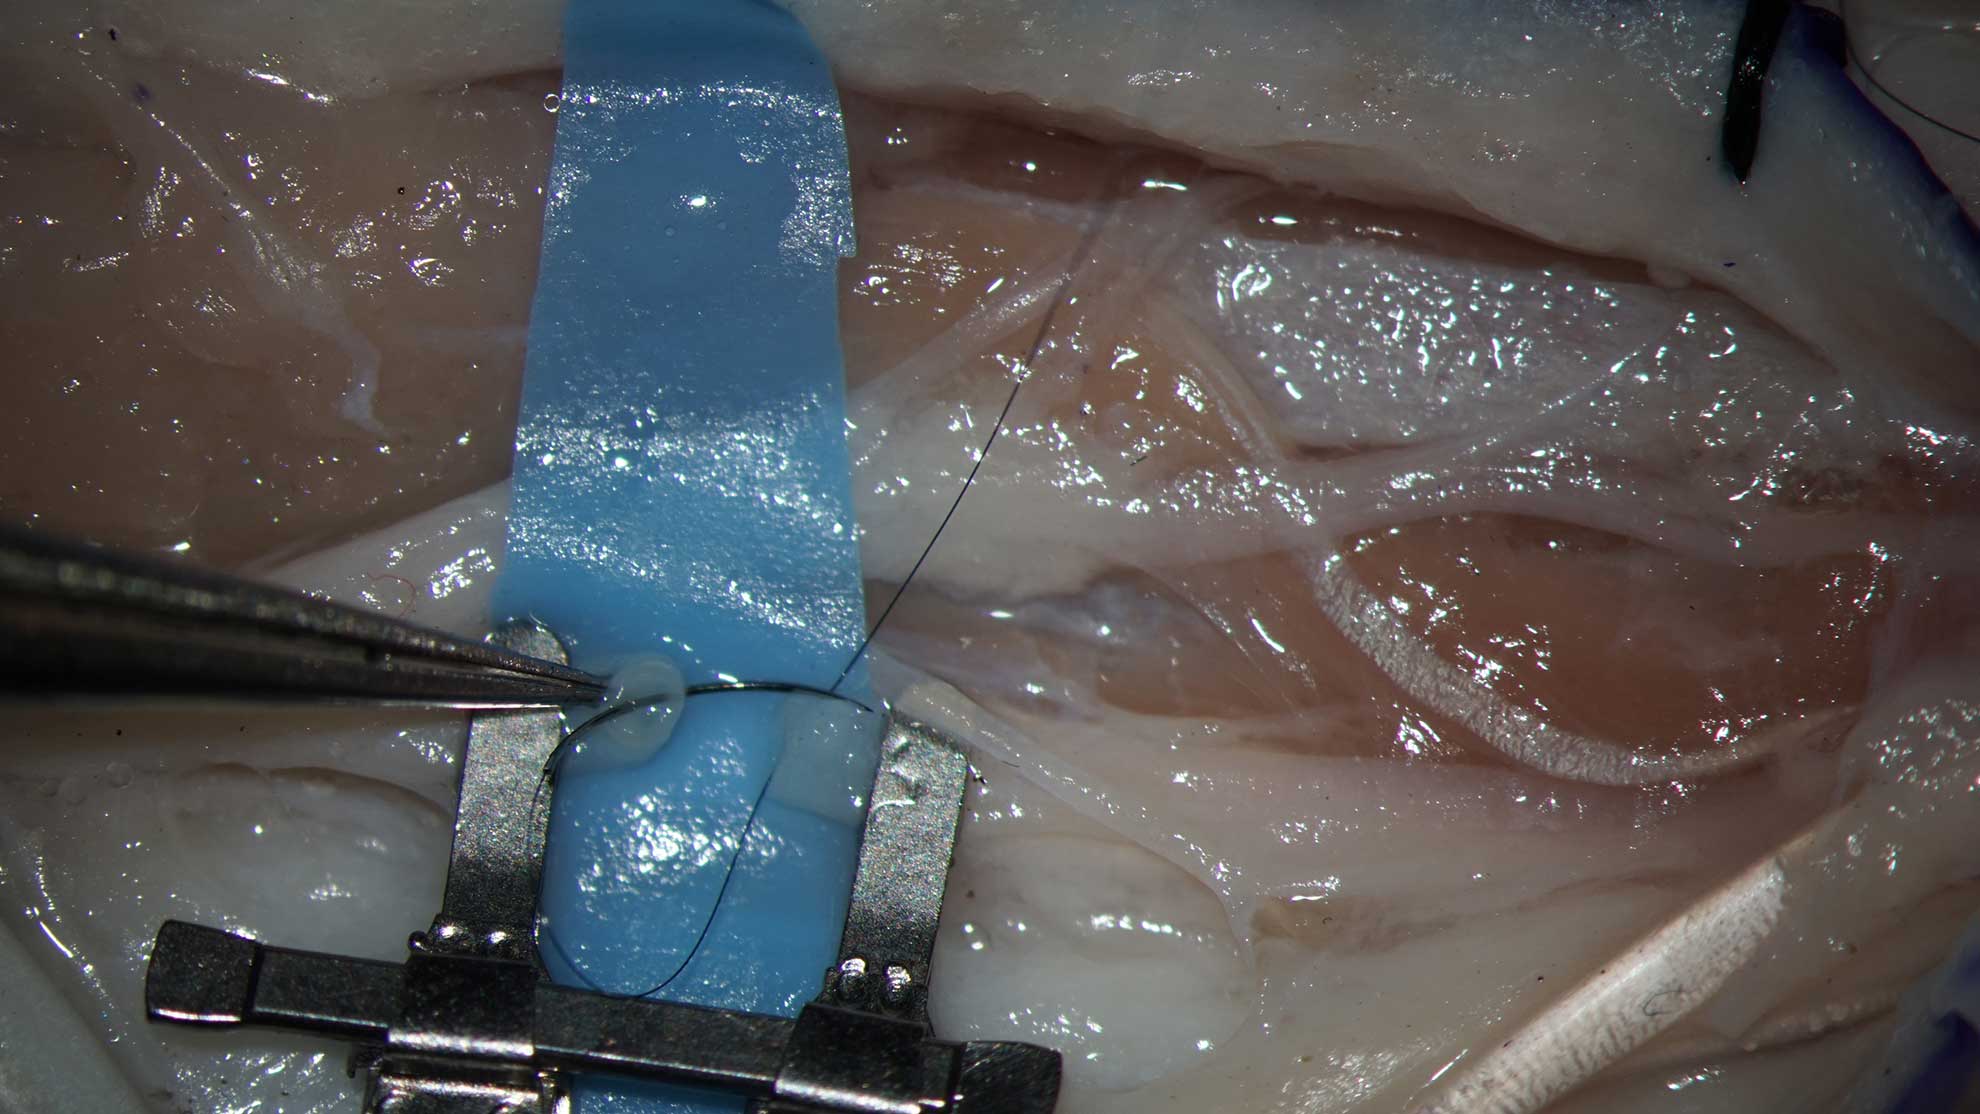
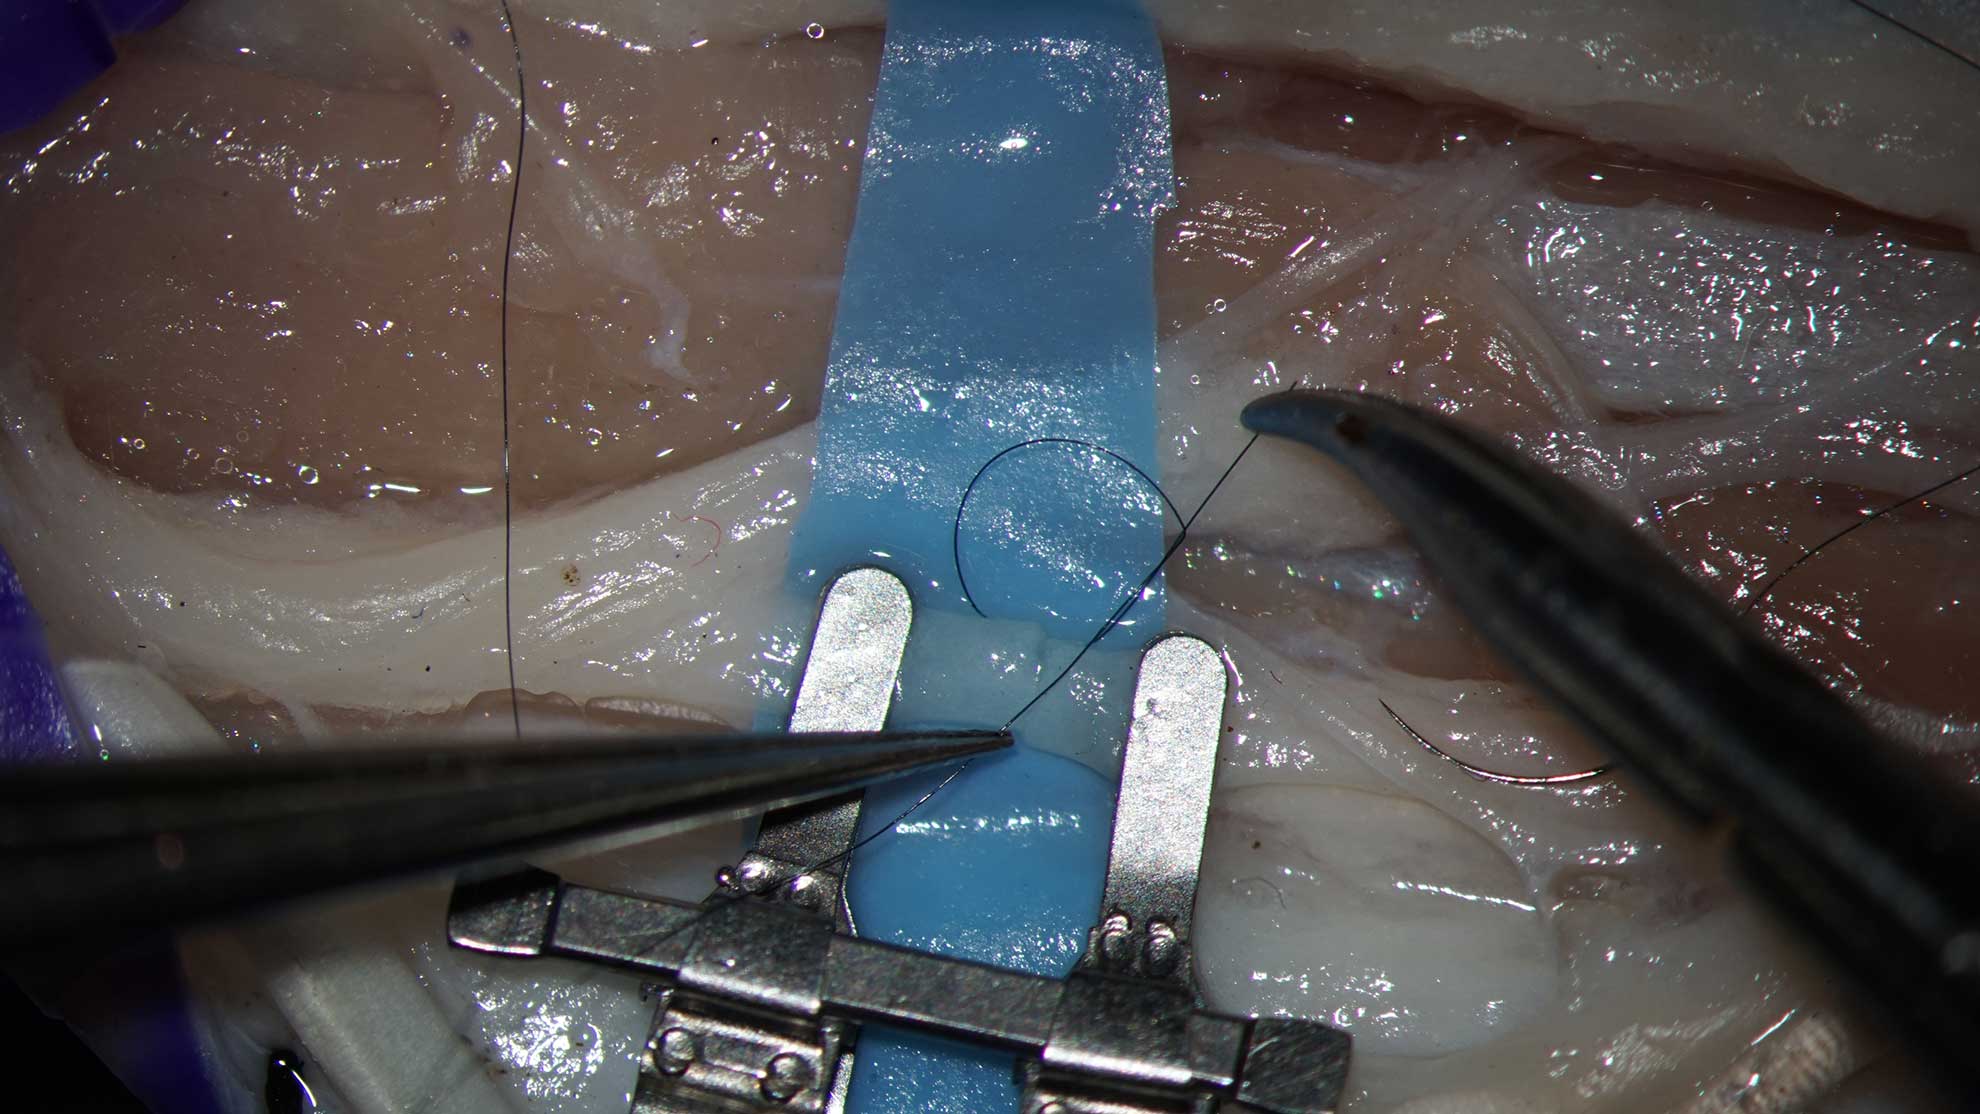
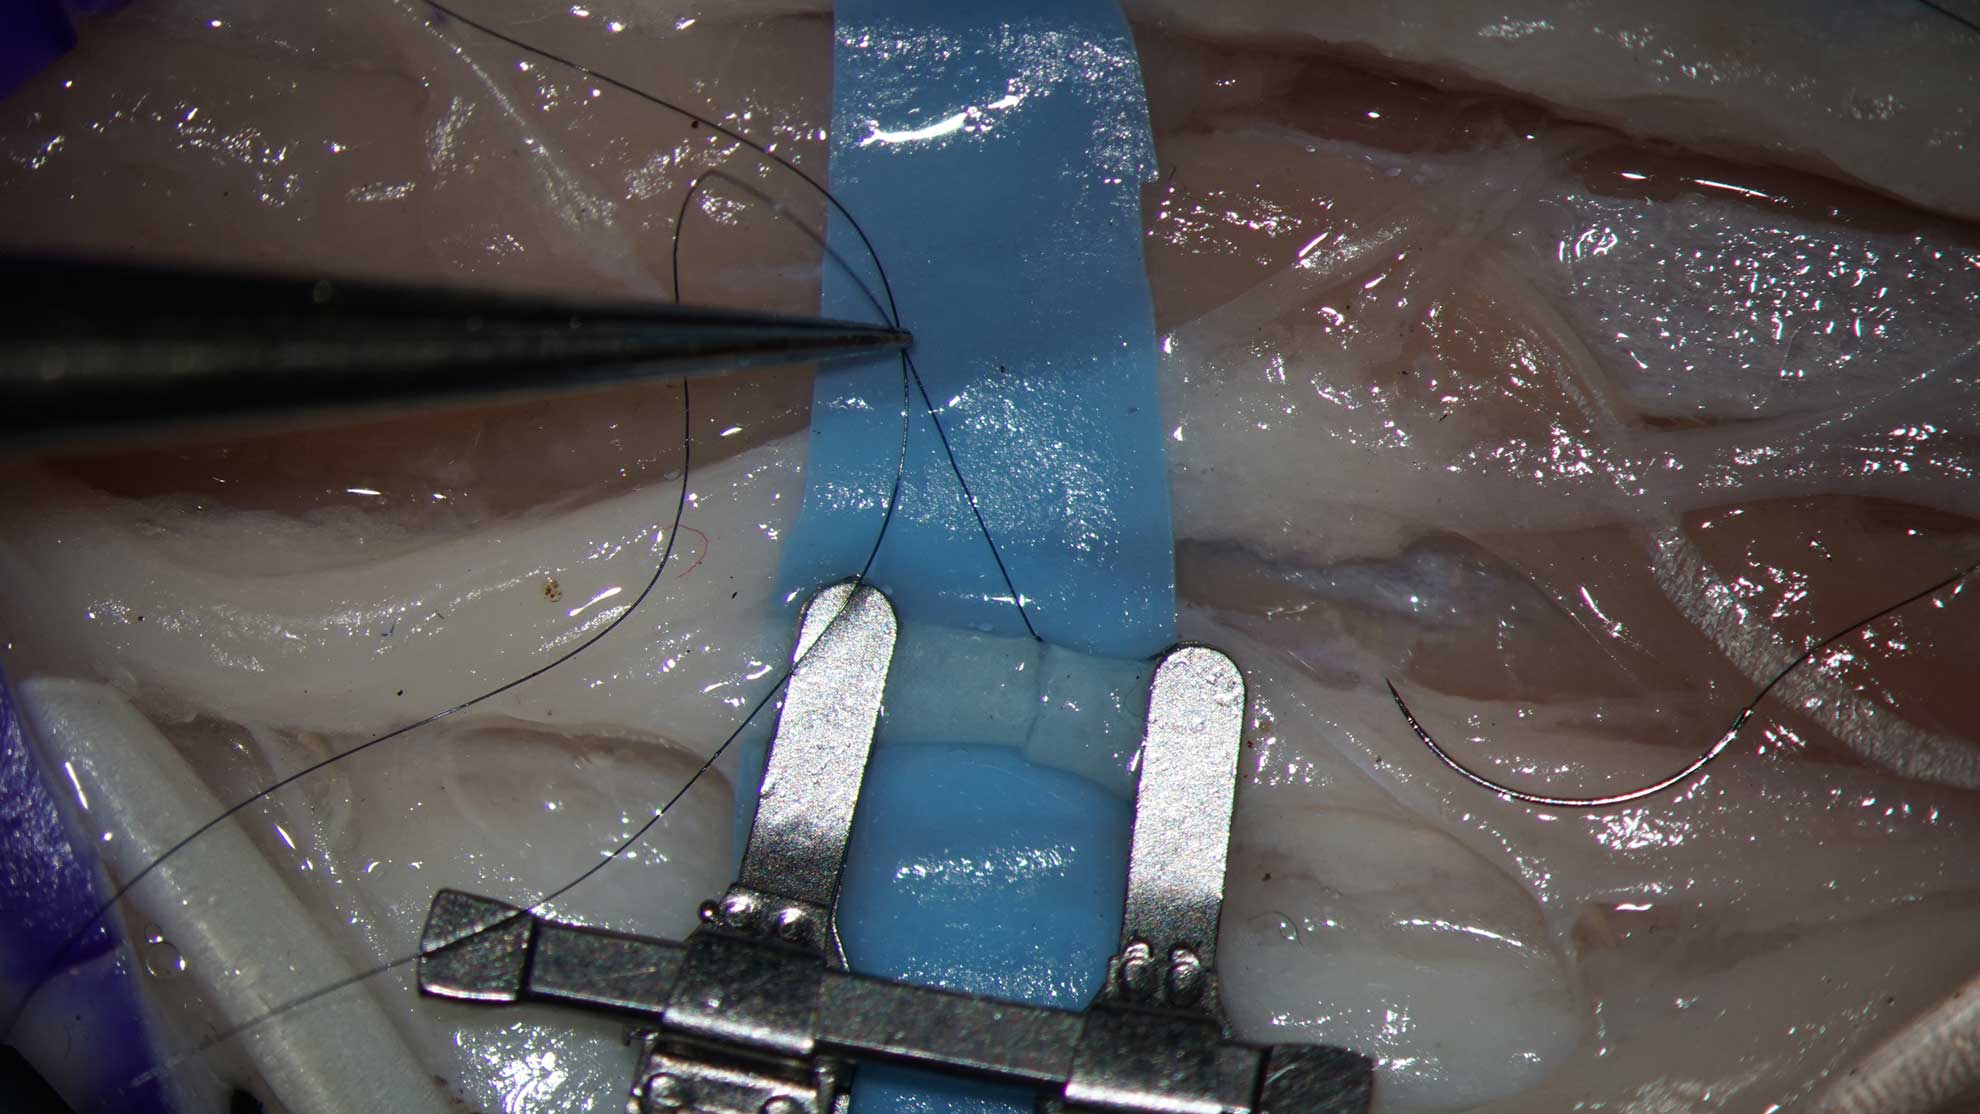
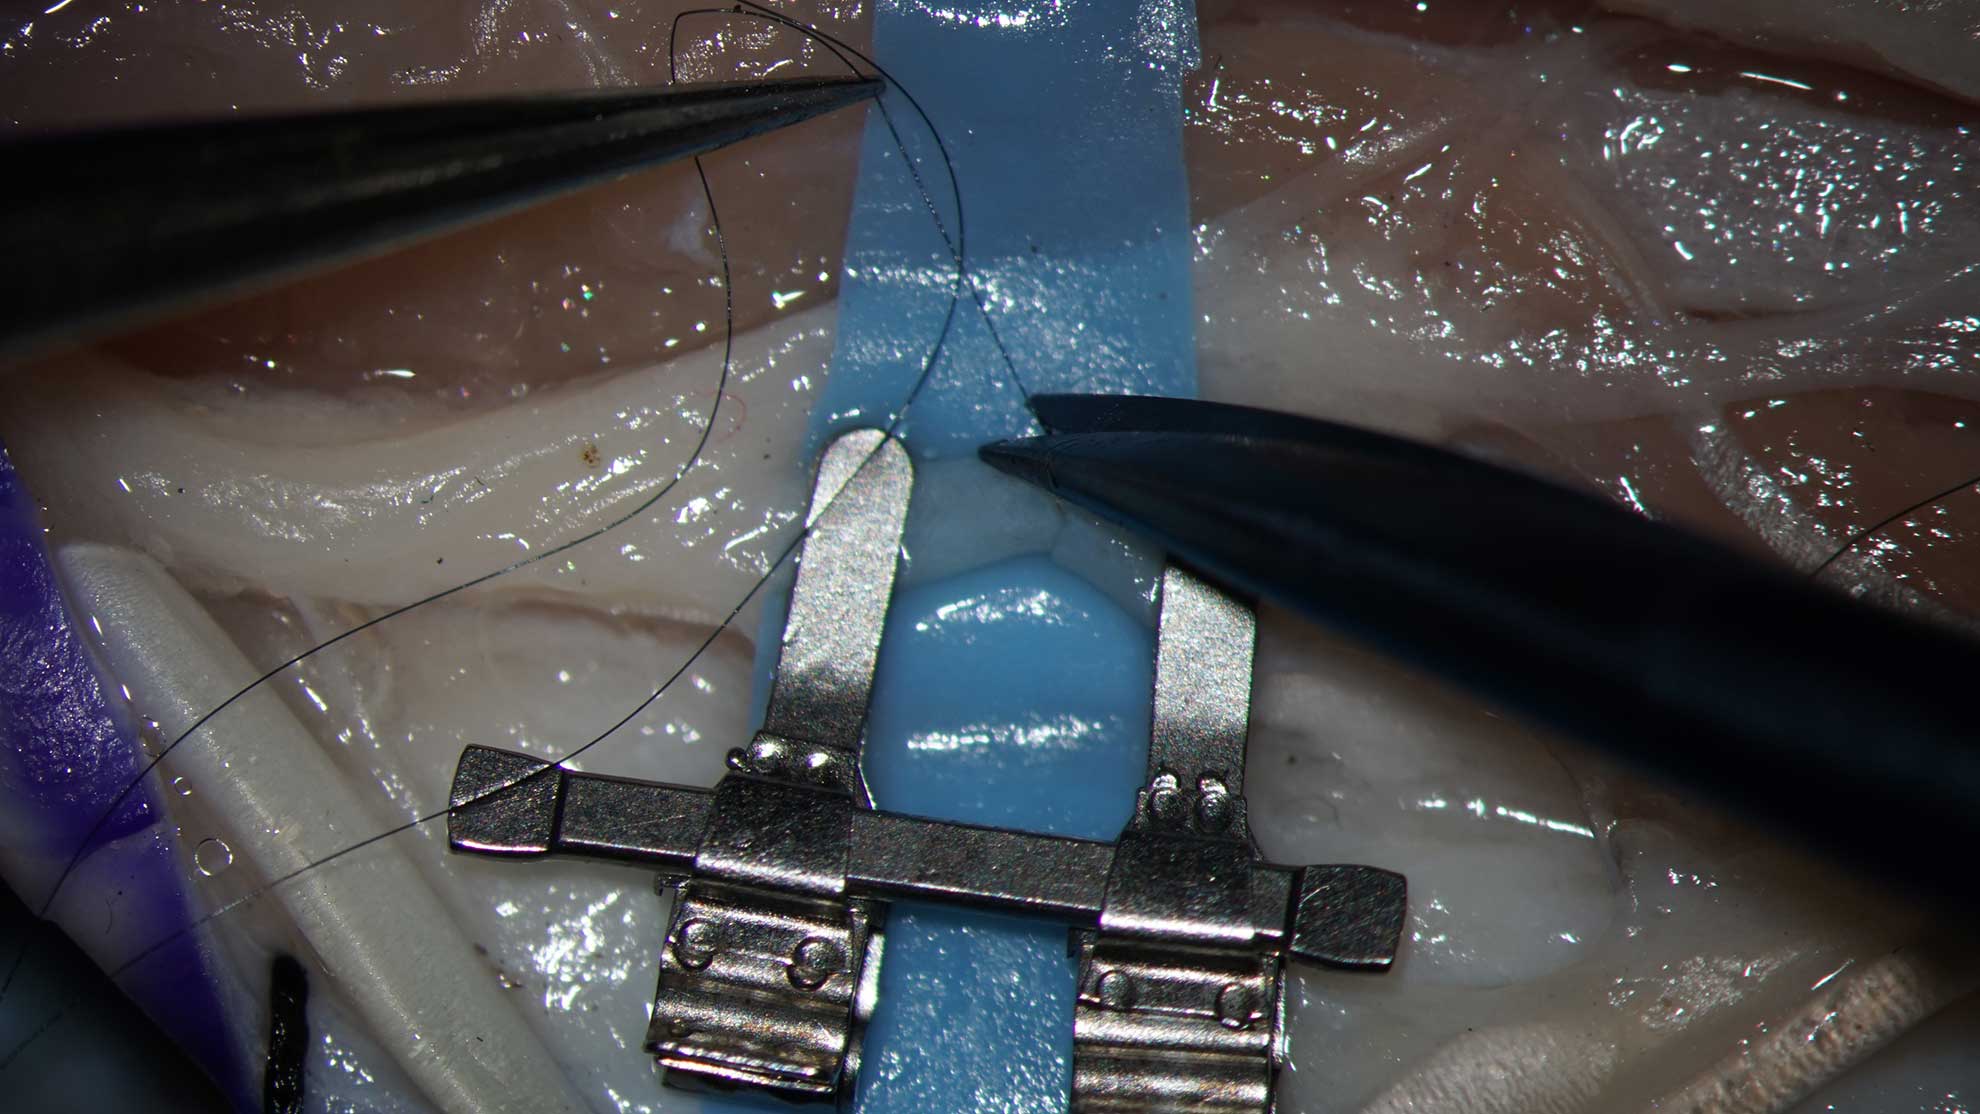
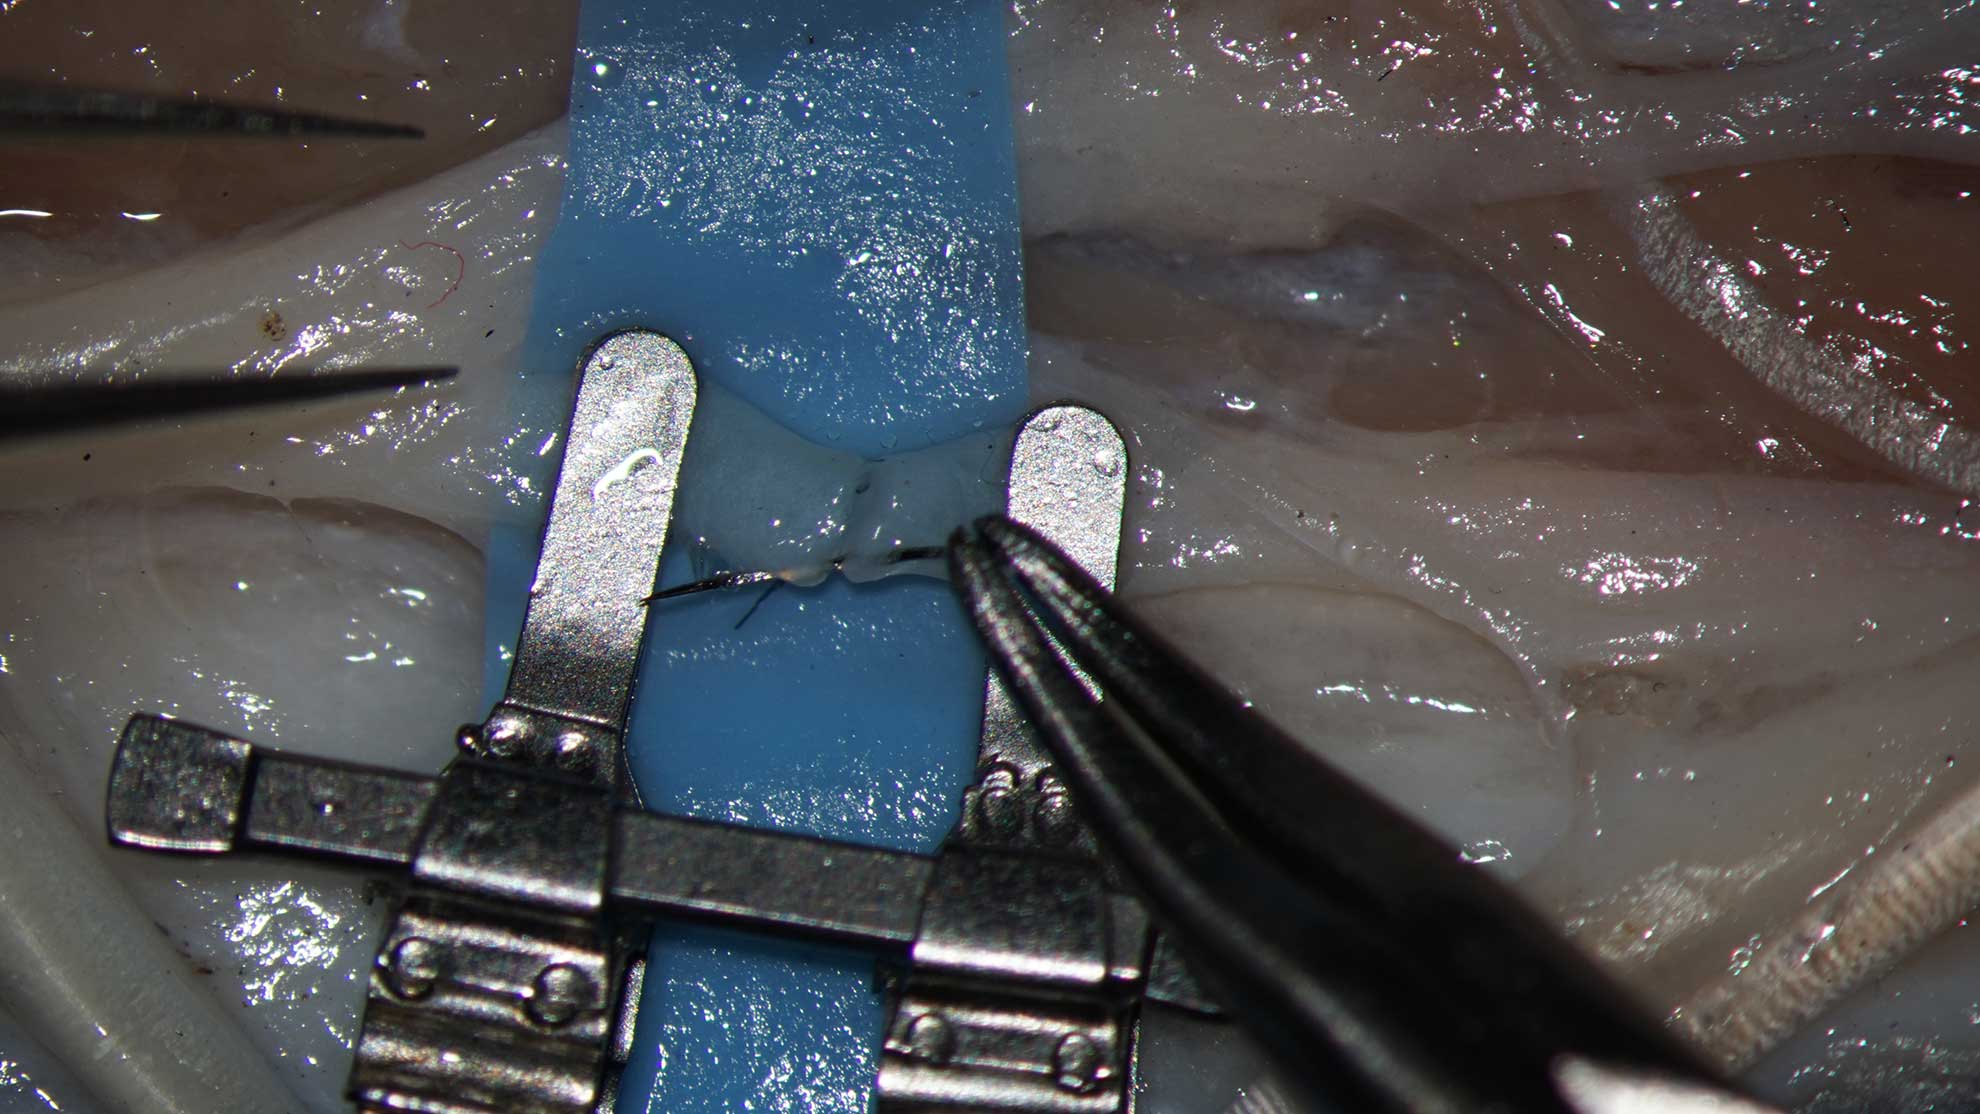
- Place the first stich in the almost non comfortable point
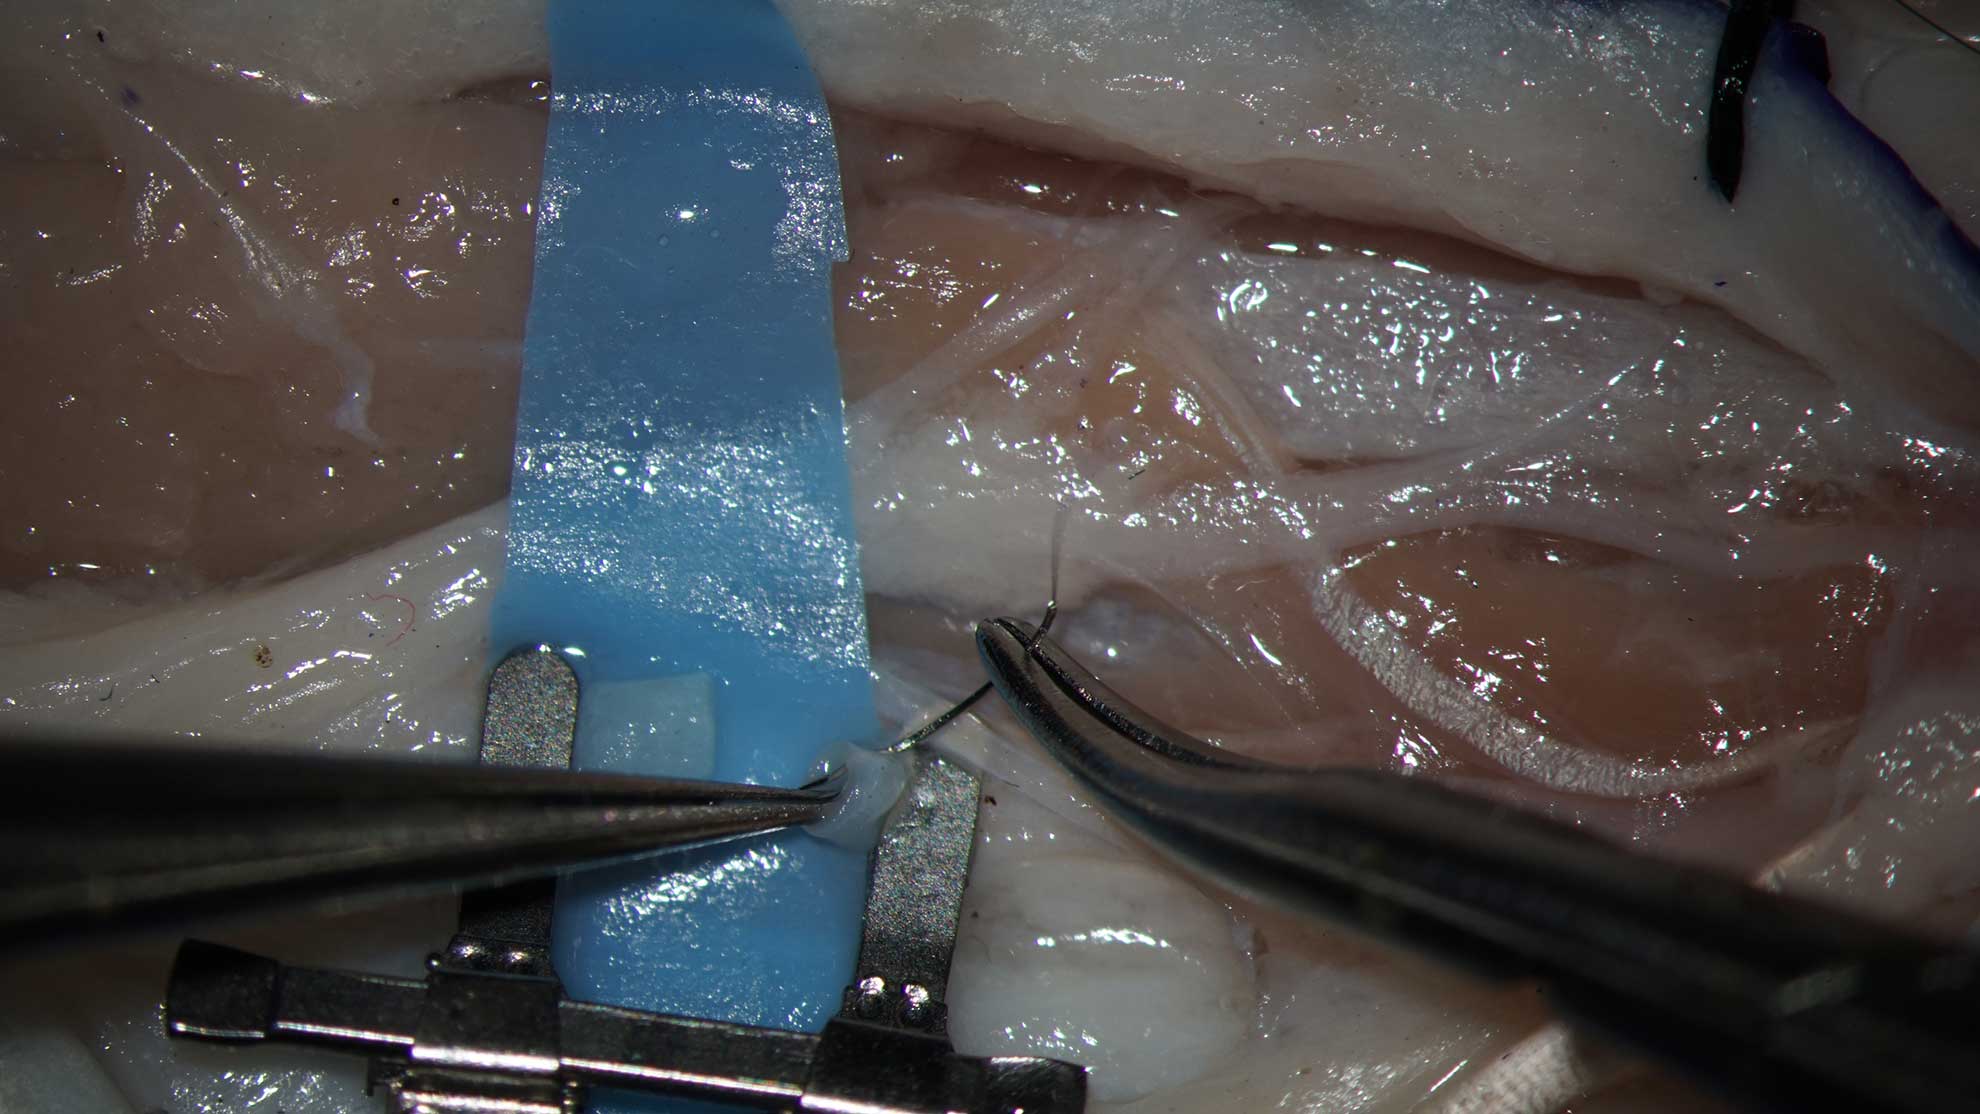
- Pass the needle completely through the hole
- Insert the needle in the symmetrical point on the opposite side
- Pass the needle through the hole. Permit to the long thread to make a loop.
- Park the needle close to the suture area. Avoid the collision between the tip of the needle and the Acland clamp.
- Adjust the distance between the vessels approximating the Acland clamp with a small Mosquito
- The opposite parts of the vessel should have a small gap. The ends must be not too far and not overlap
- Hold the longer part of the thread with the forceps. Form a loop in the longer part with the needle holder and grasp with the needle holder the end of the thread. Form the loop in right direction. The elastic forces must put the ends of free ends of the inserted ligature upwards not downwards.
- Secure the knot. Do not apply extra force. The ends of the vessel must adapt to each other without gaps and without overlapping.
- Secure two another knots. Do not grasp the long part of the thread with the needle holder. Do not apply extra force to the forceps while holding the thread. Extra force deforms the thread and makes it fragile.
- Cut the long part of the thread. Left the other end of the ligature long for elevating of the anastomosis.
- Insert the second stich in the next uncomfortable point.
- The both inserted stiches are border lines of the upper side of the anastomosis.
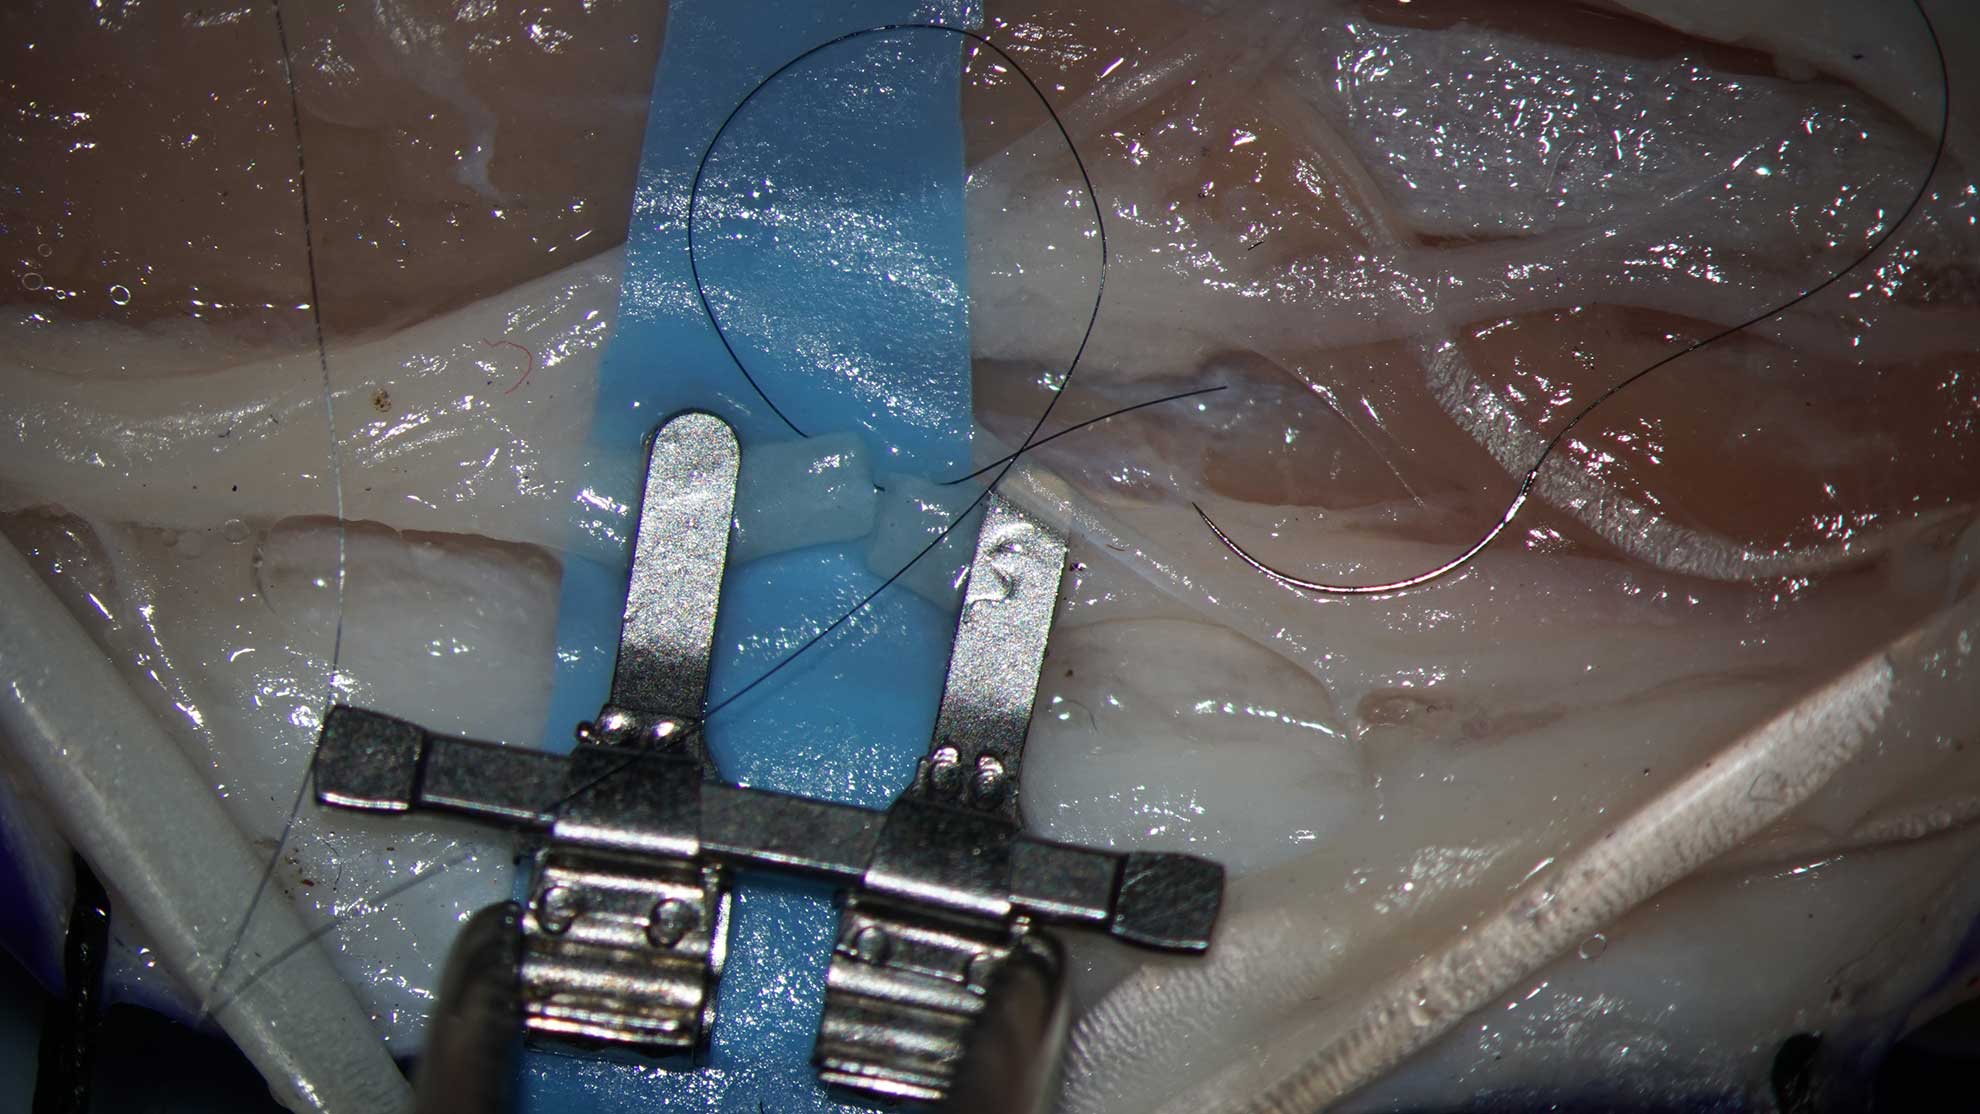
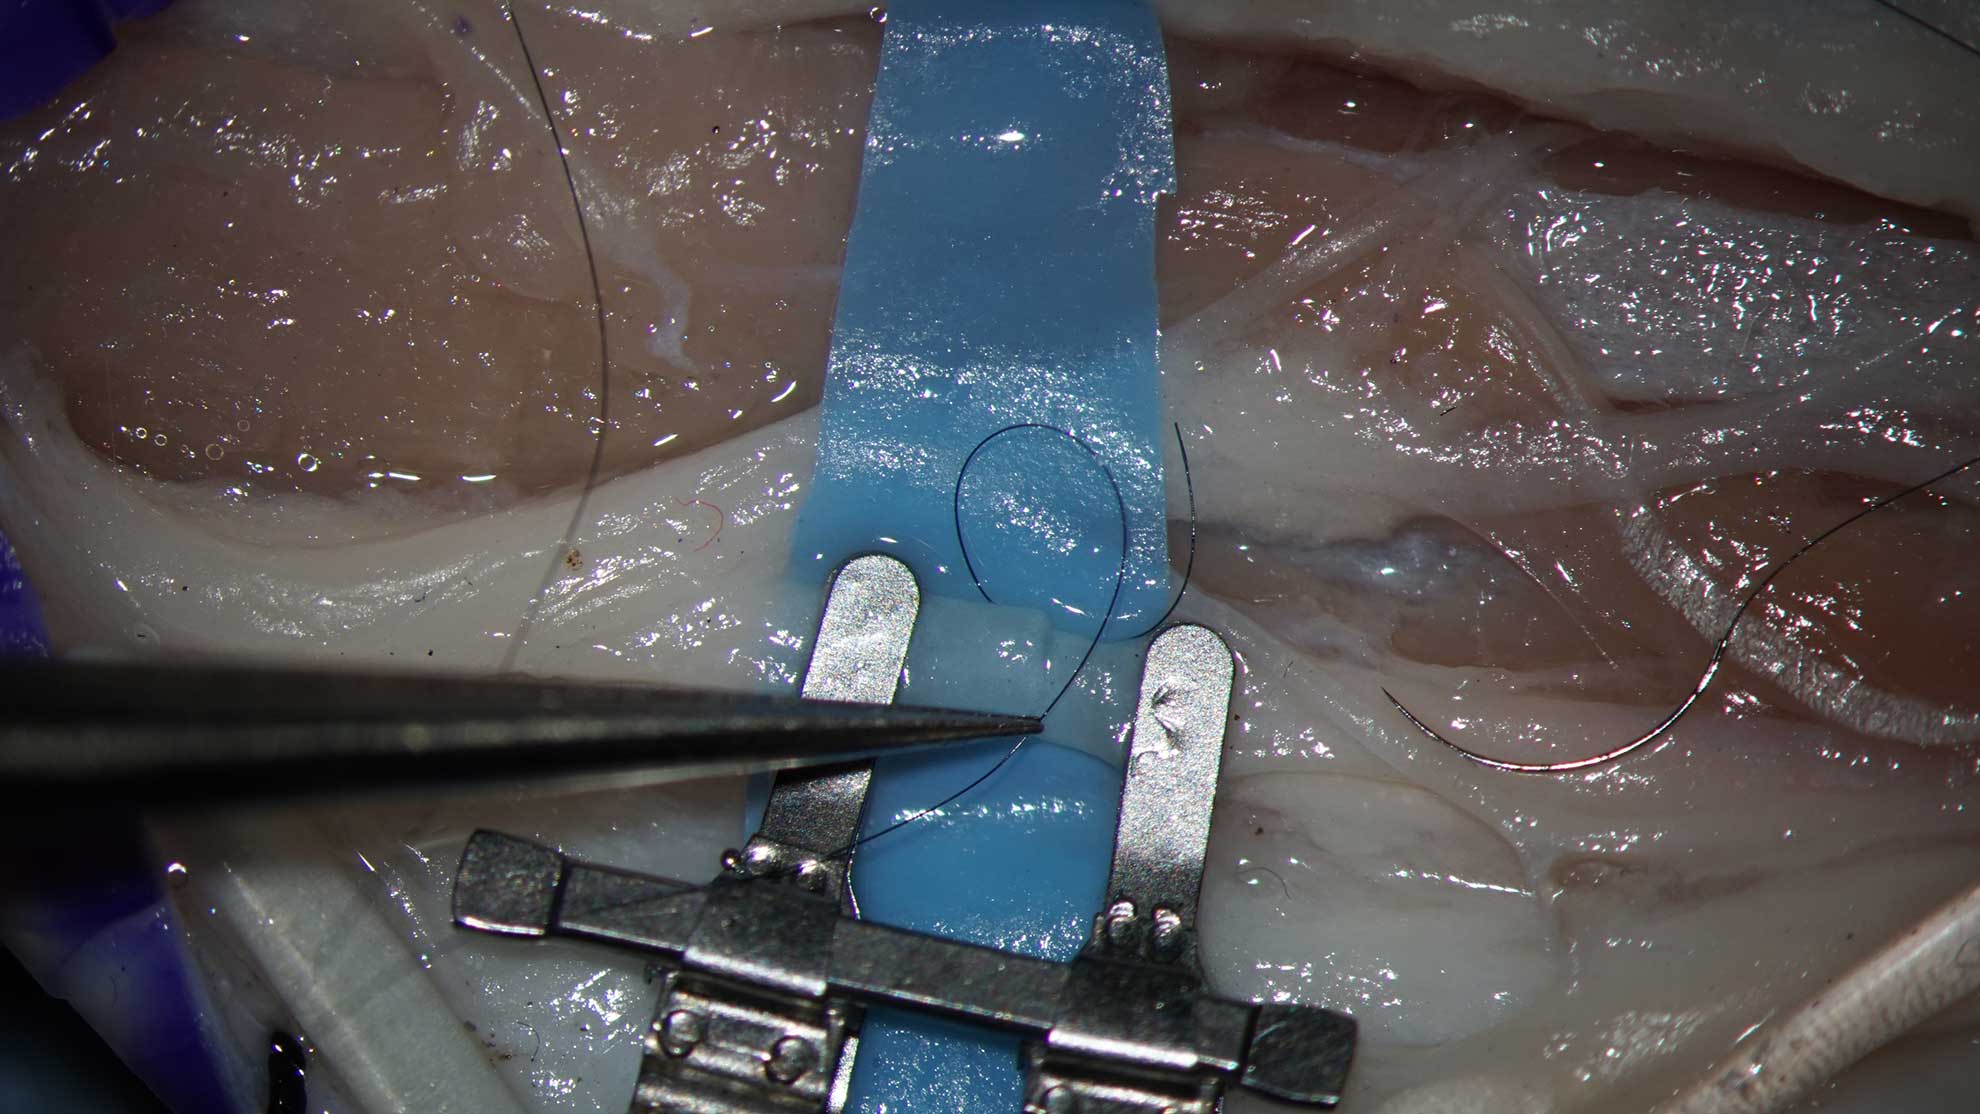
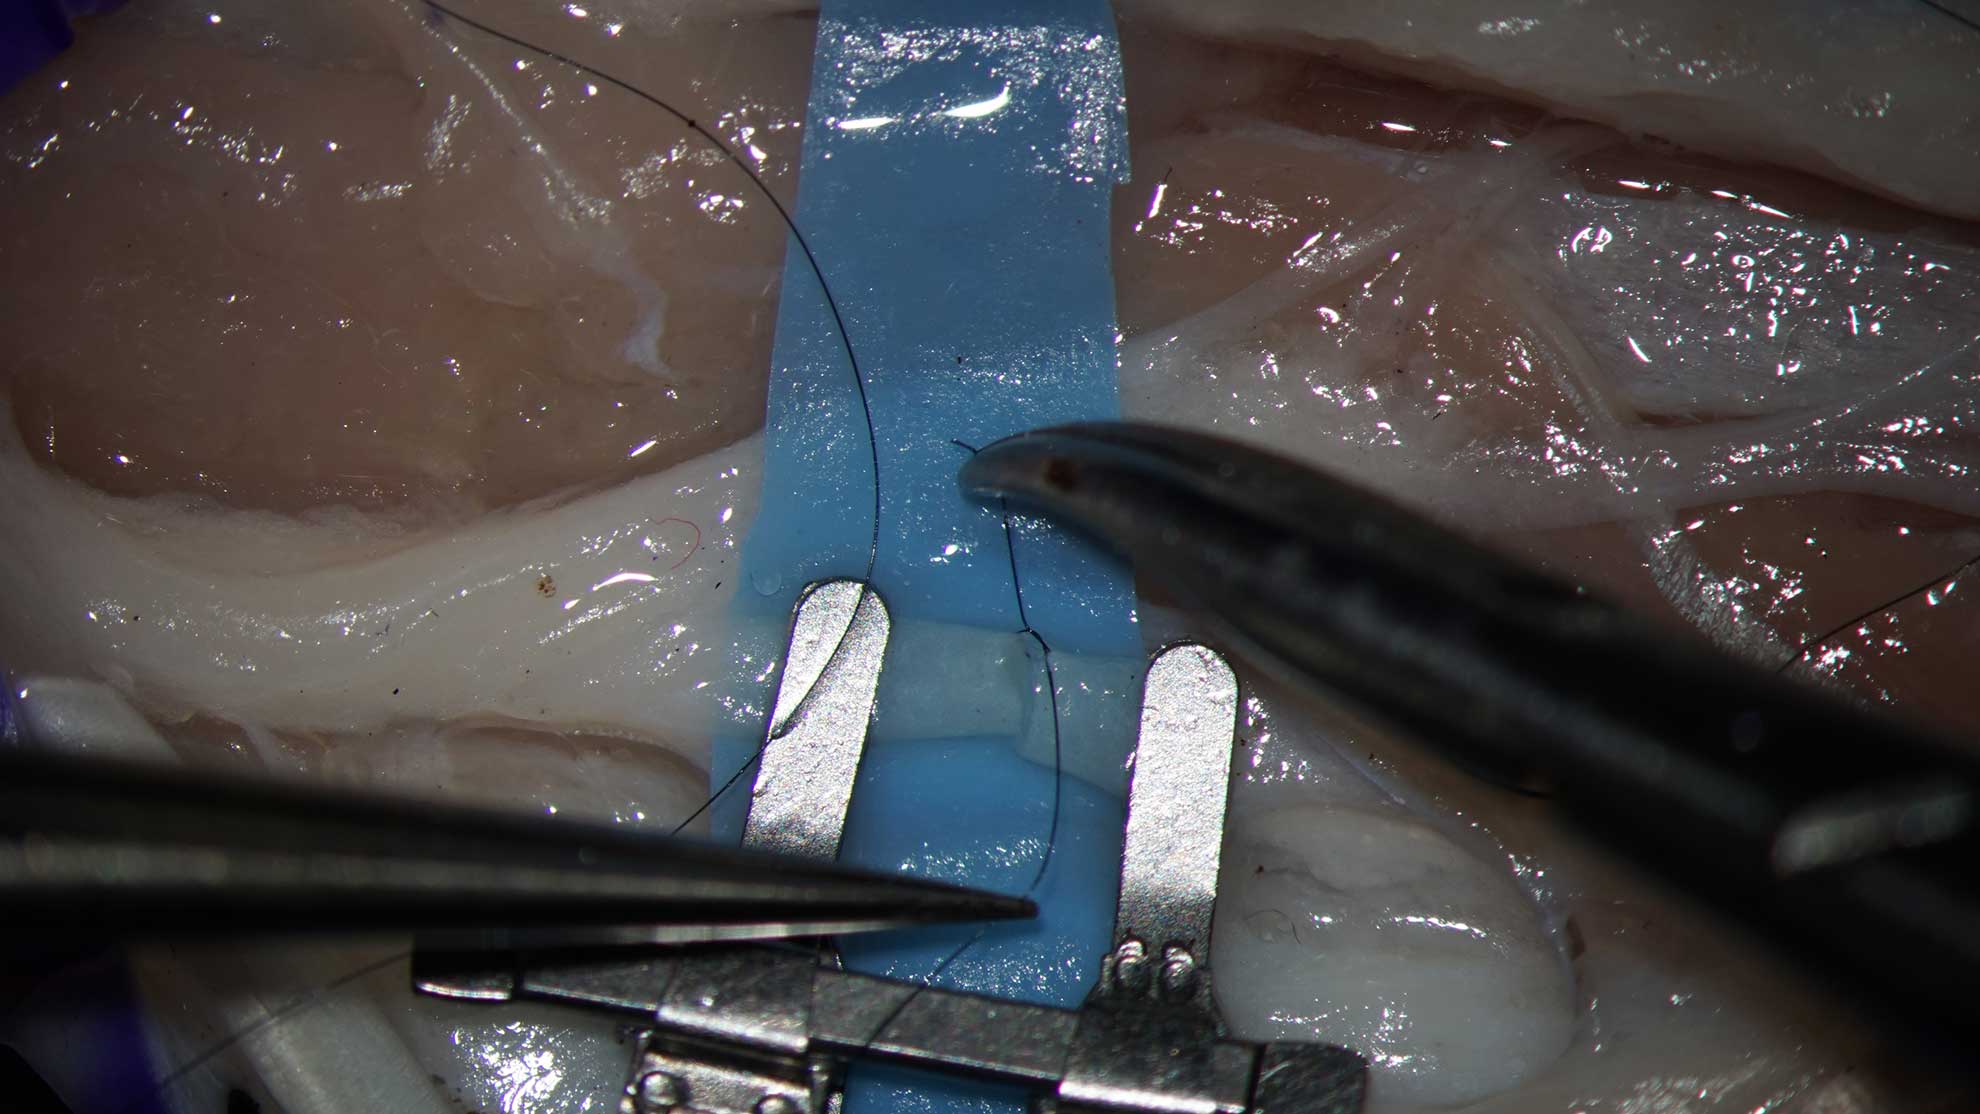
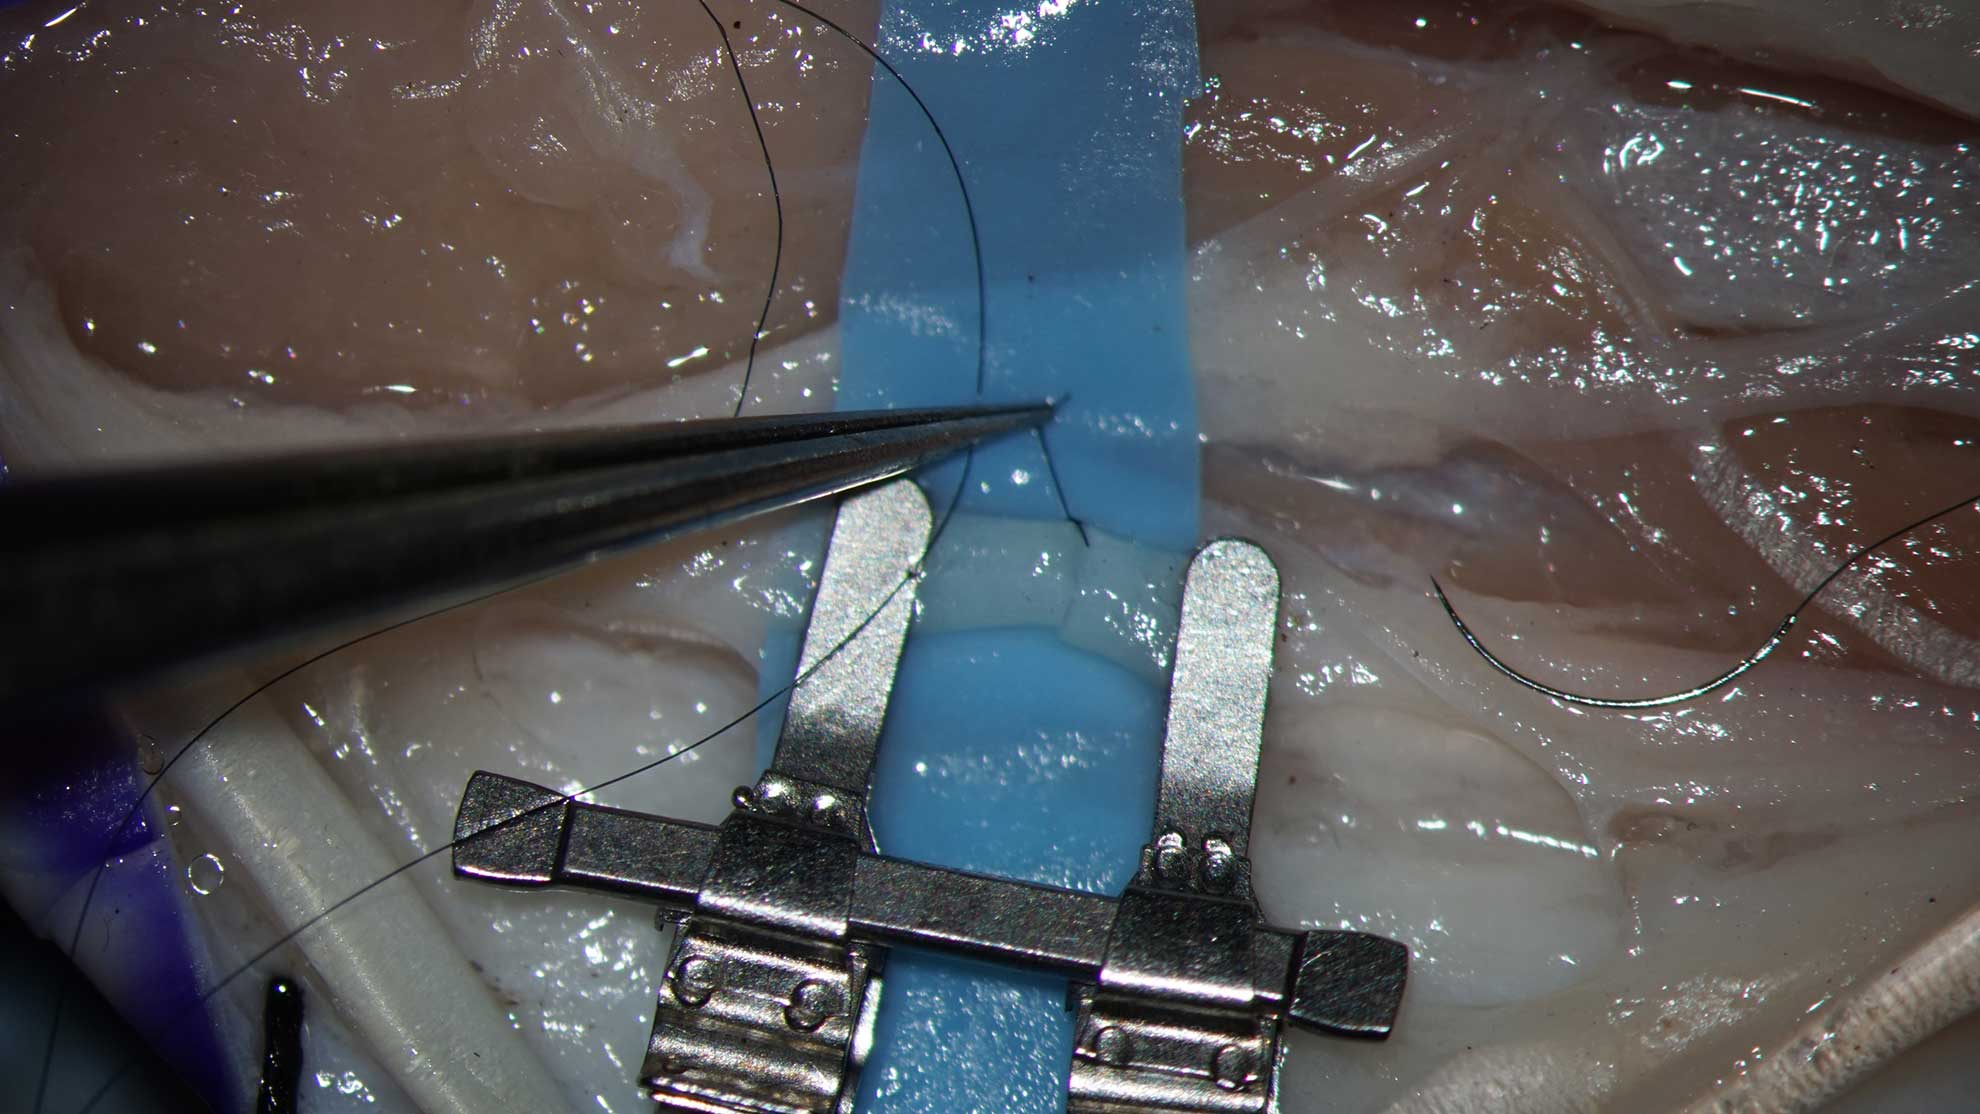
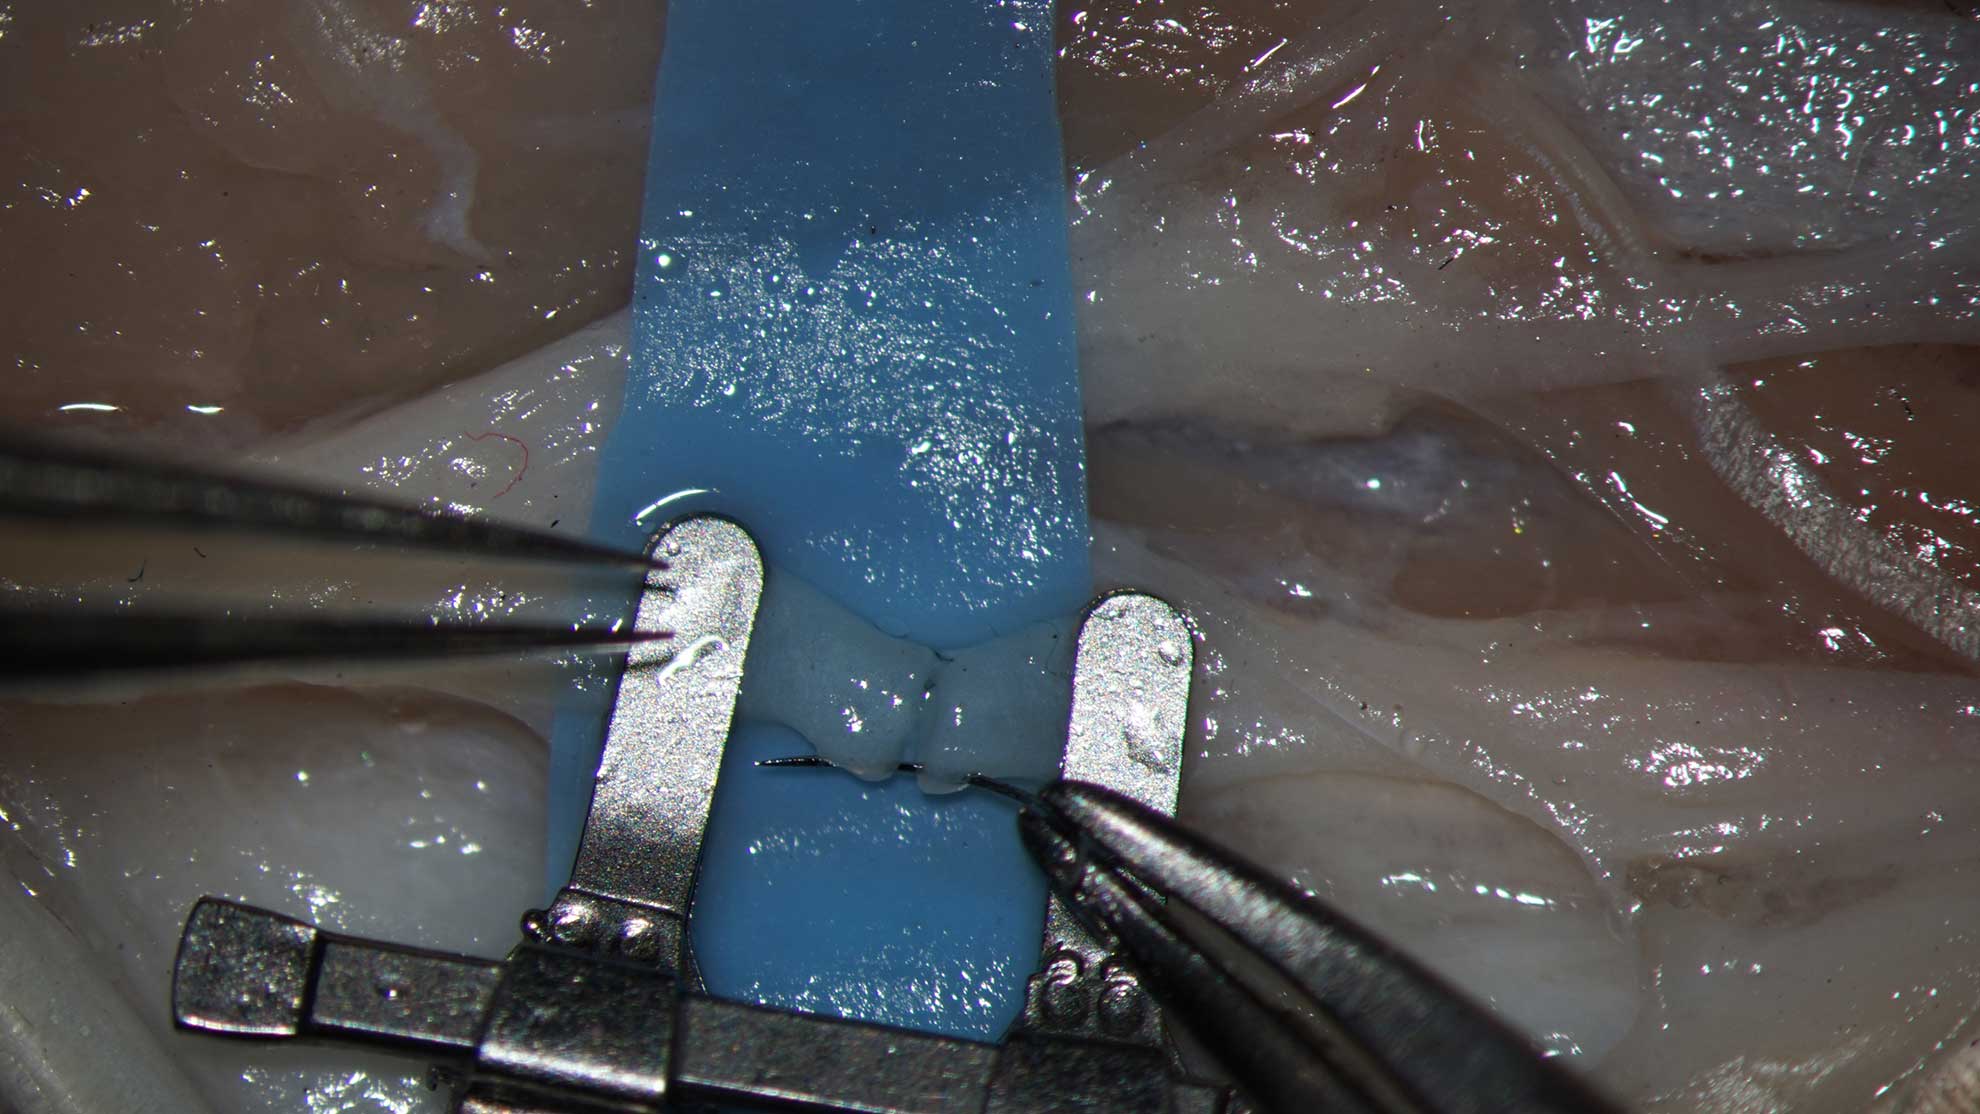
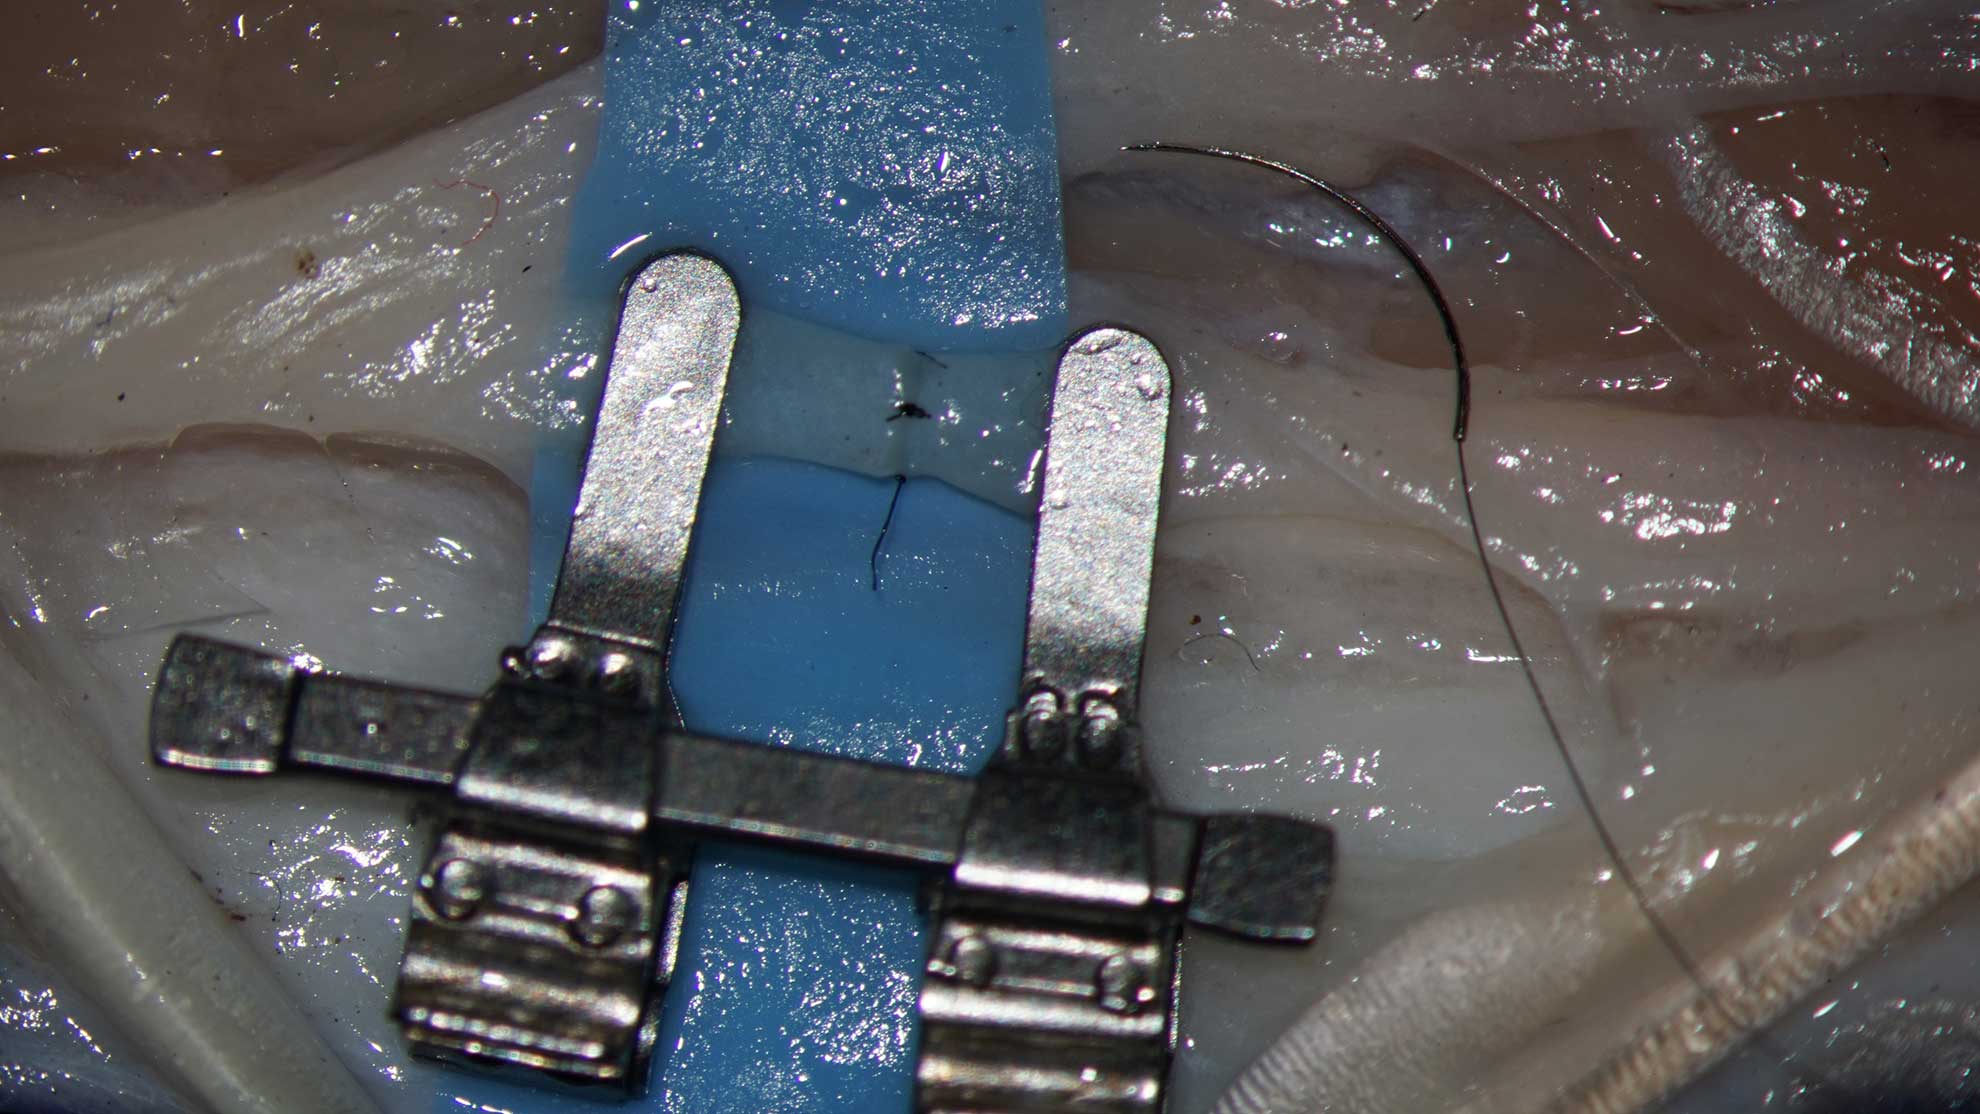
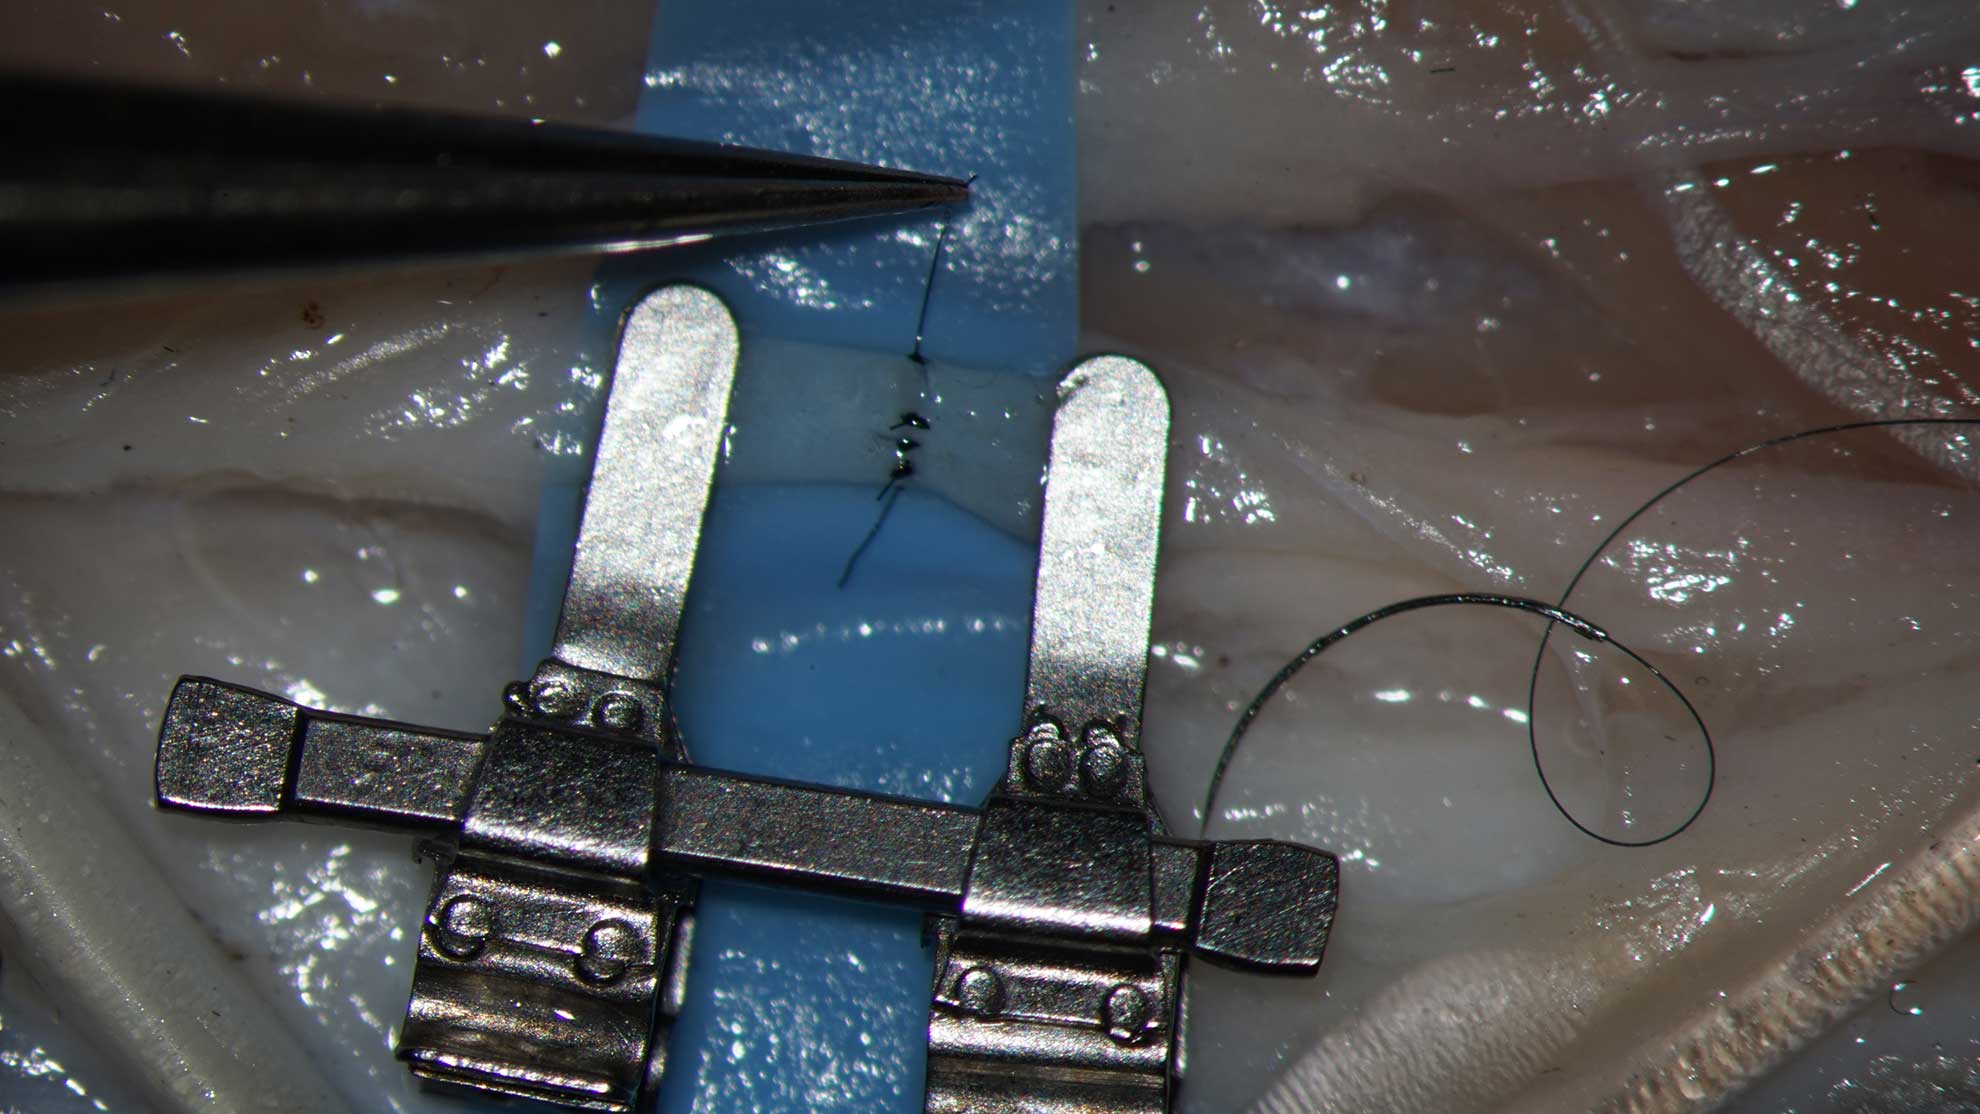
- Place sutures between the border points. Divide the intervals between stiches in equal parts. The distance from the stich to the border of the vessel end must be equal. Do not secure the knots to vigorously.
- Turnover the Acland clamp and put sutures to the uncomfortable side.
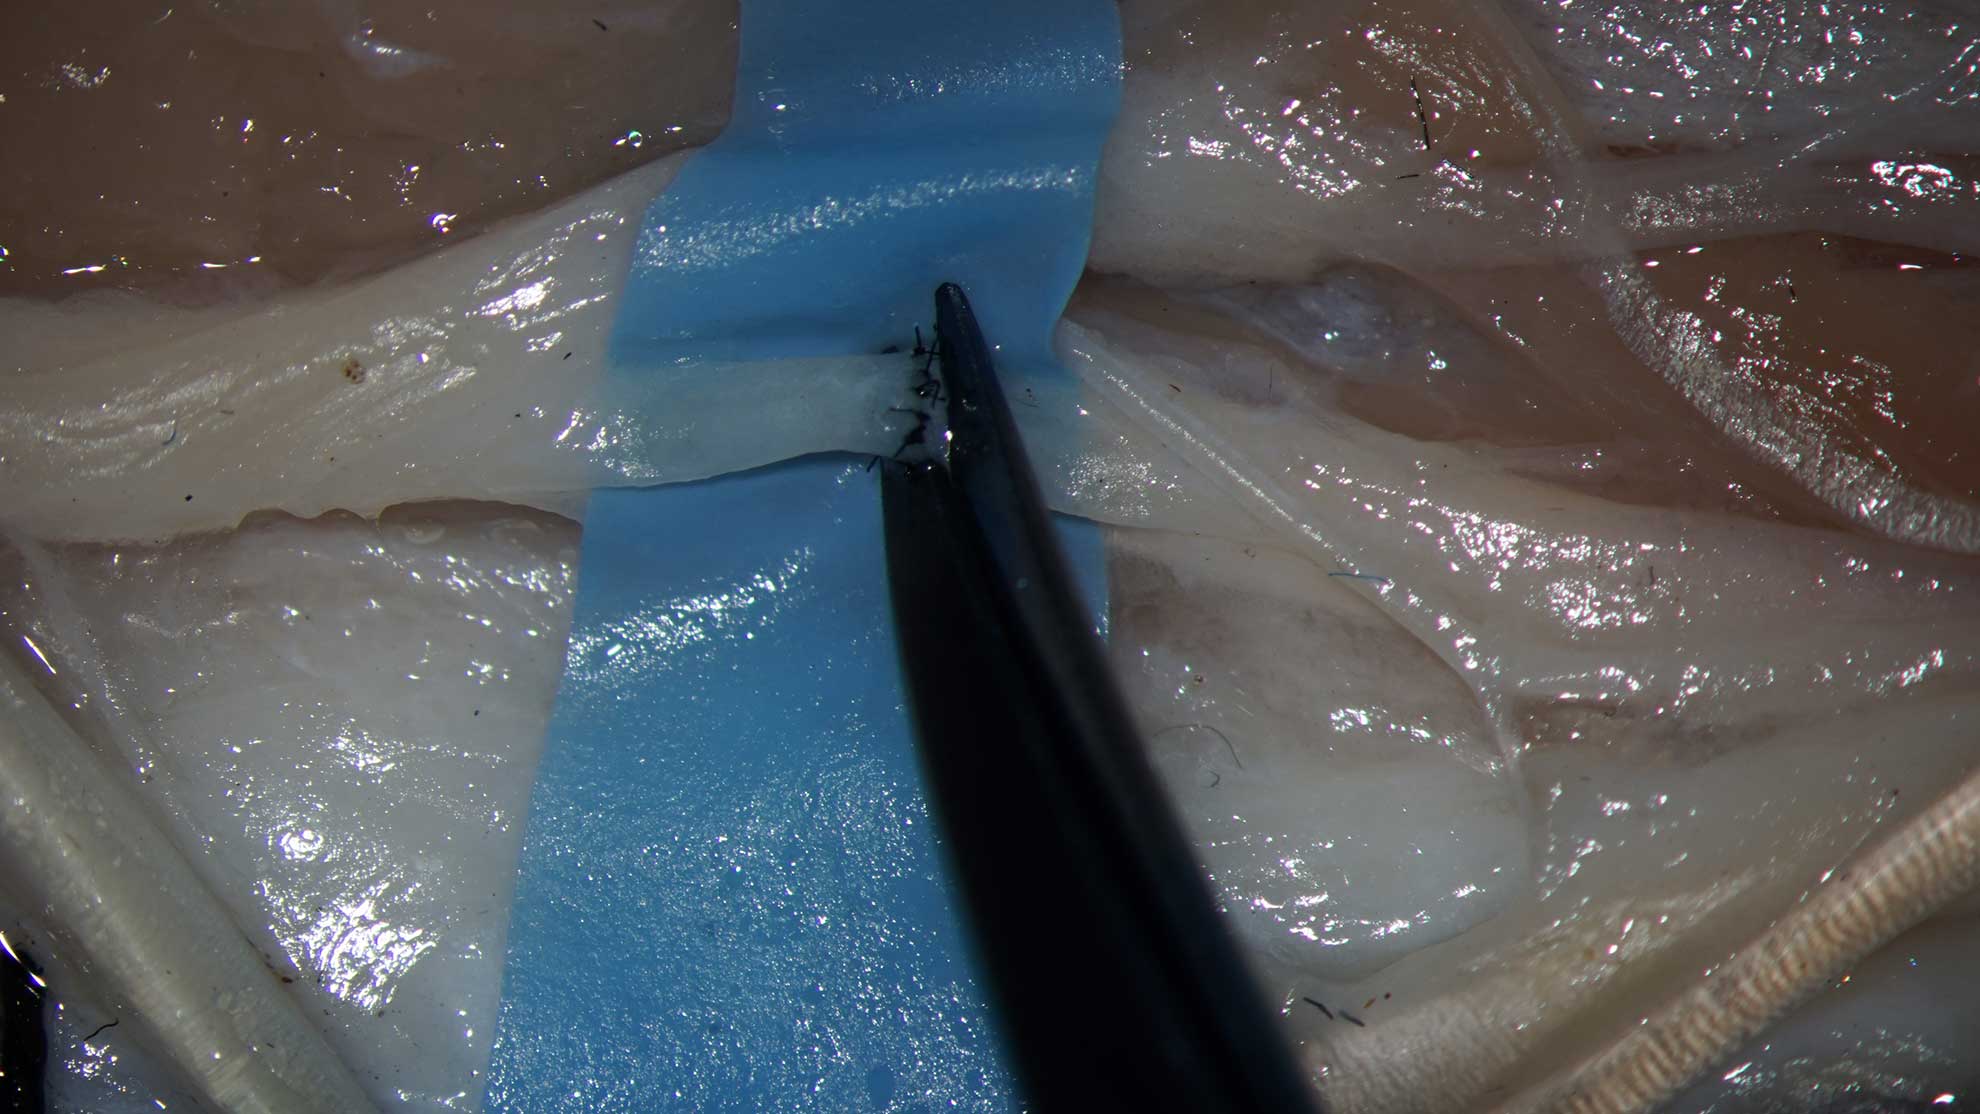
23. Remove the excess threads from the ligatures. - Turn Acland clamp in the normal position.
- Perform the final check.
- Remove the Acland clam, starting from the side where the blood flow should be considered to be less intense.
- Test the anastomosis.
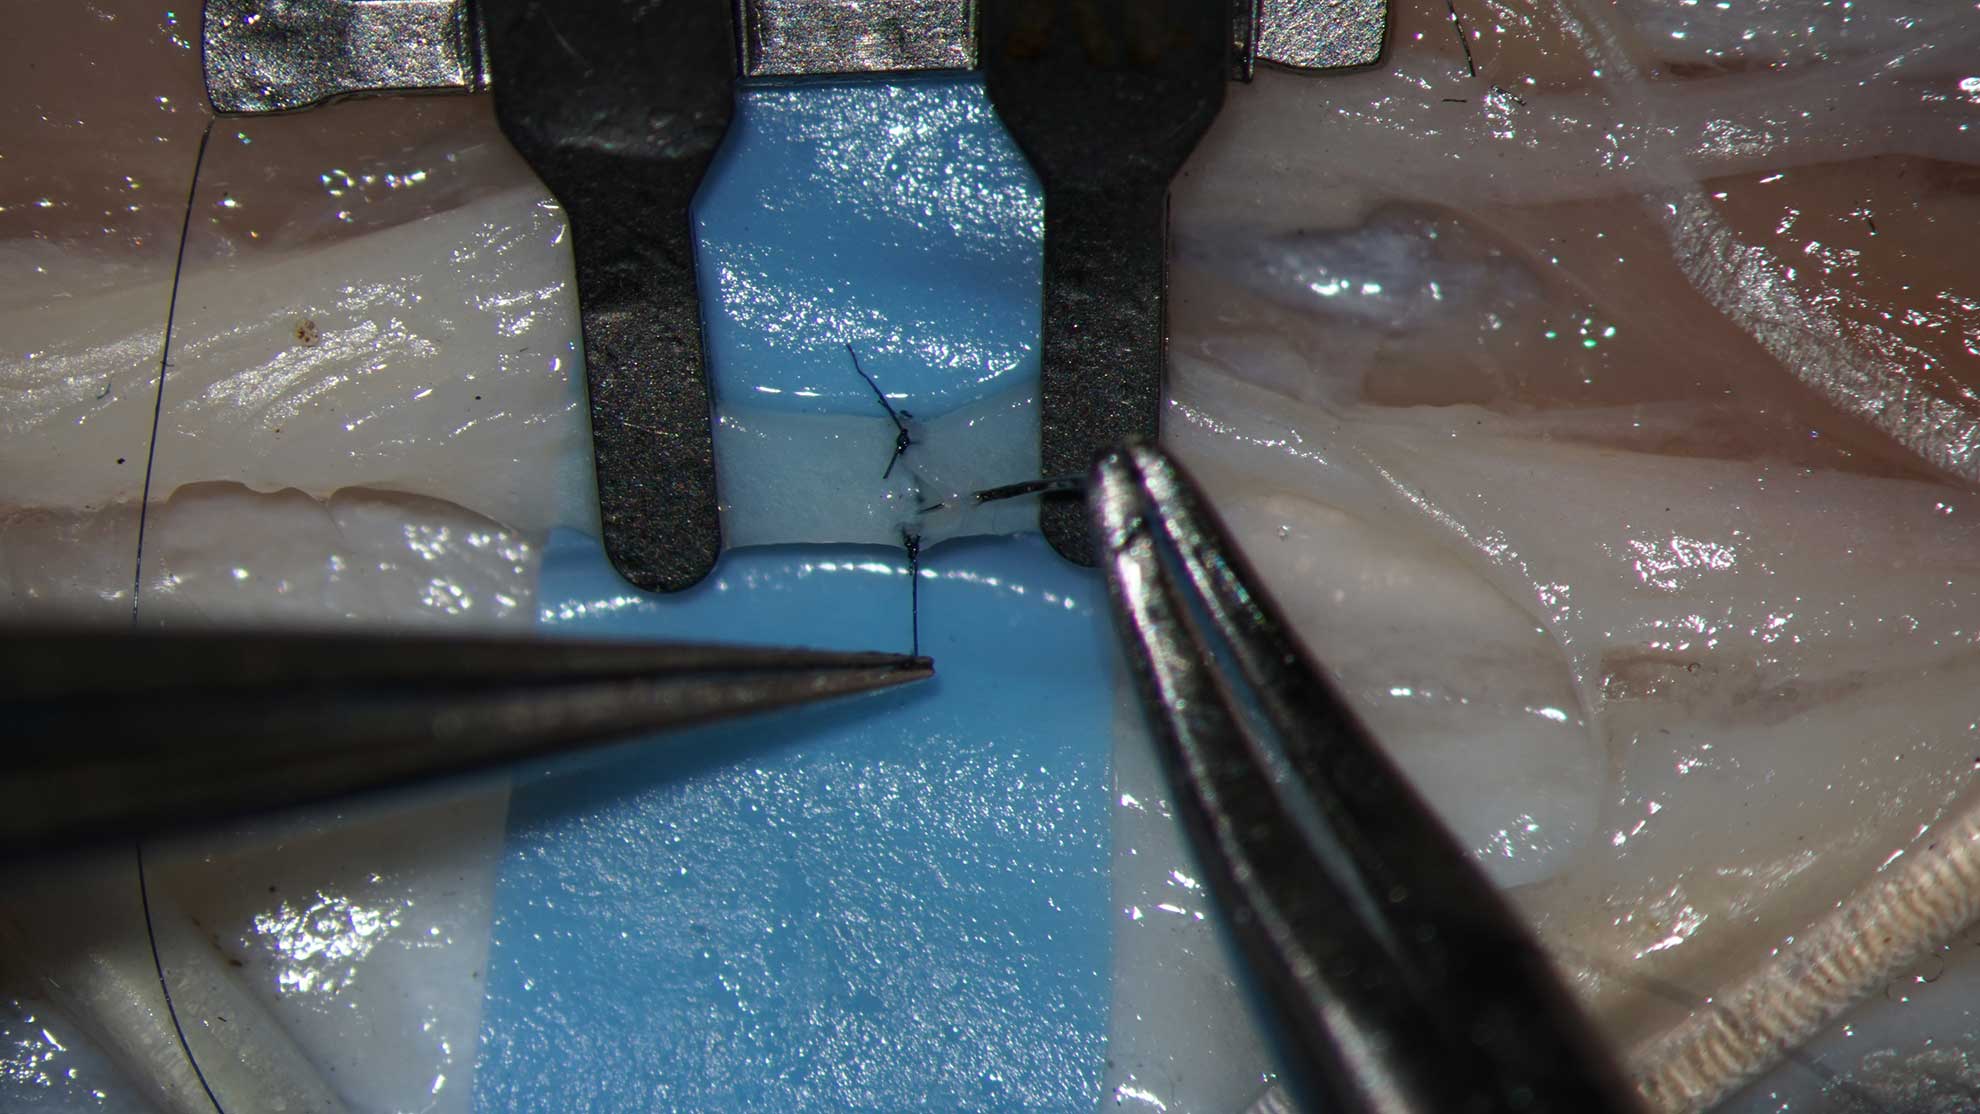
Constructing of the anastomosis: end-to-side. Vessels about 1,2 mm in diameter.
Evaluate the donor vessel Harvest a graft, compatible with the donor vessel.
Make a window in the wall of the donor vessel.
The window should involve 30 – 40 % of the diameter of the donor vessel
Prepare the end of the recipient vessel, compatible with the window.
Create the scene for your anastomosis. Maintain geometry. Avoid tension.
When the recipient vessel is the same caliber as the donor vessel, prepare the end by oblique cut. If the recipient vessel is smaller, convert the end in the platform.
Do not prepare vessels in blind way – without matching.
Imitate the end to side anastomosis – the first step is the making hole in the donor vessel. We use two techniques – if have good, curved scissors with sharp tips – make the first cut in the vessel wall, then cut a round or oval hole in the vessel, holding the part that must be removed with forceps. With this technique you hold a piece of the vessel wall and cut it out, leaving a hole. If he scissors are blunt tipped, there is not possibility to entry the vessel inside with only one branch. So, you hold the wall of the vessel with forceps and cut out an elliptical figure from outside. Both techniques are difficult when used for first time, but the results could be improved with the practice. The excision of the hole means biting with the scissors several times, each time extending the cutting line little bit more. Do not try to perform the hole with one courageous, but not precise cut.
Prepare the recipient vessel end – make oblique cut, in the broad angle make also longitudinal cut, then with scissors convert the recipient end in ellipse.
Performing the end – to- side anastomosis: Model – ChickenFoot – common dorsal metatarsal artery.
Illustrative Materials: ChickenLeg-MetatarsalArtery-EndToEnd
Fast approach. Big vessel: artery.
Provide the access to the common dorsal metatarsal artery. Remove the skin. Create the approach to the dorsal arterial structures. In surgical manner remove the extensor mechanism.
Isolate a long segment of the proximal common dorsal metatarsal artery. Take it as the graft
Distally, prepare the recipient vessel, put double Acland clamp on the segment of the common dorsal metatarsal artery. Remove the adventitia between clamps.
Take the graft to the area of planned anastomosis, adjust diameters.
With holding scissors in 45 ° to the long axis of the donor vessel, perform a transverse cut in the wall. Transect all layers. Use slightly rounded, delicate, precise and sharp scissors, stored exclusively for that purpose.
Insert the branch of the scissors in the hole and cut out an elliptical figure in the artery wall. Hold the figure with the forceps. Correct the margins, if needed.
Adjust the recipient vessel the donor vessel. Cut the recipient vessel obliquely.
Insert the scissors in the lumen of the recipient vessel and make a cut in the wide angle.
Convert the end of the recipient vessel in a elliptical platform. Keep the convex surface of the scissors outside. Remove excess triangles on the basis of widened vessel end. Face concave surface of the scissors to the remaining part of the vessel performing that maneuver.
Adjust the recipient vessel to the aperture in the donor vessel. The most uncomfortable sutures must be inserted first. Consider greater density of sutures on the wider angle of the anastomosis, to resist possible tension.
Note: the posterior wall must be closed first. The almost uncomfortable place is the dorsal part of the narrow angle and the points on the dorsal wall just proximal to the narrow angle.
(1) Called EIKA project
(2) For example, Titan Surgical and Mikrokhirurgicheskiye Instrumenty Ltd in Kazan
(3) Kang BY, Jeon BJ, Lee KT, Mun GH. Comprehensive Analysis of Chicken Vessels as Microvascular Anastomosis Training Model. Arch Plast Surg. 2017 Jan;44(1):12-18. doi: 10.5999/aps.2017.44.1.12. Epub 2017 Jan 20. Erratum in: Arch Plast Surg. 2017 Nov;44(6):575-576. PMID: 28194342; PMCID: PMC5300917.
(4) Eiken O, Lundborg G. Experimental tendon grafting within intact tendon sheath. Scand J Plast Reconstr Surg. 1983;17(2):127-31. doi: 10.3109/02844318309013107. PMID: 6197748.
